• Home
  • Wellness


        • Wellness

        • beauty
        • self care
        • kiddos
        • essential oils
          • Well-Being Daily Practices (Recorded Call)

            Well-Being Daily Practices (Recorded Call)

          • DIY No More Tangles Spray (all natural)

            DIY No More Tangles Spray (all natural)

  • Life


        • Life

        • love
        • grow
        • learn
        • live
        • Favorites

          • Women On Top Podcast Interview on Grief with Tammin Sursok and Roxy Manning

            Women On Top Podcast Interview on Grief with Tammin Sursok and Roxy Manning


          • Our Love Story: Part 12, Through Ben’s Eyes

            Our Love Story: Part 12, Through Ben’s Eyes

  • Make


        • Make

        • celebrate
        • craft
        • eat
        • nest
        • style
          • HALLOWEEN PARTY ROUNDUP

            HALLOWEEN PARTY ROUNDUP

          • Fun Gift Wrapping Ideas and Inspiration

            Fun Gift Wrapping Ideas and Inspiration

  • About
  • Oils
  • Contact
  • SHOP
    • Amazon
    • Free People
    • Rugs USA

Little Miss Momma

craft

Mod Podge Wall Art: display kiddos artwork

September 16, 2011

Lil W and I started Mommy & Me preschool.
And with preschool, came art projects. Art projects that make a Momma proud.
I decided I needed a cute way to display the precious pieces I bring home each week.

I also mentioned how I am slowly but surely re-doing Lil W’s room. Primary colors. Cars. Trucks. Balls. All things Boy.  So I thought this project would be the perfect way to hang up his goodies in his room–once my fridge iscompletely covered, that is.

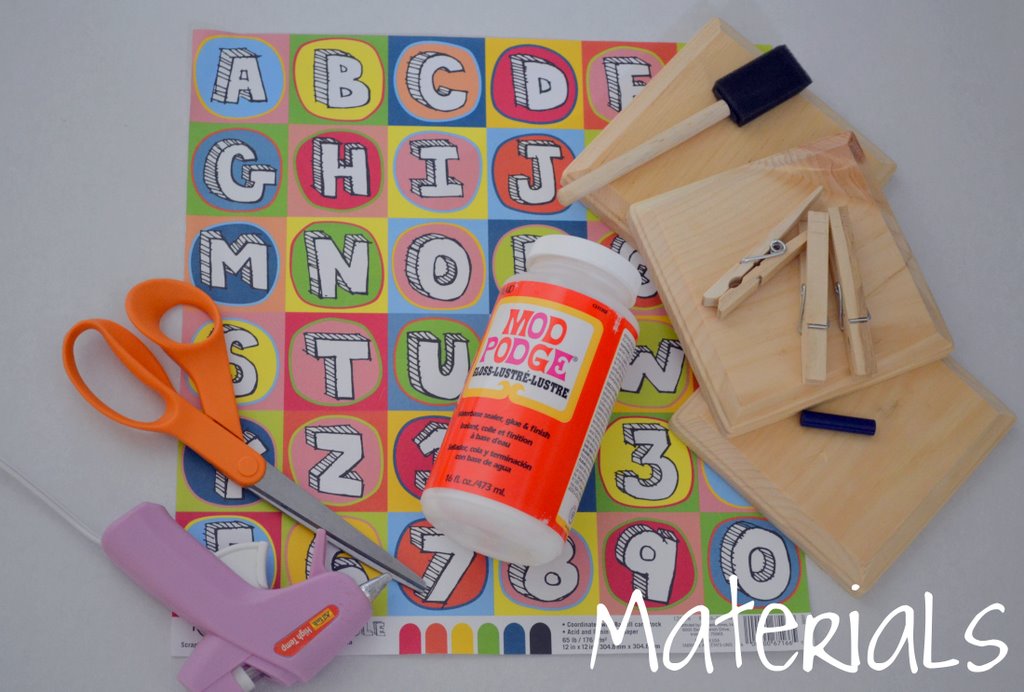
3 wooden plaques {purchased at Michael’s}
Mod Podge
Sponge brush
Scrapbook paper
Crayon
Hot glue
3 clothes pins

1. Place the paper pattern side down on top of the wood plaque.
2. Use the edge of the crayon to trace around the edge of the paper in the shape of the plaque. This is so you know exactly how big to cut the paper.
3. Cut out three squares.
4. Apply Mod Podge to the face of the plaque.
5. Place the paper on the plaque and smooth out the bubbles.
6. Hot glue the clothes pin into place.

And that’s all there is to it–seriously.  I still need to add one of those thingies that lets me hang the plaque on the wall–and I probably should have done that before I made them, but I tend to work backwards, ah well.

My son, the artist.
Who ever would have thought that a little sponge painting and stacked square papers could bring tears to my eyes.
I guess that’s motherhood.

Happy Crafting!

42 Comments
Share
Ashley Stock

I'm Ashley. Sometimes I craft, occasionally I cook, everyday I write, and I'm always Momma. This is my blog. I keep it real while still seeing the rainbows and butterflies in all of life's lessons.

You May Also Like

Nylon Baby Headband with Flower Clip TUTORIAL

September 1, 2010

Pop of Red

February 11, 2013

11 Tutorials I Love, and you will too

May 9, 2010
  • Aileen Billdt ~ Lil' Buckaroo Designs
    September 16, 2011

    Super cute idea!!! Jake and I started Mommy & Me preschool this week too and we are LOVING it!! I must say it never gets old to either read about (from awesome mommas like you) or talk to other moms that are going through the same phase in life as me! And I had to smile because we haven’t picked up a lunch box for Jake yet, but we saw the Elmo one like Lil W and that was the one Jake wanted to get. 😉

    Reply
  • ana {bluebirdkisses}
    September 16, 2011

    I love this! So cute!

    Reply
  • Chrissy Boerman
    September 16, 2011

    those are awesome.. great idea. thanks for sharing Ashley!

    Reply
  • Jamie
    September 16, 2011

    Great idea! I might have to make some for my daughters playroom! Love the artwork!

    Reply
  • aubrey
    September 16, 2011

    love, love this!

    Reply
  • Aneta Kudasik
    September 16, 2011

    So adorable!!! I want to remodel my boys’ room. I have enough rooms for them to have their own, but I want them to share for now. I’m always looking for inspirations!

    Thanks

    Reply
  • Lindsay
    September 16, 2011

    Such gorgeous work Wesley 🙂

    Reply
  • simle life
    September 16, 2011

    so adorable!! I love reading your blog for inspiration and simple thoughts of being a mom. you always inspire me!
    I would be honored if you would stop by my page and follow me
    thanks

    Reply
    • simle life
      simle life
      September 16, 2011

      http://simplytastefulparty.blogspot.com/

      Reply
  • Kristin
    September 16, 2011

    What a great idea! They turned out so cute.

    Reply
  • Chrissi H
    September 16, 2011

    Cute craft! I think that I’ll do something similar to display my boy’s artwork. Have you ever posted pictures of W’s bedroom? I’m getting started on creating my son’s big boy room and need some more inspiration!

    Reply
  • Lindsey S
    September 16, 2011

    Such a cute idea!

    Reply
  • Katie @ My Darling Days
    September 16, 2011

    So stinkin’ cute, yet easy peasy. Great idea!

    Reply
  • Maria-Isabel @Agape Love Designs
    September 16, 2011

    This is precious!

    Reply
  • Jackie
    September 16, 2011

    oh that’s a great idea! and i can do that with any scrapbook paper to make it match my kitchen or something and put up different papers.

    Reply
  • Malinda
    September 16, 2011

    Oh I love it!! I have one on my wall that says Every Child is an Artist and I hung picture wire then clipped mini clothes pins on it. I love displaying my girls work!

    Reply
  • Mollie
    September 16, 2011

    This is adorable! my almost two yr old and I just started mommy & me preschool too! I’m with ya on the art, tissue paper on a cut out apple can make a girl SOO proud. wink wink.

    Come check out our blog if you get the chance! http://www.yellowmedaisy.com

    Thanks!
    Mollie

    Reply
  • PeaceLoveTerri
    September 16, 2011

    Awwww…precious!!

    Reply
  • Anna @ The Guiltless Life
    September 16, 2011

    Hahaha it’s so true! Things become so much more precious when you know they were created by someone you love! And that idea is adorable – I might make one for my room with a more grown-up scrapbook paper pattern and just use it to display purses or anything! Thanks!

    Reply
  • Dyna Ly
    September 16, 2011

    LOVE IT!!! Thanks for sharing!!

    Reply
  • Meli
    September 16, 2011

    I simply adore this. I can handle this project. And I must!!!! We have crafts and art work coming outta the wa-zooooo!!!!!

    Reply
  • Kristen
    September 16, 2011

    Since I am horrible with crafts I usually just live vicariously through you but this one I may be able to tackle and I love it. This would be perfect for both of my girls and all of the many things they want to display.
    Thanks to sharing!

    Reply
  • Simplegirl
    September 16, 2011

    Cute, cute, cute! I must do this for my little guy. Have a super weekend !

    Reply
  • Mindy Harris
    September 16, 2011

    too adorable. i so need something like that. wildman and i did a flower artpiece where we used cupcake liners as the flower part…it needs hung!
    love your cute self and your cute blog. trying to talk the hubs into parting with me long enough for creative estates. would love to meet you but i’ll be at blogsugar too.

    Reply
  • Stephanie @ 4eighteen.com
    September 16, 2011

    I love this idea. I’ve been trying to decide how I want to display My Girl’s art work too, this is perfect. I’ve never heard of mommy and me preschool. I like that idea, I’ll have to see if they have that near me.

    Reply
  • mama marchand
    September 17, 2011

    Oh, I LOVE LOVE LOVE this! I’m saving it for when my little N is big enough to make masterpieces. 🙂

    Reply
  • brittany @lovestitched
    September 19, 2011

    I think what kills me is that he is OLD enough to be doing “art” for a “preschool” aaaahhhh stop growing lil w!
    ps – HOT necklace 😉

    Reply
  • Alyssa
    September 20, 2011

    So cute!! I have an idea….maybe you could paint a section of his “new” room with magnetic paint, then cover with his wall color…make these mod podge blocks into magnets and hang them there instead of putting wall hangers on them and hanging them on the wall that way? Just a thought, that I figured would be easier than trying to put hangers on them now that they are done…almost:)

    Reply
  • Dopey LaRue
    September 21, 2011

    These are SO cute! I can’t wait to make some for myself 🙂

    Reply
  • How to Make a Fabric Memo Board - Little Miss Momma
    October 4, 2011

    […] room–a fabric memo board. Click here to see the DIY truck wall art project. And click here to see the DIY Children’s Artwork […]

    Reply
  • Tia Perons
    October 12, 2011

    I’m in charge of crafts at my MOPS group, we just made something similar at our last meeting! We took a Lowe’s brand yardstick, drilled a hole at each end, glued 2 clothes pins–each pin had 3 silver rhinestones, then we gave each mom 3 clothes pins and they glued wooden shapes to those and painted them. We had metallic and primary colors. It turned out cute<3 we sent each mom home with 2 dry wall screw that way they had everything they needed.

    Reply
  • Mod Podge kids art display - In the kids room
    October 14, 2011

    […] Mod Podge kids art wall display […]

    Reply
  • Boy's car and truck room: little miss momma - Little Miss Momma
    October 16, 2011

    […] Lil W painted this canvas and then I had it framed at Joann’s. Mod Podge Wall Art tutorial. […]

    Reply
  • Elke Martinez
    October 16, 2011

    Love all your idea! I’ll be breaking out the modge podge!

    Reply
    • Elke Martinez
      Elke Martinez
      October 16, 2011

      oops! ideas:)

      Reply
  • Mod Podge Amy
    November 10, 2011

    I really love these little plaques Ashley! What a great idea.

    Reply
  • Melanie Cantelmo
    December 7, 2011

    I really need to do something like this! We have art work everywhere 🙂

    Reply
  • Freestyle Friday: The Princess Room « superMOMdel
    January 20, 2012

    […] scrapbook paper with a clothespins attached, so the girls can hang up artwork. I got the idea from Little Miss Momma’s Blog. This is so easy and super cheap to […]

    Reply
  • Freestyle Friday: The Princess Room | Home Electric Repair
    January 21, 2012

    […] scrapbook paper with a clothespins attached, so the girls can hang up artwork. I got the idea from Little Miss Momma’s Blog. This is so easy and super cheap to […]

    Reply
  • Display your children's artwork. - Mod Podge Rocks
    December 24, 2012

    […] five kids? I have a sneaking suspicion! If you are a kids’ artwork keeper, then Ashley from Little Miss Momma has a great way to hang it using plaques and Mod Podge. I think these little plaques look fun and […]

    Reply
  • Hold the Office
    September 15, 2013

    This is such a cute idea. I am just about to update my boys’ rooms as well and may want to do this:)

    Nicole
    HoldtheOffice.com

    Reply
  • HERVE LEGER
    March 25, 2020

    As a signature French fashion brand, Black Bandage Dress has proven its worth in the fashion industry for catering nothing but high quality line of bandage dress.

    Reply

Leave a Comment Cancel Comment

Previous Post
Creative Estates Retreat: and a Jumbo giveaway
Next Post
Dwindling Summer
About Me

About Me

I'm Ashley. Sometimes blogger. Everyday oiler. Cozy homemaker. Milestones. Meltdowns. Life lessons of a momma-in-training.

Instagram

…

Wellness

Life

Make

Recent Posts

  • Urban Outfitters 50 % Off Faves

    November 30, 2021
  • Amazon Fall Fashion Favorites

    October 23, 2021
  • HALLOWEEN PARTY ROUNDUP

    October 21, 2021

Shop My Favorites

Follow Along With Me

…
  • Home
  • Wellness
  • Life
  • Make
  • About
  • Contact
  • Amazon
  • SHOP

Copyright 2020 Little Miss Momma Site Powered by Pix & Hue.