









 Post by Michelle {Little Miss Momma’s Momma}
Ashers has been begging me to make her one of these for so long, and now she has one.
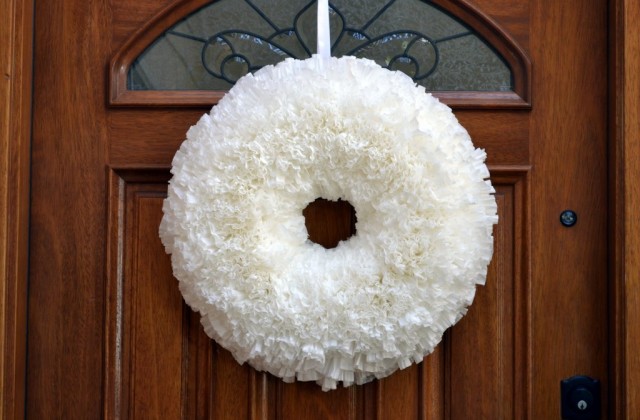
You may remember the lampshade I made her a few days ago, well I had lots of coffee filters left over so I decided to make her a fun wreath to match. I’ve seen a bunch of these wreaths on pinterest, and I knew it would be fairly simple to make.
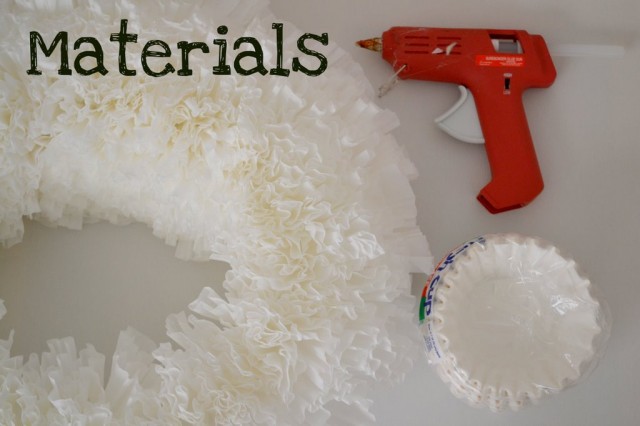
It’s so easy. This is all you need:
Styrofoam wreath (white)- Michael’s 12.99
glue gun and glue sticks
coffee filters, 2 packages Dollar tree
thick Sharpie with rounded tip (to avoid burns and help stick/push into the styrofoam)
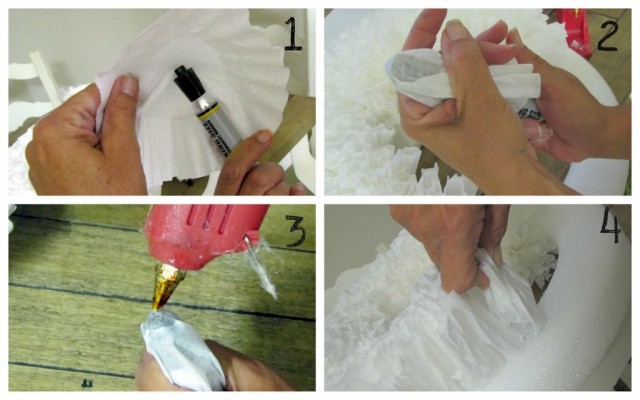 1. place the tip of the sharpie at the center of a coffee filter
2. gently wrap one coffee filter around the sharpie
3. apply hot glue to the tip of the coffee filter
4. holding the sharpie firmly, place the glued tip of the coffee filter into the styrofoam, hold for 3 seconds then remove the sharpie
5. Repeat 300-375 more times
TIPS:
Place the filters as close together as possible
You may want to purchase special styrofoam hot glue. I used regular hot glue though.
Use a white styrofoam wreath so that it doesn’t show through.
Try not to put the filters to close to the edge of the inside circle of the wreath or it will not sit flush against the door.
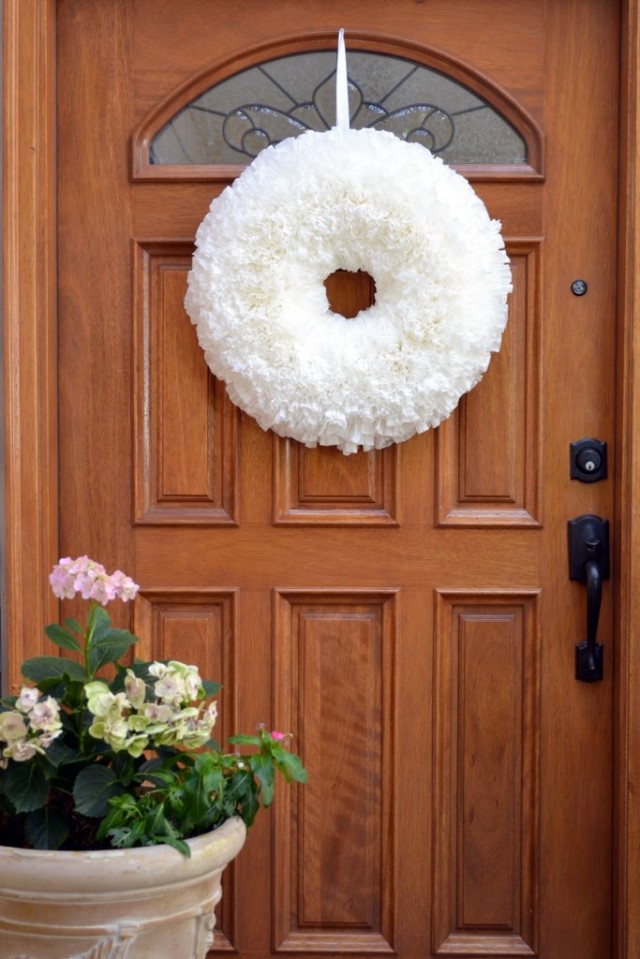
I added a white ribbon to the back for easy hanging, if you don’t want a ribbon you can just attach the styrofoam directly to a nail.
Happy Crafting,
LMM’s Momma-Michelle

Sabrina
Really cute!! I’ll have to try that for the Shabby Chic spare bedroom I have. Maybe hang it on the inside of the door. Thanks for the idea!
harga besi beton polos
SabrinaSo cute… And it really match with door
Erika @ Oops! I Craft My Pants
Oh my goodness, I LOVE IT. That’s seriously genius to use to sharpie with the circle thing at the top.
Also, confession time.
You’re my bloggy girl crush. There. Now it’s out in the open. I told my husband, and he said it’s okay that I want to BE you, because you make great things and you’re an awesome writer. How’s that for a stamp of approval?
Anna @ The Guiltless Life
Such a chic and simple idea! I love your idea of hanging it in the shabby chic spare bedroom on the inside of the door, Sabrina. Thanks to Michelle for such a great post!
Mindy Harris
it looks awesome! i love the little miss momma blog! i want to be successful like her one day.i am going to copy the wreath idear.
Summer @ Made By Munchie's Mama
This is so cute! I am totally going to make one for christmas! Thanks for sharing.
Chrissy Boerman
Oh michelle so glad you are back to blogging.. missed you! Love the crafts you have been doing. can’t wait to see your finished home decor makeover you were working on a while back!
Jamie
Cute- and easy!
And I am loving Ericka’s comment!! LMM is SO loved!
lindsay lee
AWWW I want one! Can Little Miss’s Momma make me one??? LOVE YOU GUYS!!
Ashley
Haven’t been on your blog in a while. Forgot how much I loved it 🙂 Must visit more often!!
ilene
are you really little miss momma’s momma?! i love it!
and this is such a great tutorial – super shabby chic!
Jennifer
Love it! I loved the lamp shade a few days ago and after seeing this today I went out and got supplies to make the lamp shade. My 4 year old son says it’s “so girly”. Thanks for the idea!!
Steph
I’m so excited to make this!!!! I bought the filters today and will get the styrofoam wreath tomorrow! It’s so pretty! I love it!! Thanks for the idea and how-to!
Erika @ Oops! I Craft My Pants
Just realized this post was written by LMM’s Momma. Woops. I suppose I could develop a little bloggy crush on you, too. Only time will tell 🙂
ana {bluebirdkisses}
Hm I posted but it didn’t show up…maybe my comment was sent to the spam folder lol
I love this project! I love how it turned out and it inspired me to think of a fun Halloween project! Dyeing the coffee filtes orange and black …it could look super cool I think!
irene wibowo
beautiful! so pretty! 🙂
Love Simple Green
Comeca Jones
Too pretty!
Amanda Wagstaff
I love this! Is it totally weird that i want to run to the store right now to get the supplies to make this. Hi my name is Amanda and I am a craft addict…..
Suzanne
So pretty! I really want to try this myself! We are doing 5 Days of Giveaways on our blog this week if you or any of your readers want to stop by!
Em @ And Nothing Else Matters
Such an awesome idea. I tried a variation with patty cases (I have never used a coffee filter here in Australia!) and thick cardboard for the backing. I love how it turned out.
http://nothingelsematters-em.blogspot.com/2011/09/patty-case-wreath.html
Kristin
So pretty! Thanks for sharing!
summer
This idea was so beautiful! I wanted to make one but couldn’t find a form at Walmart so I grabbed a couple cones and made candy corns! I linked back to your tutorial. Thanks for the inspiration, it has been a big hit!
http://madebymunchiesmama.blogspot.com/2011/09/cupcake-liner-candy-corn-tutorial.html
Coffee Filter Wreath | Life Lessons from a Shopaholic
[…] filters needed. What to do with 100 coffee filters you ask? idk, so I asked Pinterest and found a Coffee Filter Wreath tutorial. Easy enough right – yes, it actually was. It’s really cute and I think I could change […]
Christmas Paper Crafts and Gifts - {TONS of ideas}
[…] them again next year and maybe I’ll add this banner to it this year! Paper Flower Ornament Coffee Filter Wreath Reindeer Candy Bars Modge Podge Photo tiles Composition Notebook Christmas Planner Last year I […]
filter wreath (pin) « All Is Grace
[…] Here’s the tutorial: Coffee Filter Wreath Tutorial. […]
Aimee
I am making mine now! I filled a small spray bottle with water and food coloring and am making a Christmas themed wreath with red and green. The only bad thing is that when they get wet they lose some of the crinkled look that I like but they still look good!
Shannon
I have featured your awesome wreath on my Countdown to Christmas and have given you credit.
Great work!
Lorraine Castellon-Rowe
Love this…it’s absolutely gorgeous. Gonna’ try to make one. Love the directions and your tips!! Thank you so much!!
KIm
I saw this somewhere a few weeks ago and finally gathered all my supplies and tried it today. Your directions were super easy and it came out great. Thanks for sharing.
Valentine Wreath « creationsbynorma
[…] And then I hot glued the filters on the styrofoam. I found the tutorial here. […]
Zion's Studio Photography » Post Topic » Merry Christmas!
[…] I’m definitely one for symmetry. In one of my craft blog roaming sessions, I came across this Coffee Filter Wreath tutorial and loved how it looked, I especially loved how easy it looked! And I was right, very easy […]
Jasmine
I am a wife, mother of 5 and we have a limited budget to say the least. But, Im a thrifty girl and like to dress things up and do what I can to make things nice. I follow your blog and love to get inspired. I got a little emotional looking at your wreath and thinking about all the people that don’t think they have the money to have nice things or make their homes feel warm and inviting. A pack of coffee filter are $1 and foam wreaths are everywhere, too. I feel really proud that there are people, like you, that find and make beauty out of such simple things that everyone can buy and do even on a tight budget. Even if it is one dollar at a time. Love your blog and appreciate your ideas and inspiration.
Jess @ The Colorful Ones
I love how huge and full this looks! Pinning for future reference; thanks! 🙂
Debbie
I would like to make this with a group of children aged 8-11…..is there an alternative to using hot glue?
Como fazer uma guirlanda de forminha de papel | Cacareco
[…] e tutorial guirlanda com forminhas de papel por Little Miss […]
Elaine B
Thank you so much for the tip of using a magic marker to place the coffee filters evenly. Not as many burns either! Do you trim the wreath so that it is even all around or just let it be?
Get Ready For The Holidays
[…] How To Make A Coffee Filter Wreath by Little Miss Momma. This reminds me of when we’d “flower” the flatbeds for parades in high […]
Holiday Pin-spiration | Champion Mortgage Inc. - Mortgage Broker in Guelph, Milton and Mississauga
[…] https://www.littlemissmomma.com/2011/09/how-to-make-a-coffee-filter-wreath.html […]
stock market shares
You must understand how the stock market operates prior to investing in it.
Supply and demand is how the stock market operates.
The amount of shares of stocks is what makes up
the supply. The demand is determined by the amount of shares
that investors are interested in purchasing. Furthermore, be aware that with
every shared that is bought, there is a person on the other side
that sells the share.
__________________________________________________________________________
I love stock market shares
profitable options trading strategies
Thank you for sharing your info. I truly appreciate
your efforts and I am waiting for your further write ups thanks once again.
Mitchell
Thanks in support of sharing such a pleasant thought, paragraph is nice, thats why i
have read it entirely
Ernestine
You actually make it seem so easy with your presentation but
I find this topic to be actually something that I think I
would never understand. It seems too complex and very broad for me.
I’m looking forward for your next post, I will try to get
the hang of it!
Back exercises Dvd
I got this website from my friend who informed me
about this website and now this time I am visiting this
website and reading very informative content here.
ยาปลูกผม
Hi mates, good article and good urging commented here, I am
truly enjoying by these.
доставка сборных грузов из сша
Thanks for any other informative blog. Where else could I get
that type of info written in such a perfect approach?
I’ve a undertaking that I am just now working on, and I have been on the glance out for
such information.
modern coffee maker
Everyone loves what you guys are up too. This
kind of clever work and coverage! Keep up the very good works guys I’ve added you guys to my
personal blogroll.
play candy crush
Heyy I know this is off topic but I was wondering if you knew of any widgets I
could add to my blog that automatically tweet my newest twitter updates.
I’ve been looking for a plug-in like this for quite some time and was
hoping maybe you would have some experience wijth something like this.
Please let me know if you run intoo anything.
I truly enjoy reading your blog and I look forward to your new updates.
brazilian Hair products
I was suggested this blog through my cousin. I am now not positive whether this post
is written by means of him as nobody else recognize such exact about my problem.
You’re incredible! Thanks!
adsense tutorial
Have you ever considered about including a little bit more than just
your articles? I mean, what you say is valuable and everything.
However think of if you added some great graphics or video clips to give
your posts more, “pop”! Your content is excellent but with pics and video clips, this site could
definitely be one of the most beneficial in its niche.
Superb blog!
play terraria
Hello i am kavin, its my first time to commenting anyplace, when i read this article i
thought i could also create comment due to this
sensible article.
benefits of social media
Hello to all, how is everything, I think every one is getting more from this website, and
your views are pleasant in favor of new visitors.
Jurgen Crum
Witam,
bardzo udane miejsce, napewno chętnie odwiedze Cię tu nie raz, bardzo ciekawie piszesz twojego bloga – jest niewątpliwie dużo udani
Pozdrawiam
Daria
Adolfo Ragan
Siemka,
bardzo piękne miejsce, napewno chętnie odwiedze Cię tu nie raz, bardzo ciekawie piszesz twojego bloga – jest rzeczywiście dużo udani
Pozdrawiam
Jowitka
Donna+Zoerner
I am definitely going to add this to my list of things to try. I read somewhere that for the base of a wreath that those swimming noodle things can be used, and are a lot cheaper. Idk though since I am totally new to crafting. 🙂 I will pin this. Thanks!
fast proxy list
Hi there,I read your blogs named “How to Make a Coffee Filter Wreath – craft – Little Miss Momma” daily.Your writing style is awesome, keep up the good work! And you can look our website about fast proxy list.
themoonatomicc.tumblr.com
Having read this I thought it was really informative. I appreciate you spending some time and energy
to put this informative article together. I once again find myself personally spending way too much time both reading and leaving comments.
But so what, it was still worthwhile!
HERVE LEGER
“I love the idea of movement, but this White Bandage Dress can be especially difficult to achieve with a knit because they’re all
Christmas Paper Crafts and Gifts - {TONS of ideas}
[…] them again next year and maybe I’ll add this banner to it this year! Paper Flower Ornament Coffee Filter Wreath Reindeer Candy Bars Modge Podge Photo tiles Composition Notebook Christmas Planner Last year I […]