


A post by LMM”s Momma {Michelle}

Reclaimed Wood Inspired Art/Frame
Every now and then I like to go through Ashley’s comments and click on the link that takes me to the readers blog. Often, this is how I discover some of my new favorite blogs and projects. And clicking on one readers link is what took me to the post that inspired today’s project. The original idea can be found over at Make and Do Girl.
I came across a cute little project she did using Starbuck’s coffee stirers. I was so inspired by it that I had to give it a go.
Here is the end result as seen in Ashley’s living room…

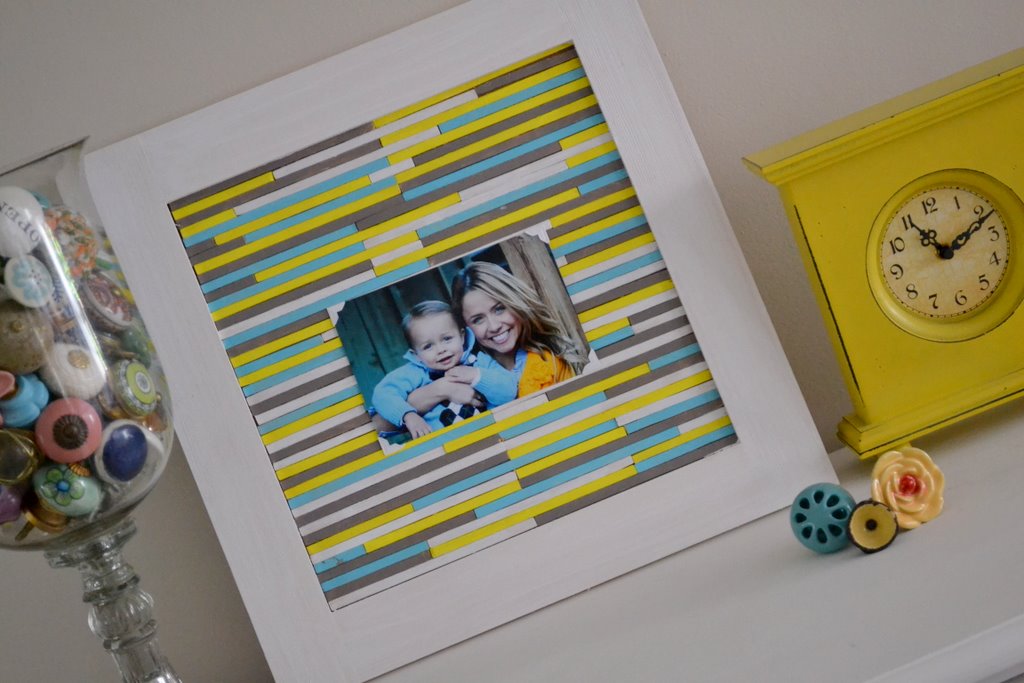
Here is the end result as seen in my new beachy bedroom

Supplies: 2 packages Woodsies from Michael’s (Starbucks was not that thrilled with me depleating their stock of coffee sticks)
4 colors craft paint. I used colors from Martha Stewart’s line of craft paint.
Elmer’s glue
frame with backing
paint brushes
razor saw (optional) or scissors

I am in love with all the colors in the Martha Stewart collection. I painted one side of the sticks in equal amounts of gray, blue and yellow and just a few more in white. Let them dry.

I also used a razor saw to cut the sticks.
I used a 12×12 frame opening and 6 inch sticks so two sticks side by side fit perfectlly.
I used one of the sticks to apply the glue to the back of the painted sticks.
I kept the cardboard back of the frame attached to the frame and put the glued, painted sticks directly onto the frame backing, so it would fit perfectly when I finished.

It took about two hours start to finish.

-Michelle
Sharleanna
Oh my goodness LOVE it!! New project on my list. THANKS!!
Lau
LOVEIT!!!!!!!
Stephanie @ 4Eighteen
This turned out SO great! I think I might have to give it a try as well.
Make and Do Girl
Michelle, that looks AWESOME! I love using this idea as the background to showoff a photo. Thanks to you and Ashley for featuring my tutorial.
Beth @ Through the Eyes of the Mrs.
It looks great! What a fun frame and backround they make. xoxo
Cerrisse
So cute! love this idea 🙂
Trisha
I absolutely love this idea. The colors you chose are perfect beach colors! The bright yellow totally makes it for me. Thanks for sharing!
Megan
This is so great! Thanks for the review of the Martha colors I’ve been hesitant about buying. Now they are on the list!! I’m adding this to my projects list, with Christmas colors!
Great post!!
kara
Gorgeous! Love it!
Emily
What a great idea! Thanks for sharing it.
elise
Oh my, this is so great! I love the colors you used and I love the simplicity of the wooden sticks. I really love this idea.
misty
So cool! I love it!!
Danielle
that is so cool. i love simple projects like this that make a big impact. its a great gift idea too. 😉
Aretusa
Cute idea! So easy to personalize maybe for Christmas!!!
Tonya @ Love of Family & Home
Very cute idea! Love it!
Amanda
What a fabulous idea! Too cute, I may do one of these in “Christmas colors” this year. LOVE! Thank you for sharing. 🙂
~Amanda
Gabby
Such a great idea! I love the colors as well! Thanks for sharing this project.
Gabby
Lisa A
I love the bright colors! What a great idea 🙂
Rachael B
I love this idea! Will definitely have to try it, thank you!
Mariah
Super cute! Just wanted to let you know you have a quotation (“) after LMM up at the top, instead of an apostrophe (‘). I do that all the time when I’m writing in caps! Thanks for sharing the craft!
PeaceLoveTerri
way cute.. love this project!!
Maureen@Loving this Life
What a clever idea! And so cute too!
Melissa
Seriously so cute!!! Totally gonna make some of these with my kids! Thanks for sharing!
Melanie Cantelmo
What a great idea!!!
Blogs I Love | Clarion Wren
[…] Little Miss Momma. Ashley is awesome. I think she blogs about nearly everything – from being a mom to fashion and accessories to diy projects like crafts and photography. She also has the occasional post from her own momma. I am in love with her momma’s DIY Reclaimed Wood Inspired Frame. […]
katie s
Totally love this! I’ve bought the wood pieces…now I just need to get my little men to help out in painting the sticks so they can enjoy the art work we’ll be making for their room! Thanks for the fun idea!
Six 2012 DIY Trends, 48 Tutorials - SNAP! Creativity
[…] 1. Reclaimed wood wall art 2. Reclaimed wood storage boxes 3. Reclaimed wood headboard 4. Reclaimed wood bench 5. Reclaimed wood headboard 6. Reclaimed wood honeycomb shelves 7. Cabinet door art desks 8. Reclaimed wood table top art […]
Nancy
Great idea I love it and will try to attempt it myself……thanks for sharing
Jess @ The Colorful Ones
Um, this is like a total creative genius moment! I love the look, and never would have thought of recreating it this way!!! Thanks so much for the inspiration! 🙂
rashmi
i like ur craft,how did u attach a star fish ? and how did you fix that in a glass frame?
HERVE LEGER
Herve Leger, Oktoberfest outfit people tend to wear our collections together, as one piece. But I like them as separates; it’s almost cooler,” she says. “I would put this jacket with a pair of jeans or a work skirt. And of course it all but if you’re in L.A.,