


Button Checkers Tutorial
Cottage Chic Distressed Checker Board


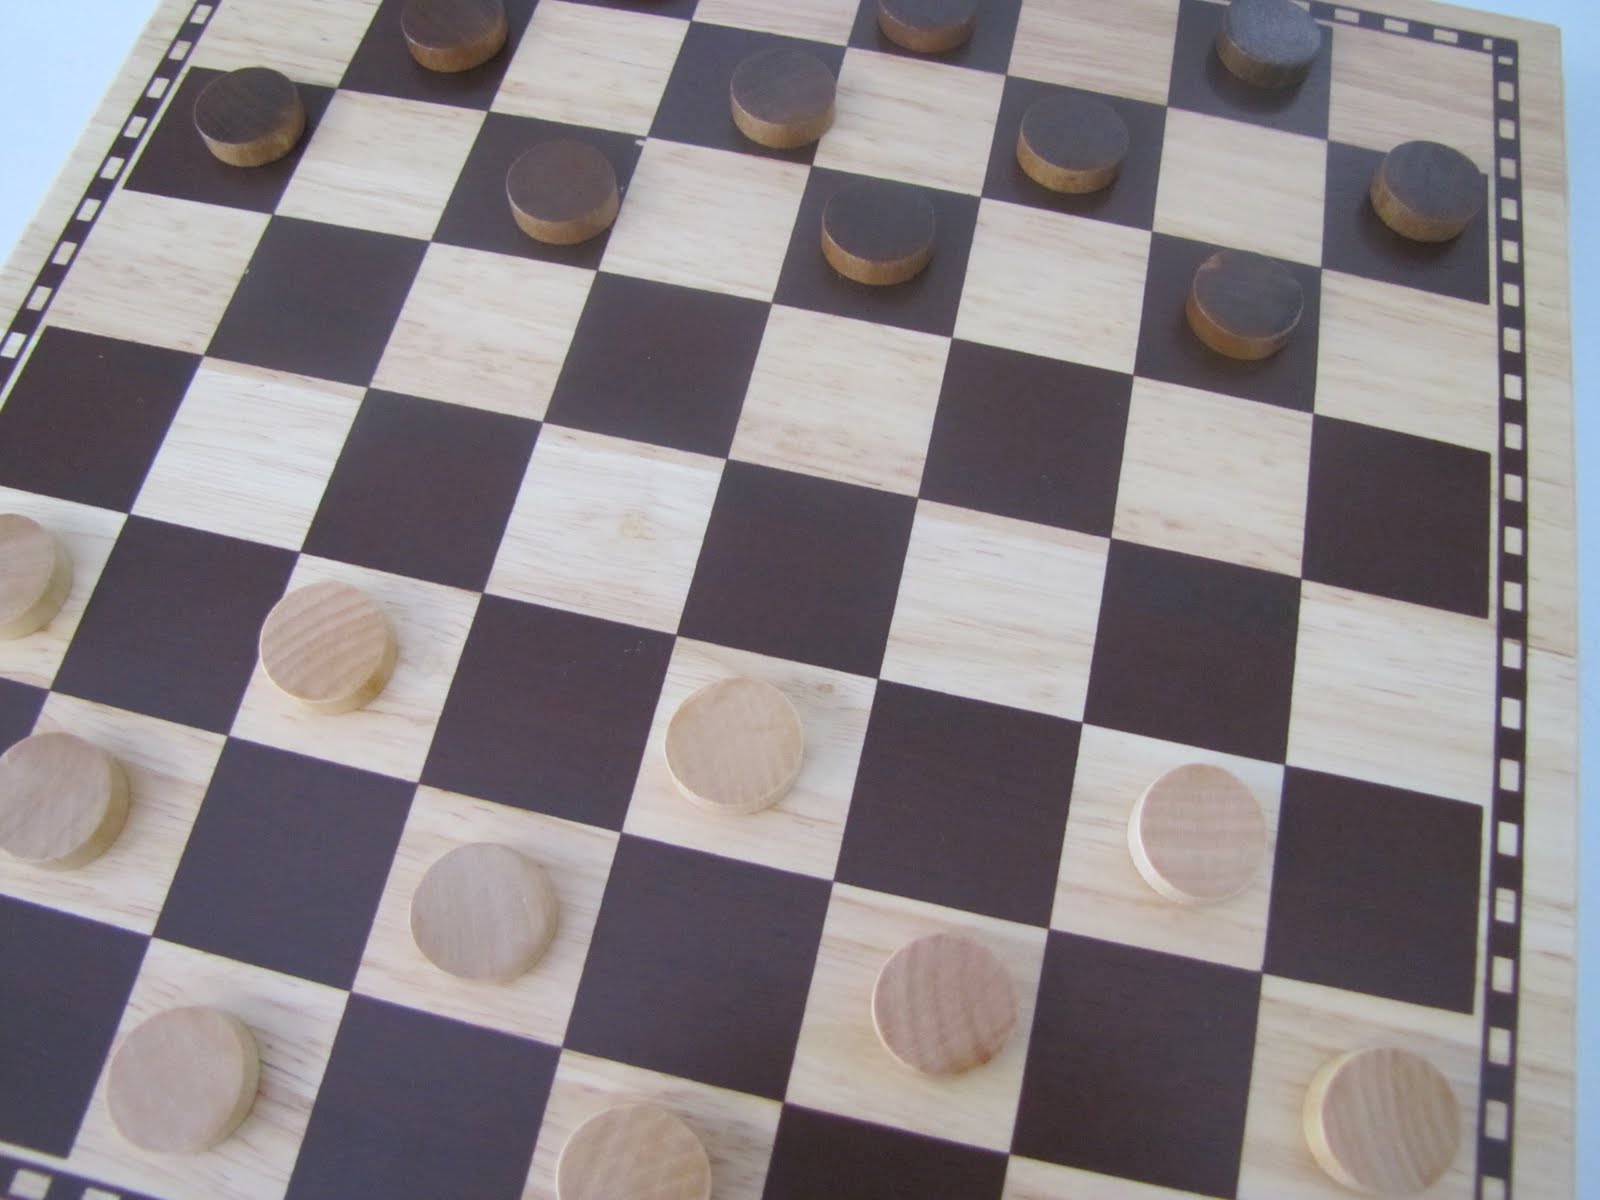
I hardly remember how to play checkers, but I sure had fun making this cottage chic distressed checker board with button pieces! I was cleaning out my garage and stumbled across my current checker board–BORING and frankly, quite ugly!
So I made my own, and now you can too!
Here’s what you’ll need:
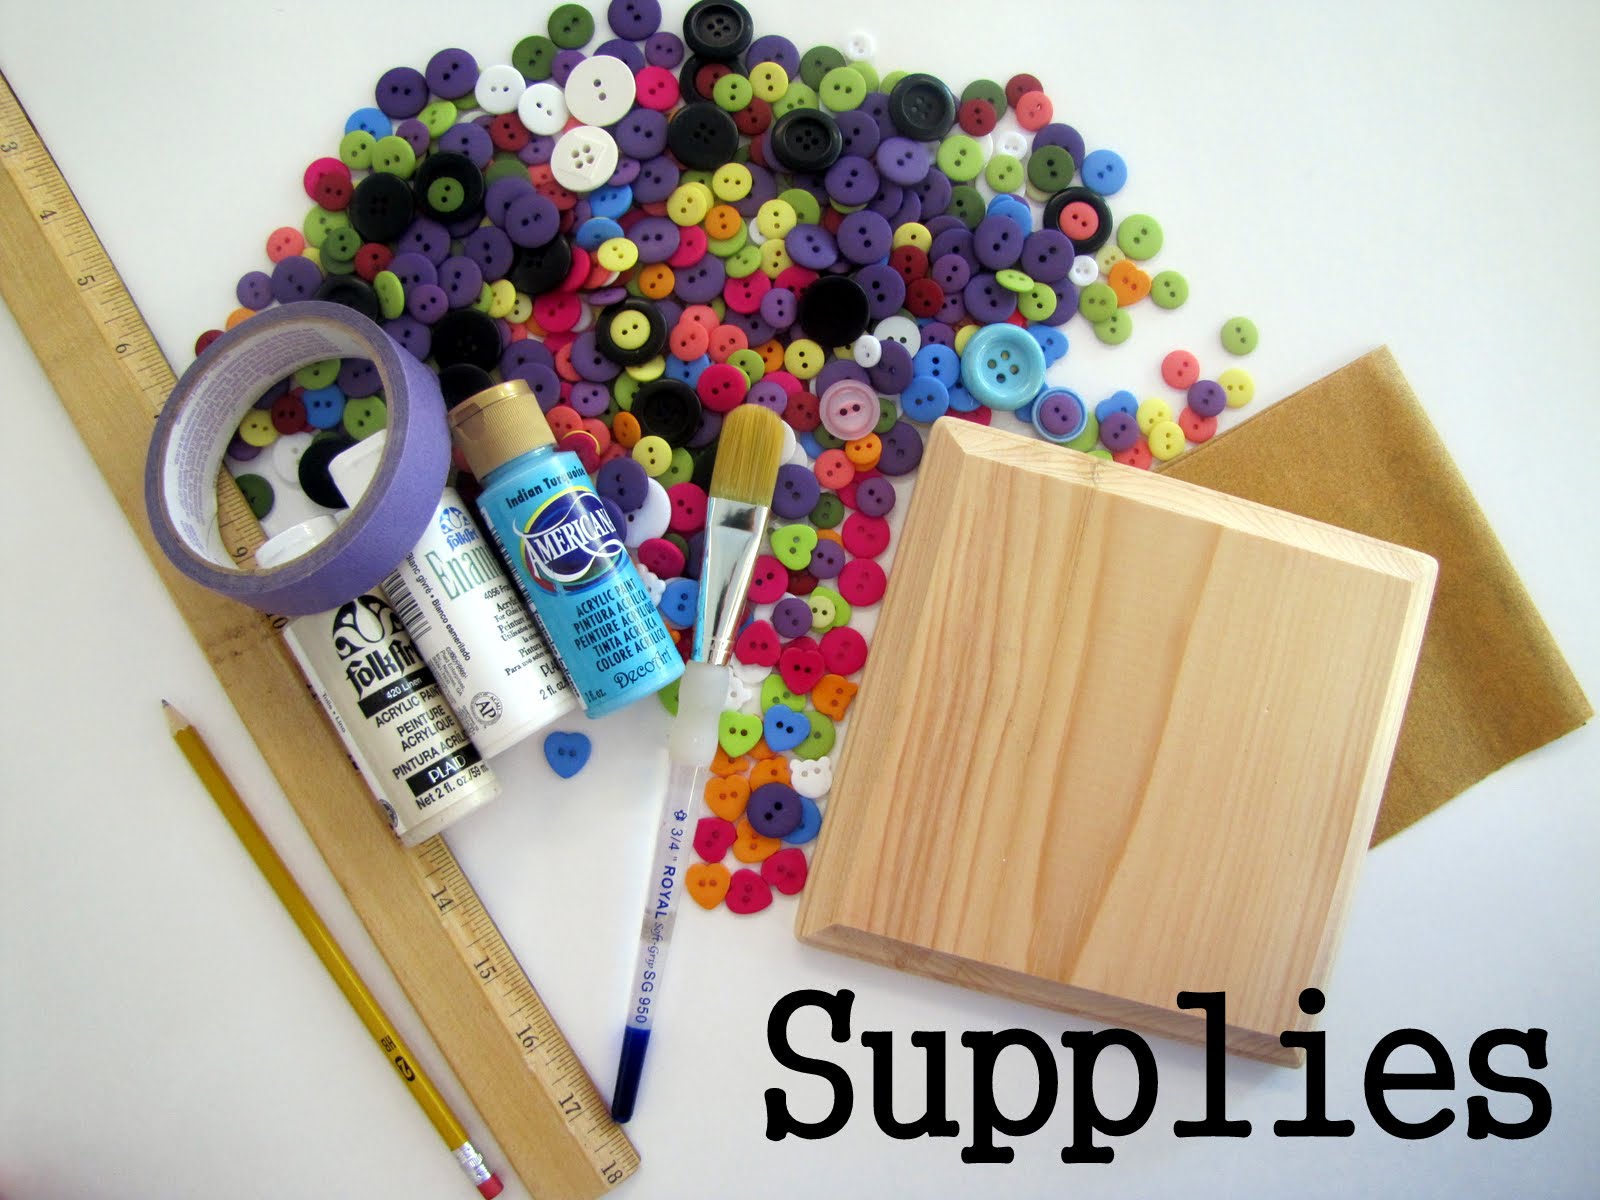
Supplies:
Wooden plaque {available at Michael’s} mine is 6×6 and was about $1.50
Acrylic paint in the colors of your choice {I used turquoise and off-white}
Painter’s tape
Paint brush
Sand paper
Pencil
Ruler
STEP ONE:
I didn’t have off-white paint on hand so I mixed tan with white to get my desired color.
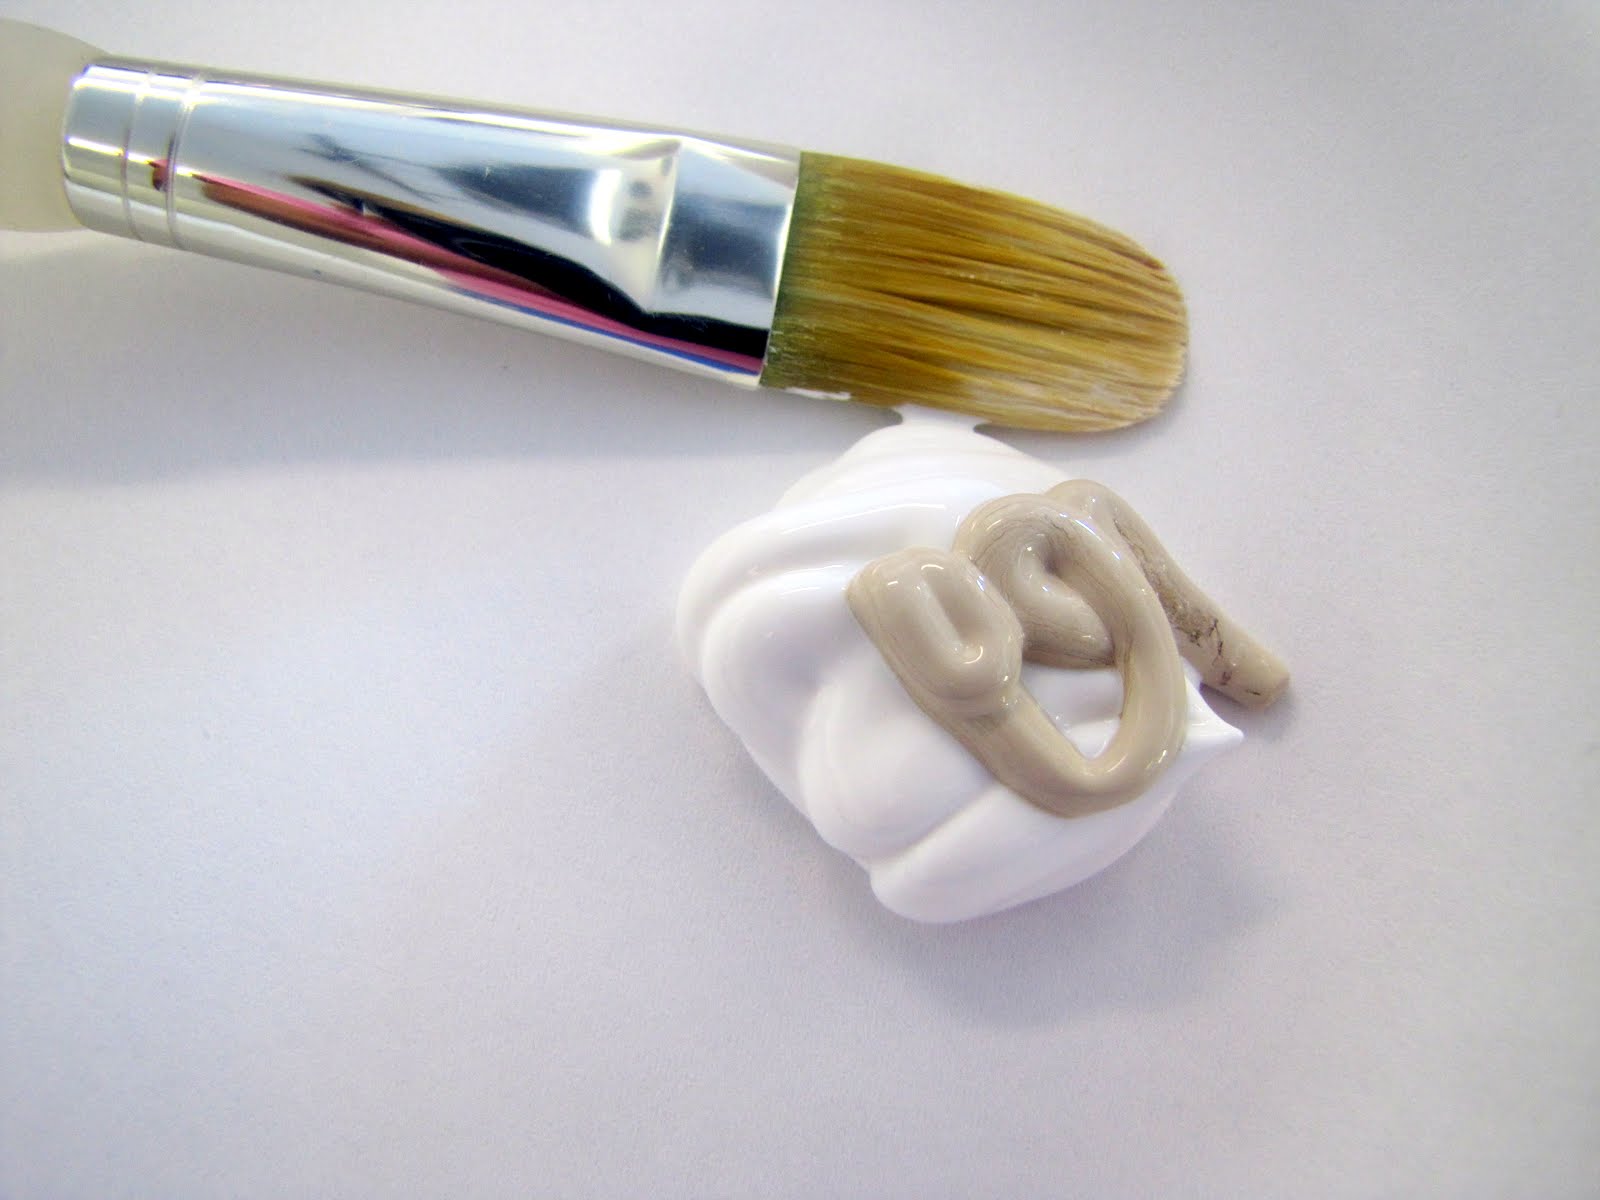
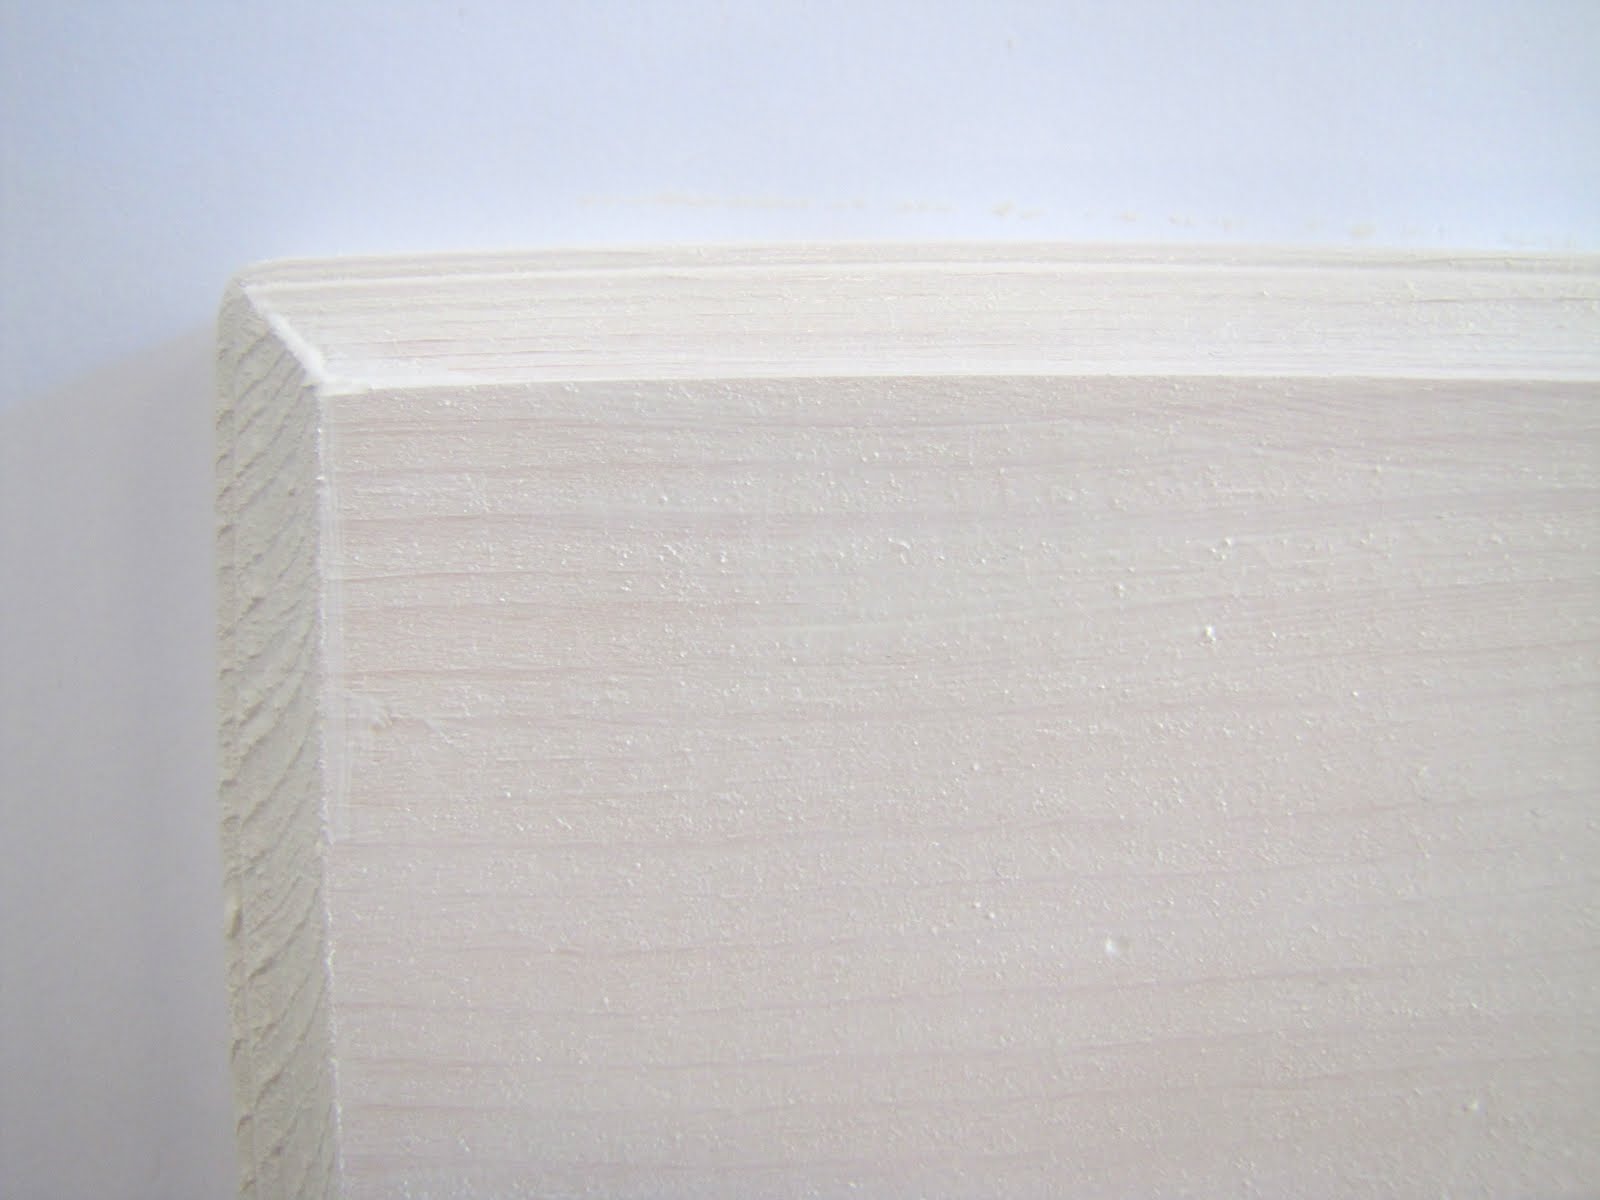
Paint the plaque a thin coat of the white. You can even add a tiny bit of water to the paint to give it the white washed look.
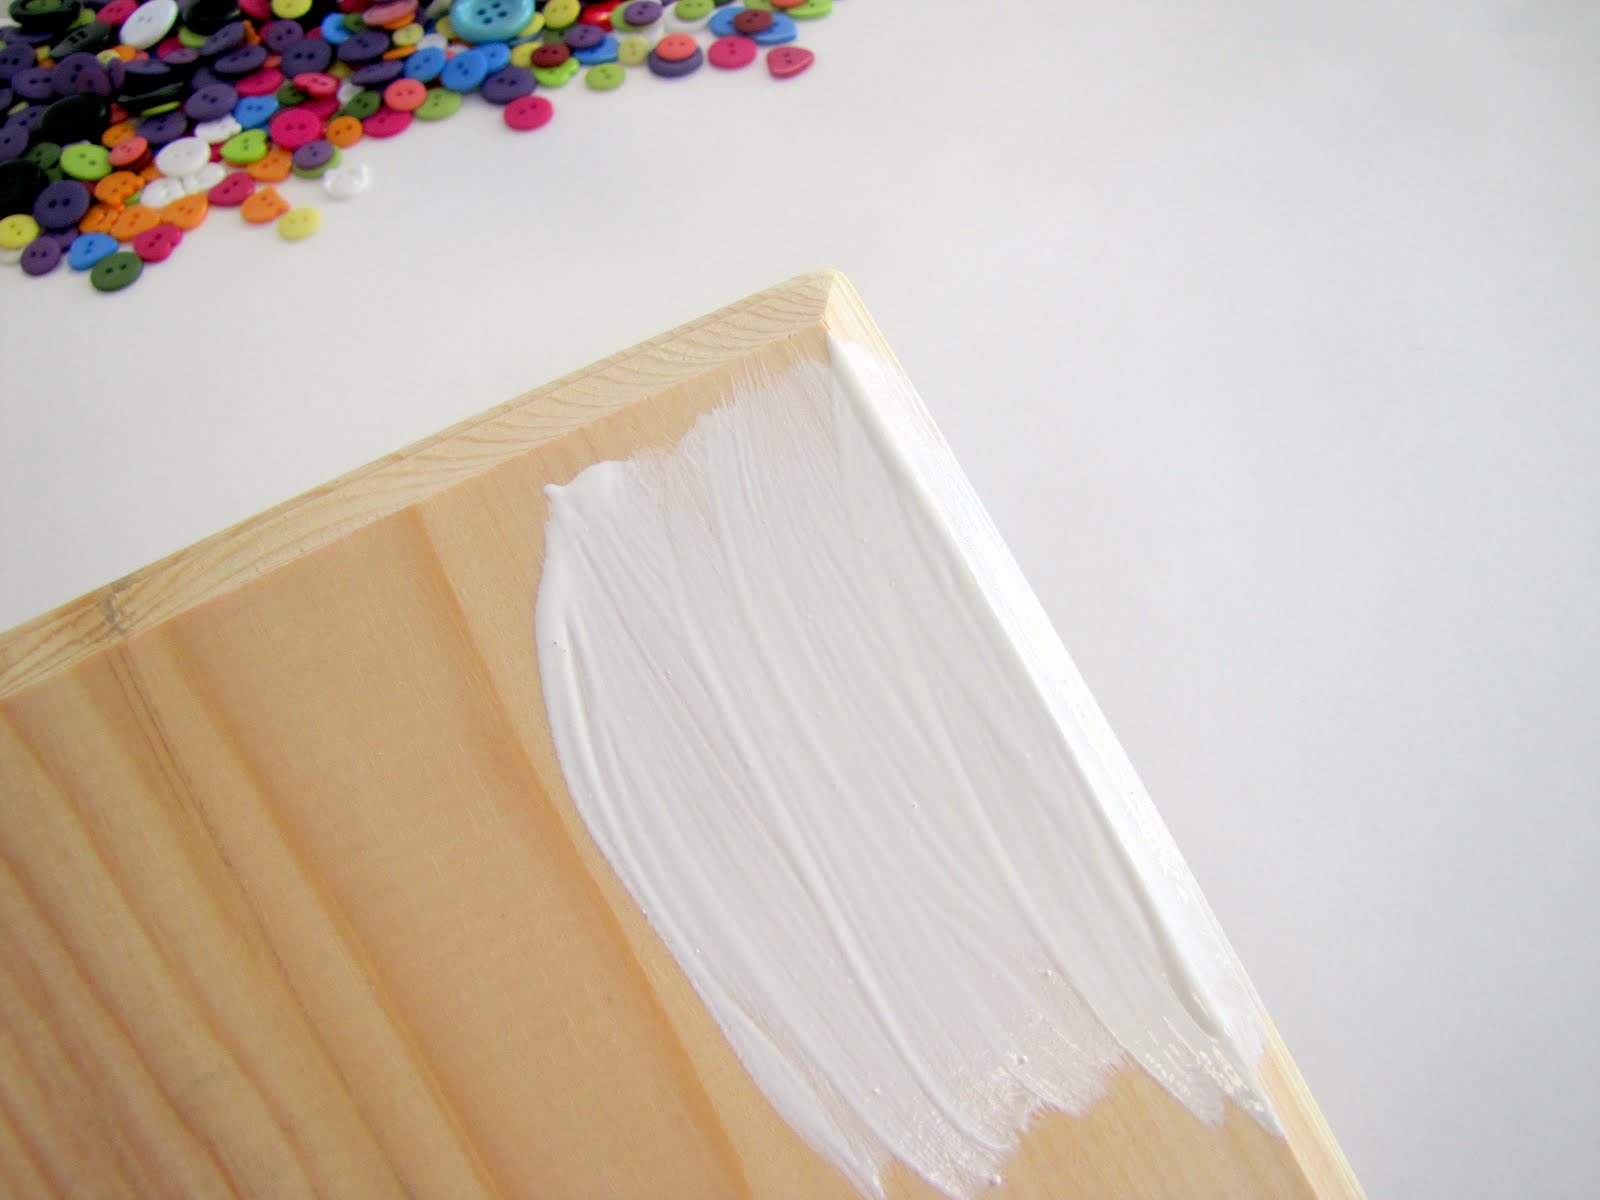
I like that you can still see the wood grains through the paint.
STEP TWO:
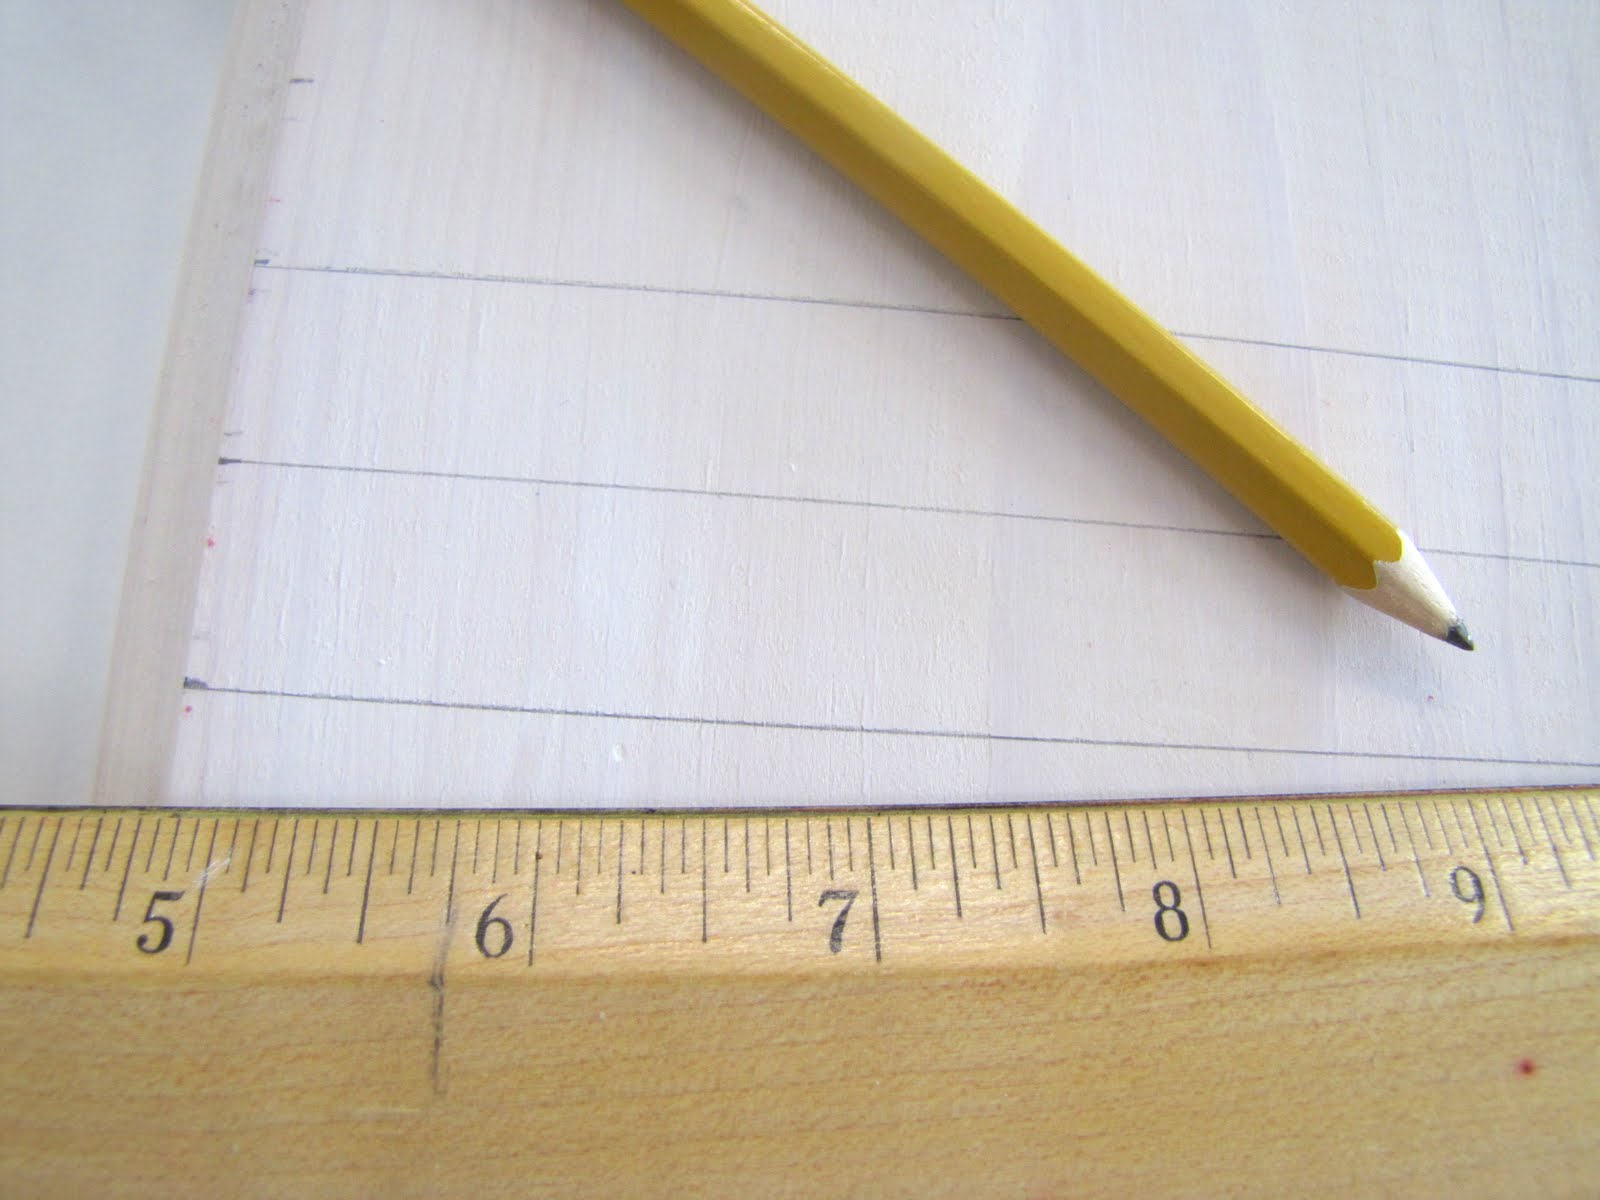
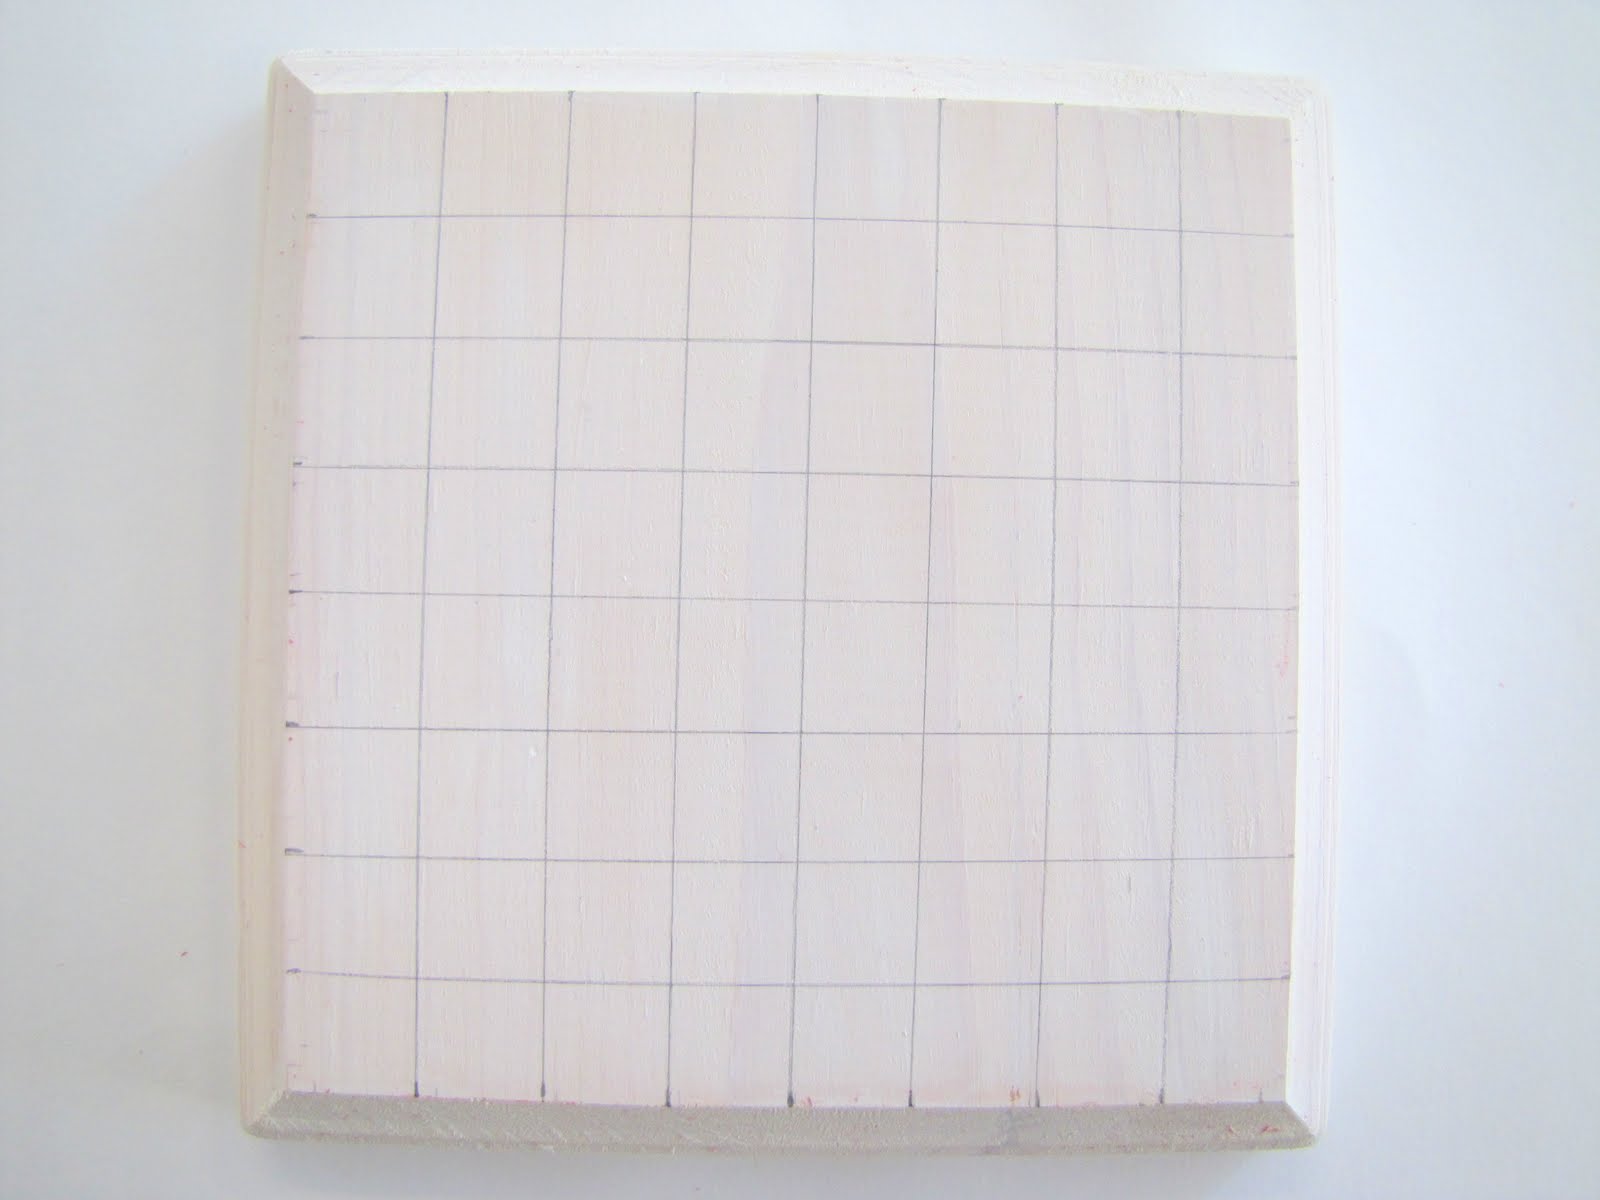
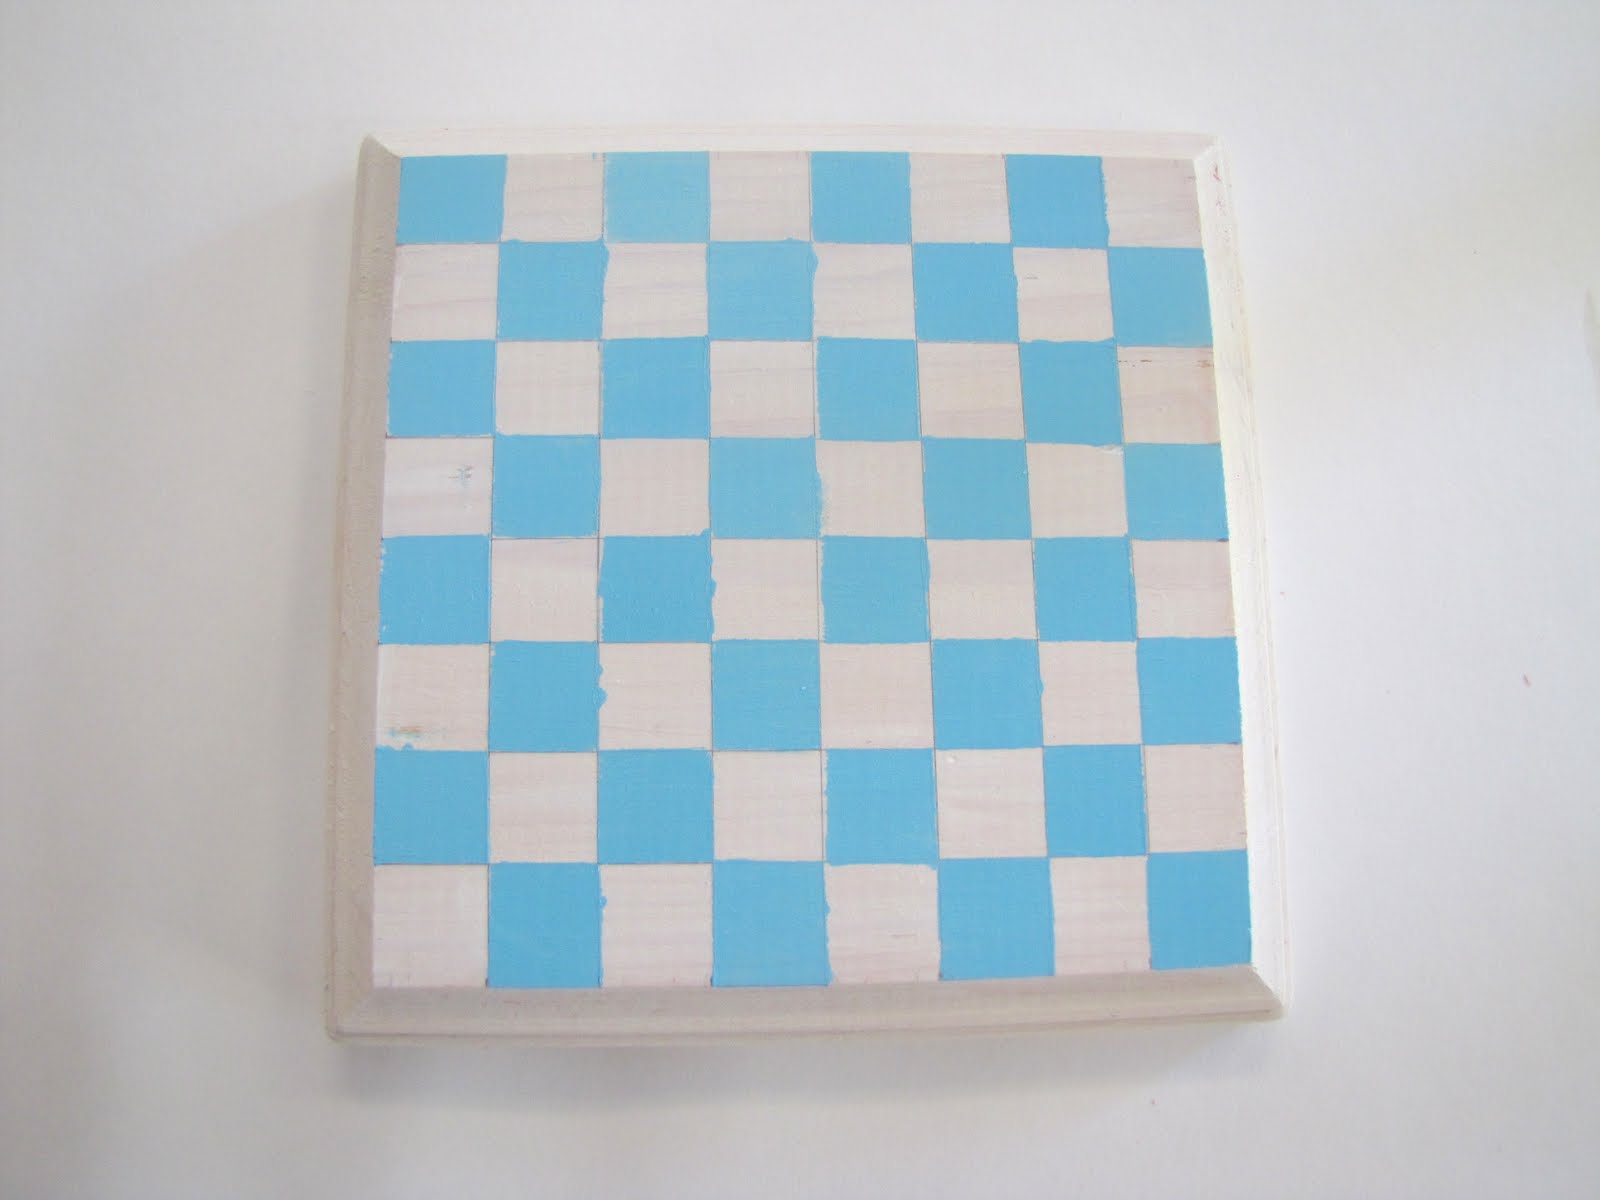
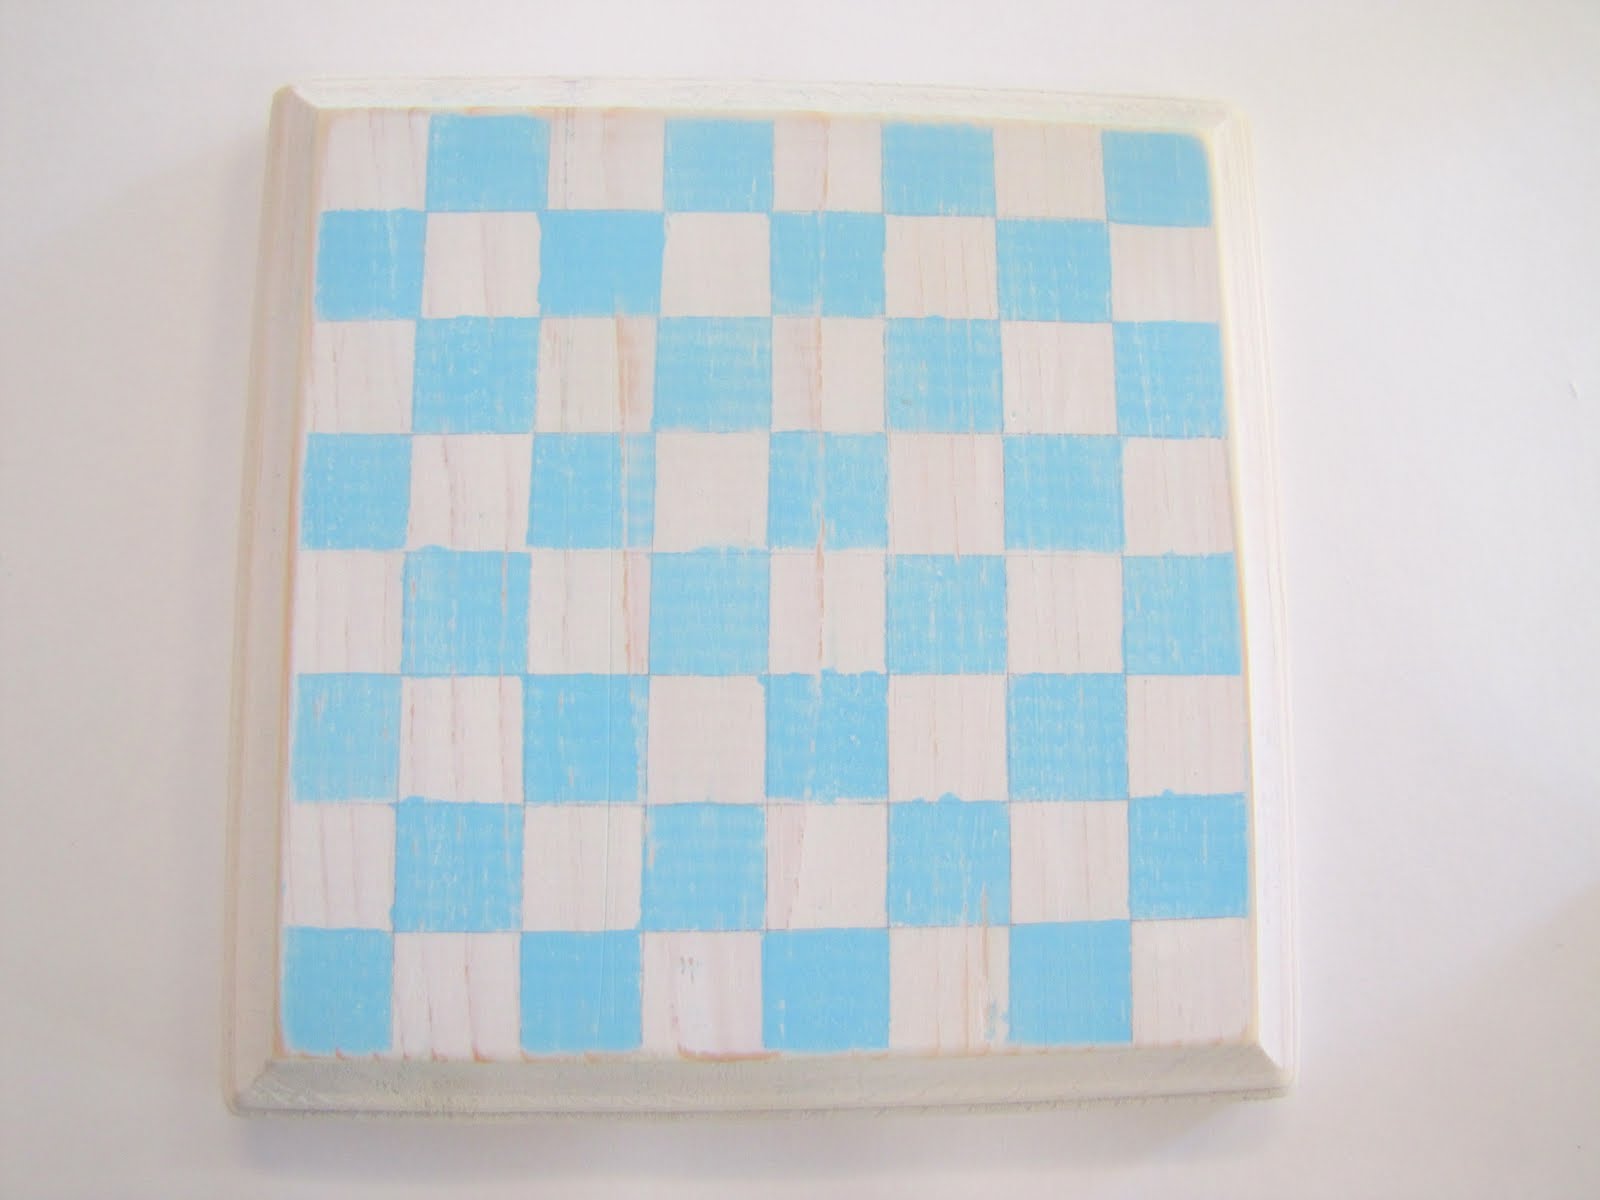
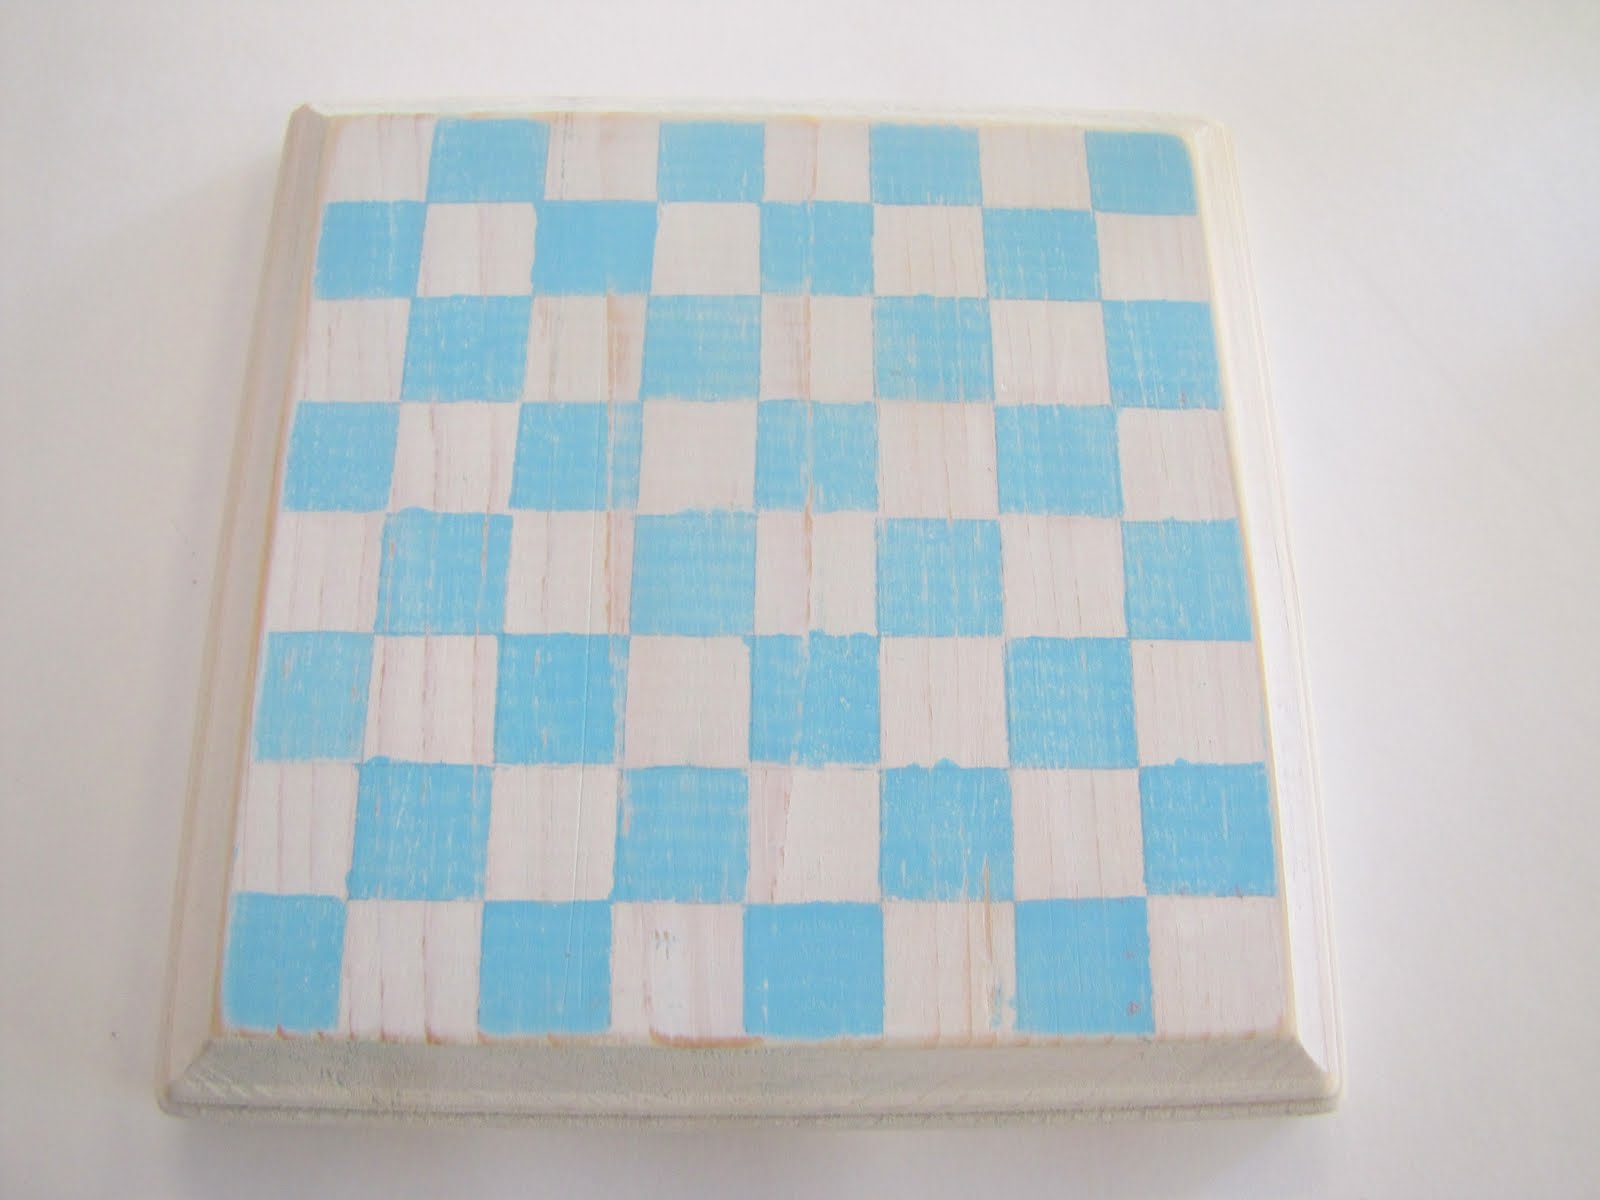
A checker board is 8 squares by 8 squares {64 total squares}.
You will need to measure off your boxes. Take the number of inches long of your plaque and divide it by 8. This will give you the necessary width of each of your boxes. For example: if your plaque is 6×6 inches, take 6 inches divided by 8 boxes and you get .75. This means each box will be 3/4 of an inch wide.
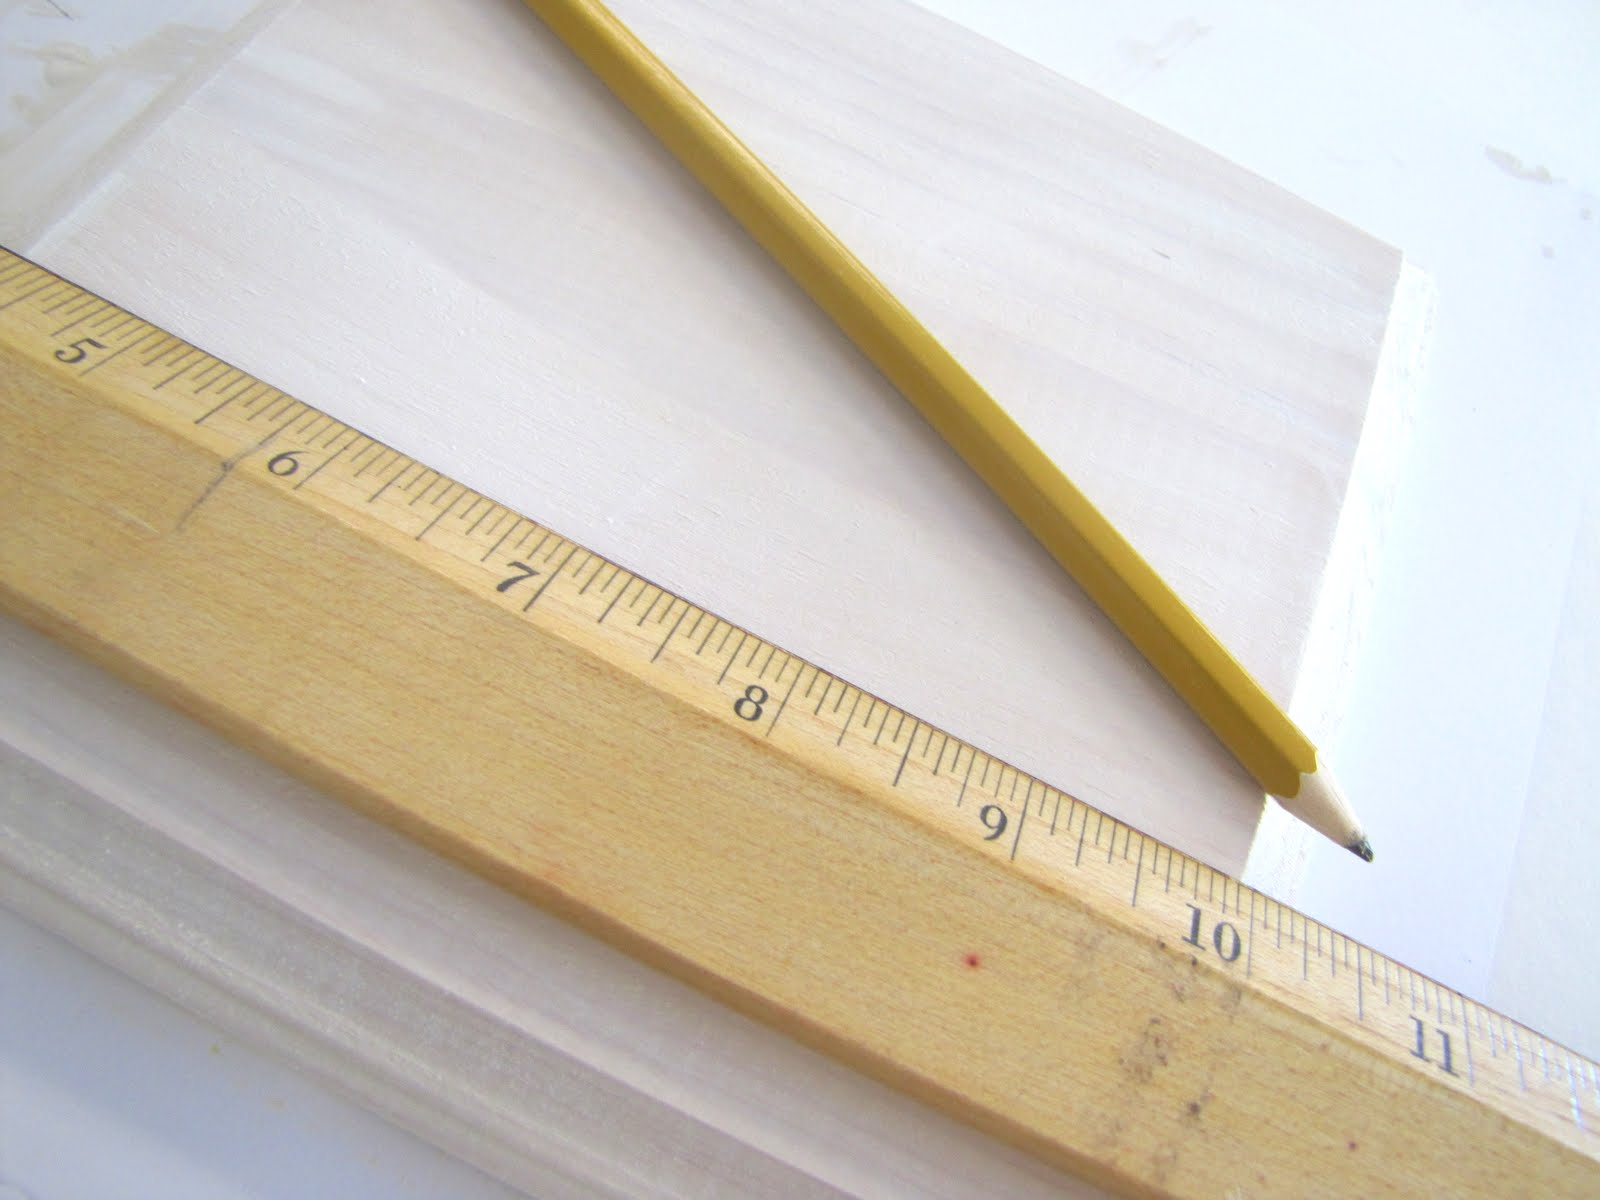
Use your ruler and pencil to mark off your measurements on all four sides.
Now connect all the lines.
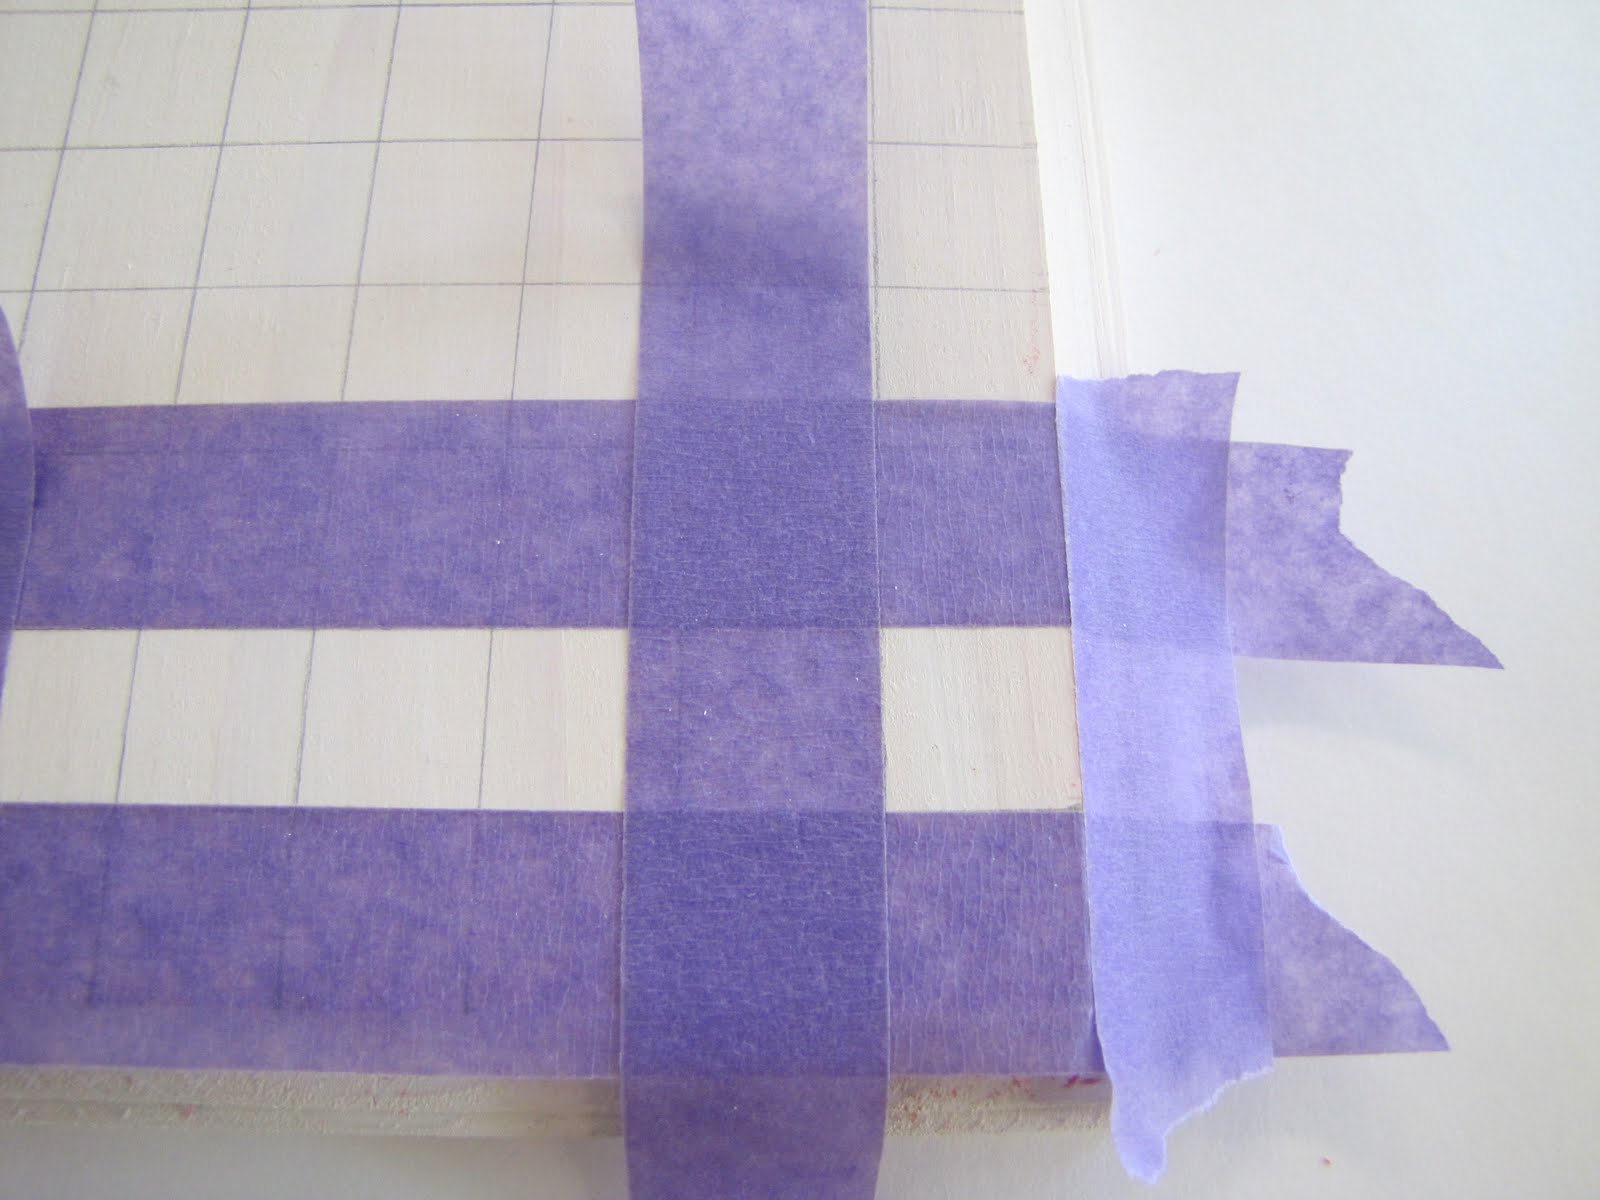
STEP THREE:
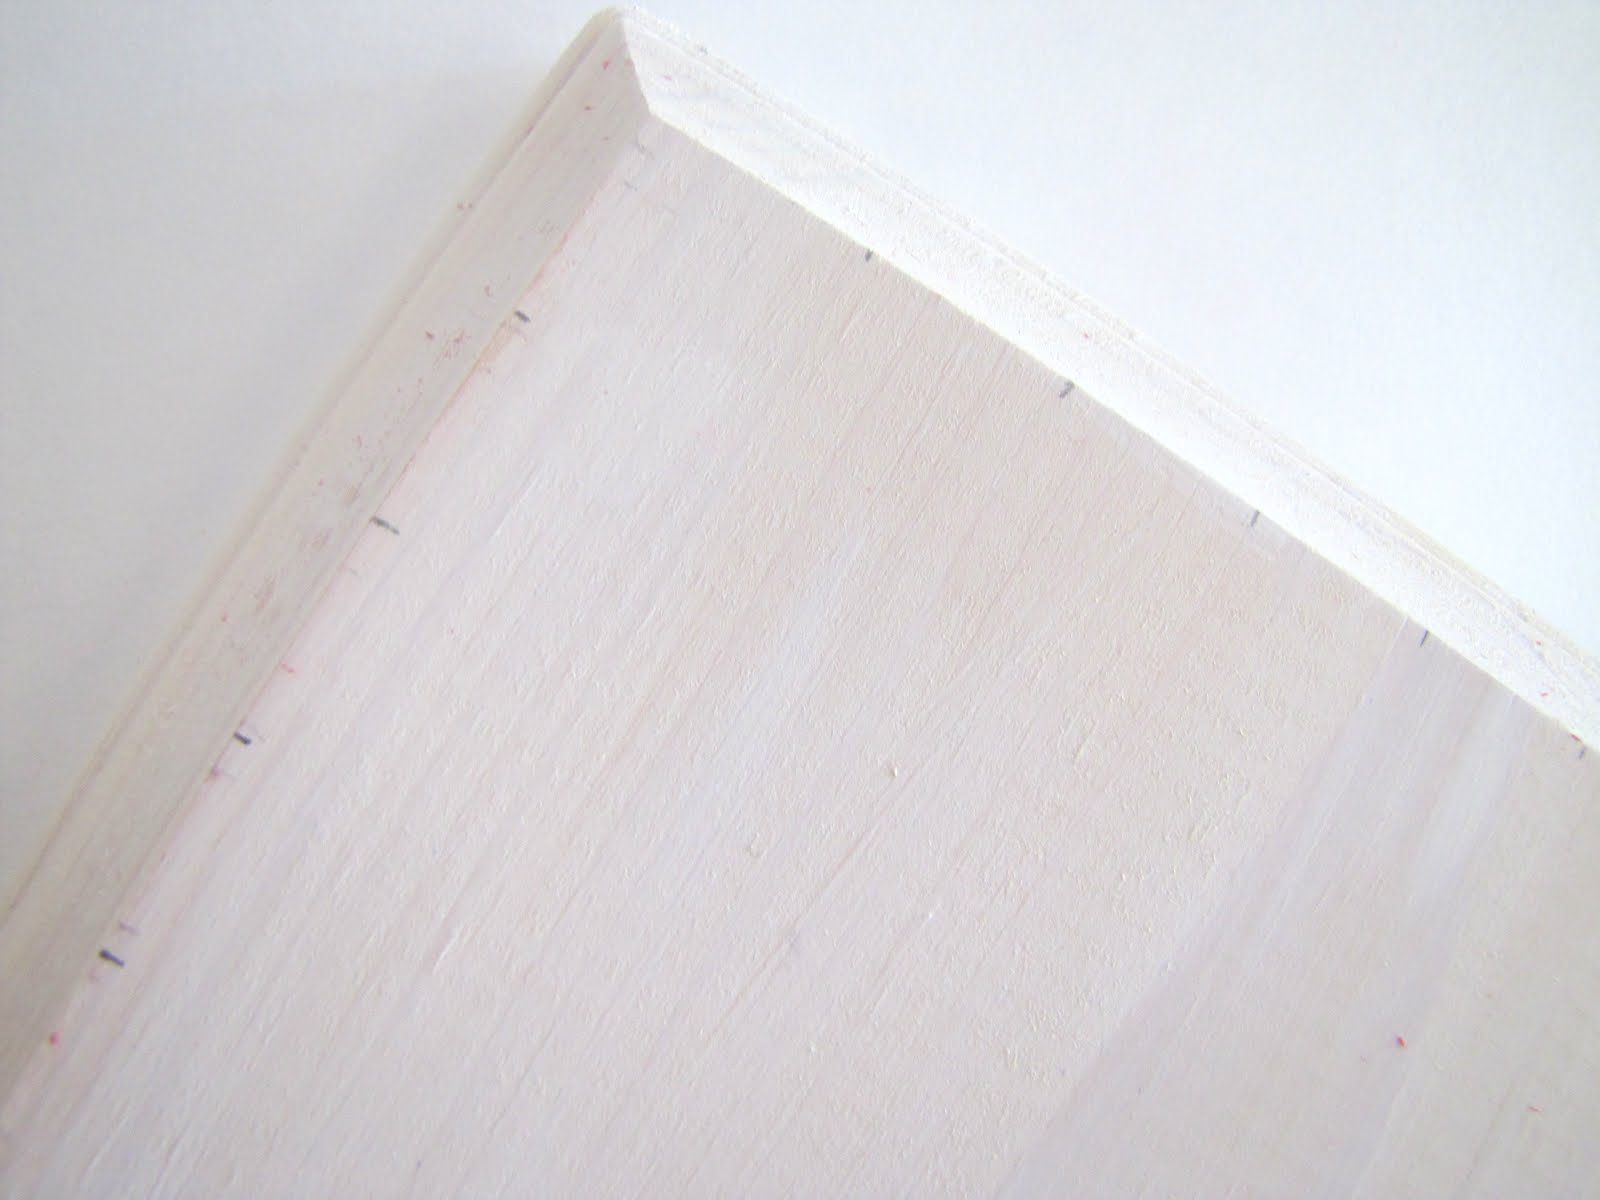
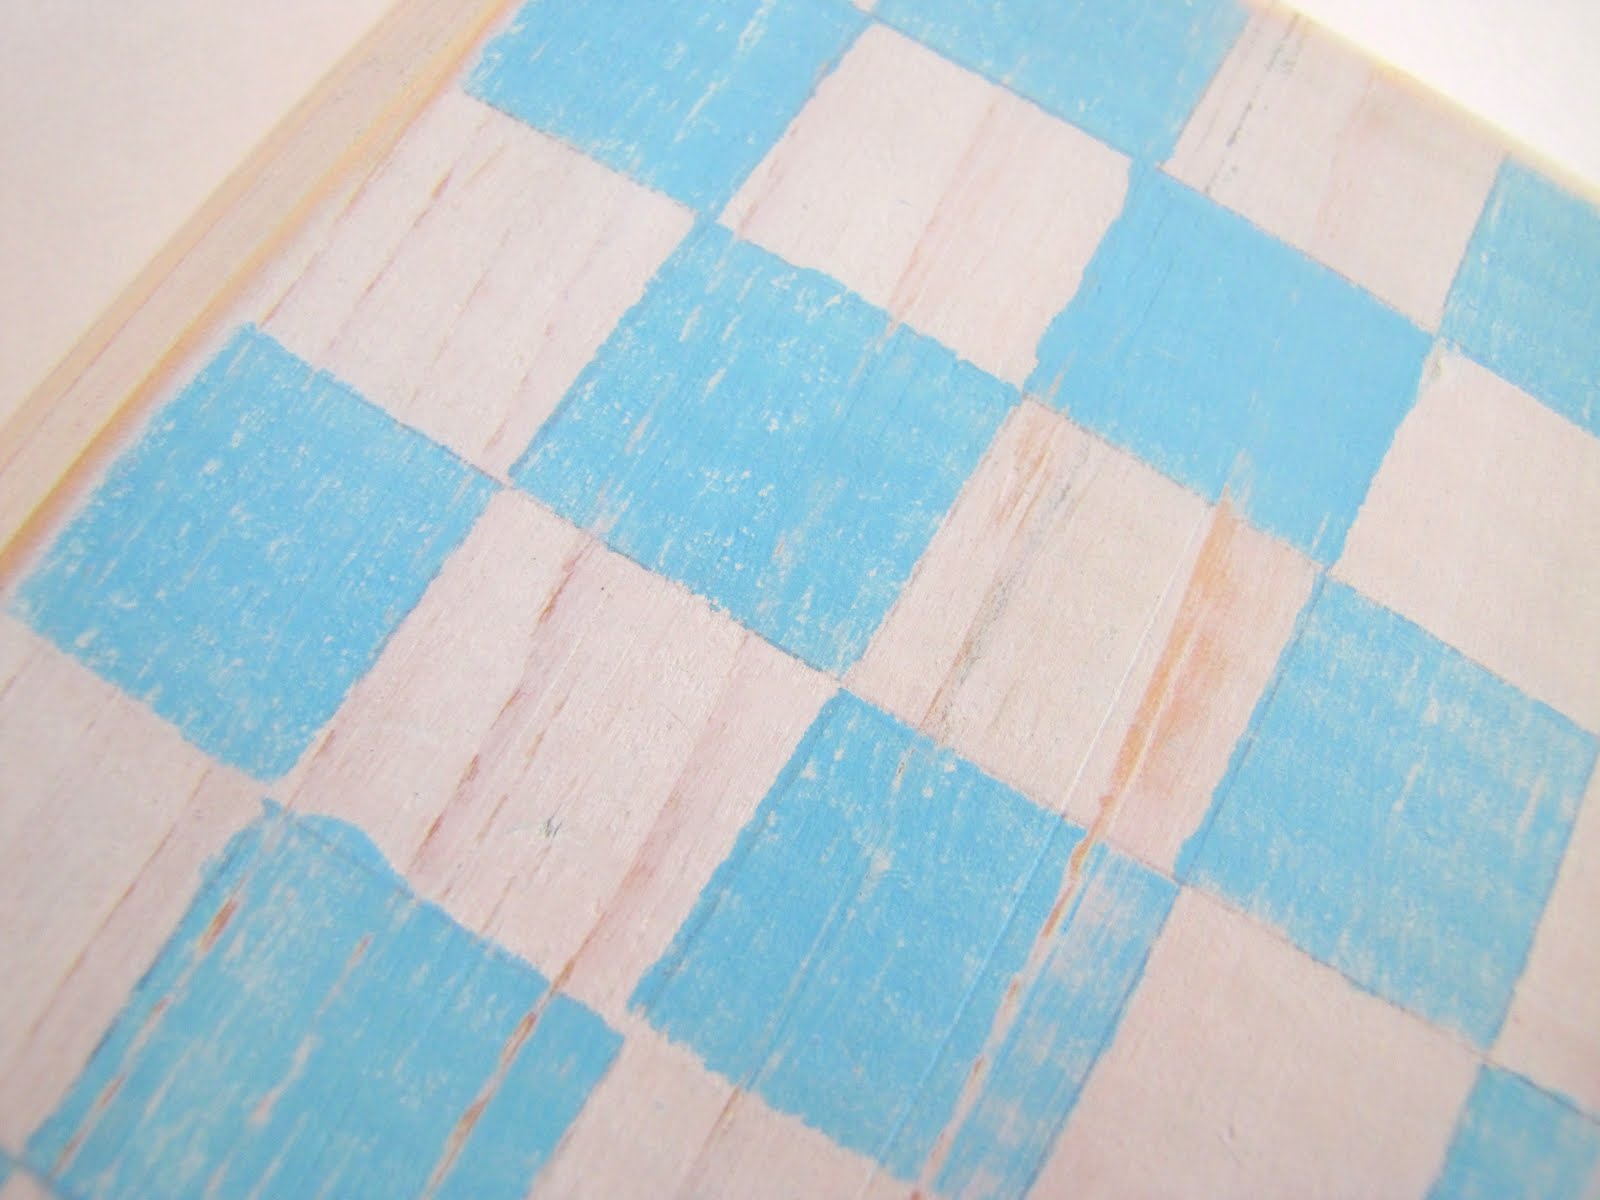
Once you have all your grid lines marked off you are ready to begin painting your squares. In order to get straight lines you will need to tape off each box with painter’s tape.
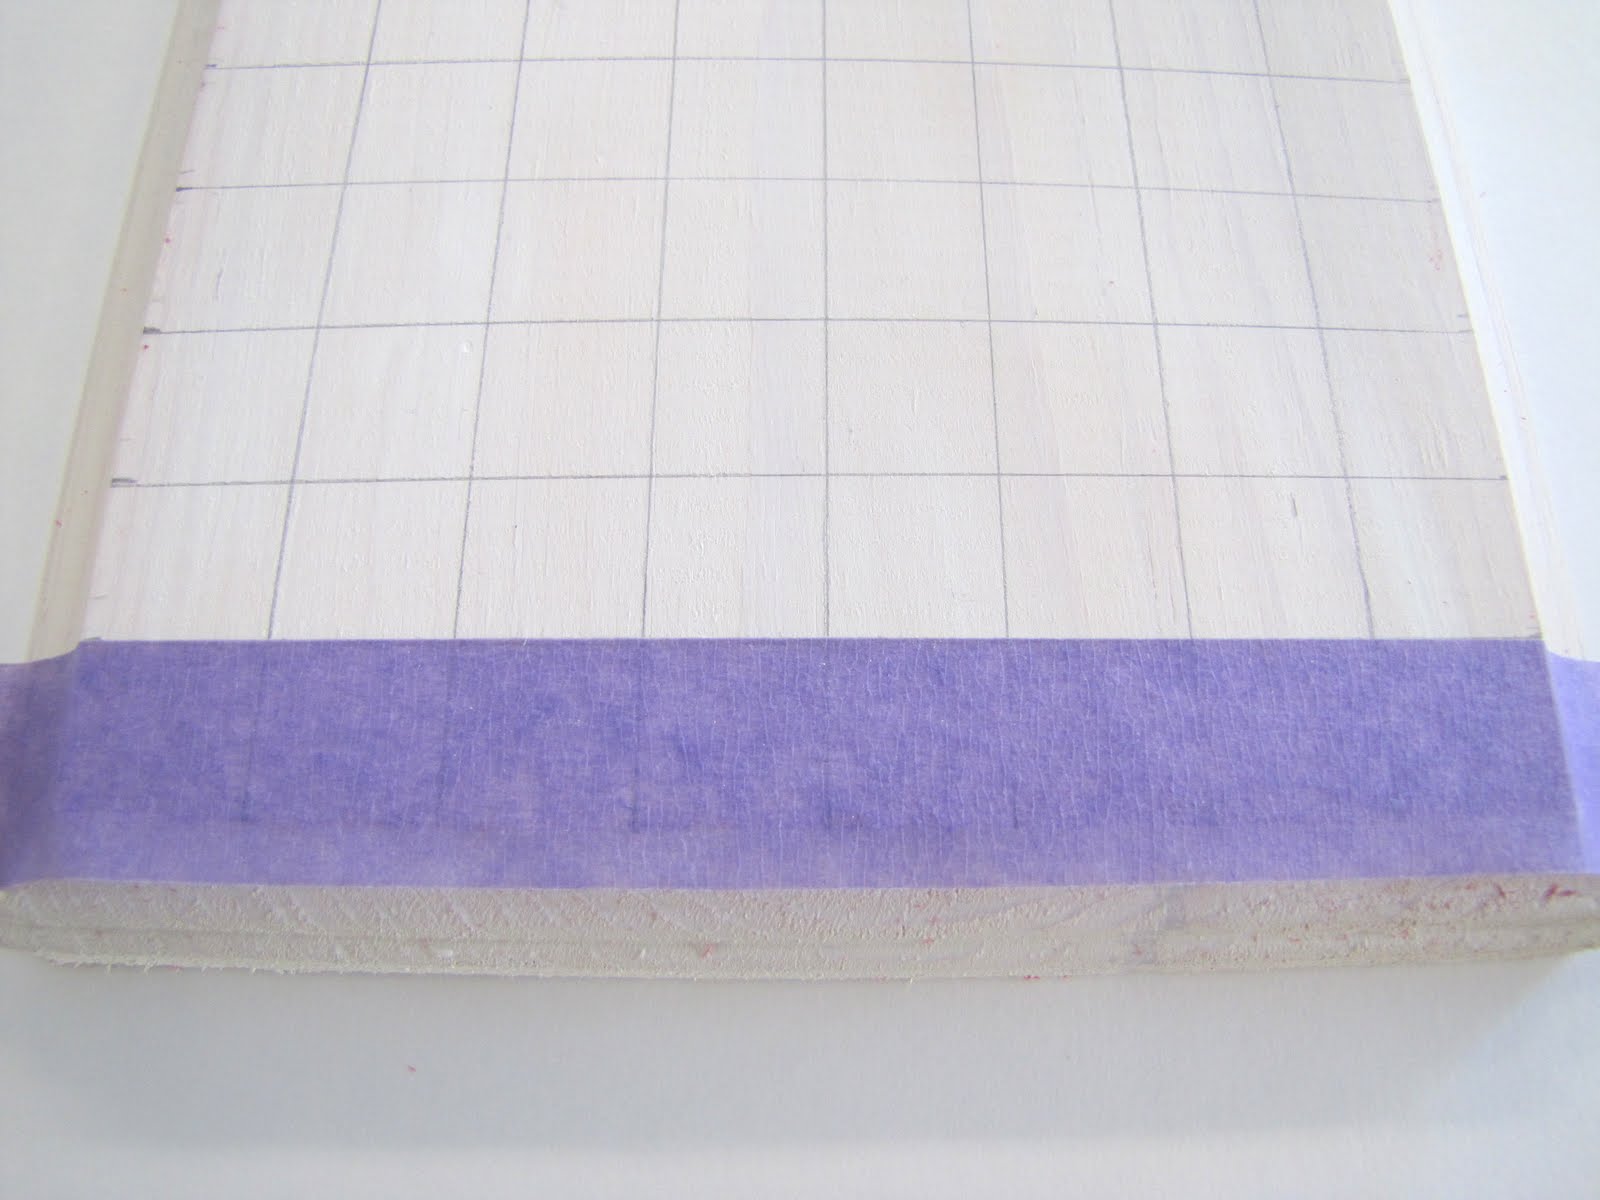
Use VERY little paint when painting in your colored boxes, otherwise the paint will more like run under the tape {and it won’t look as distressed}.

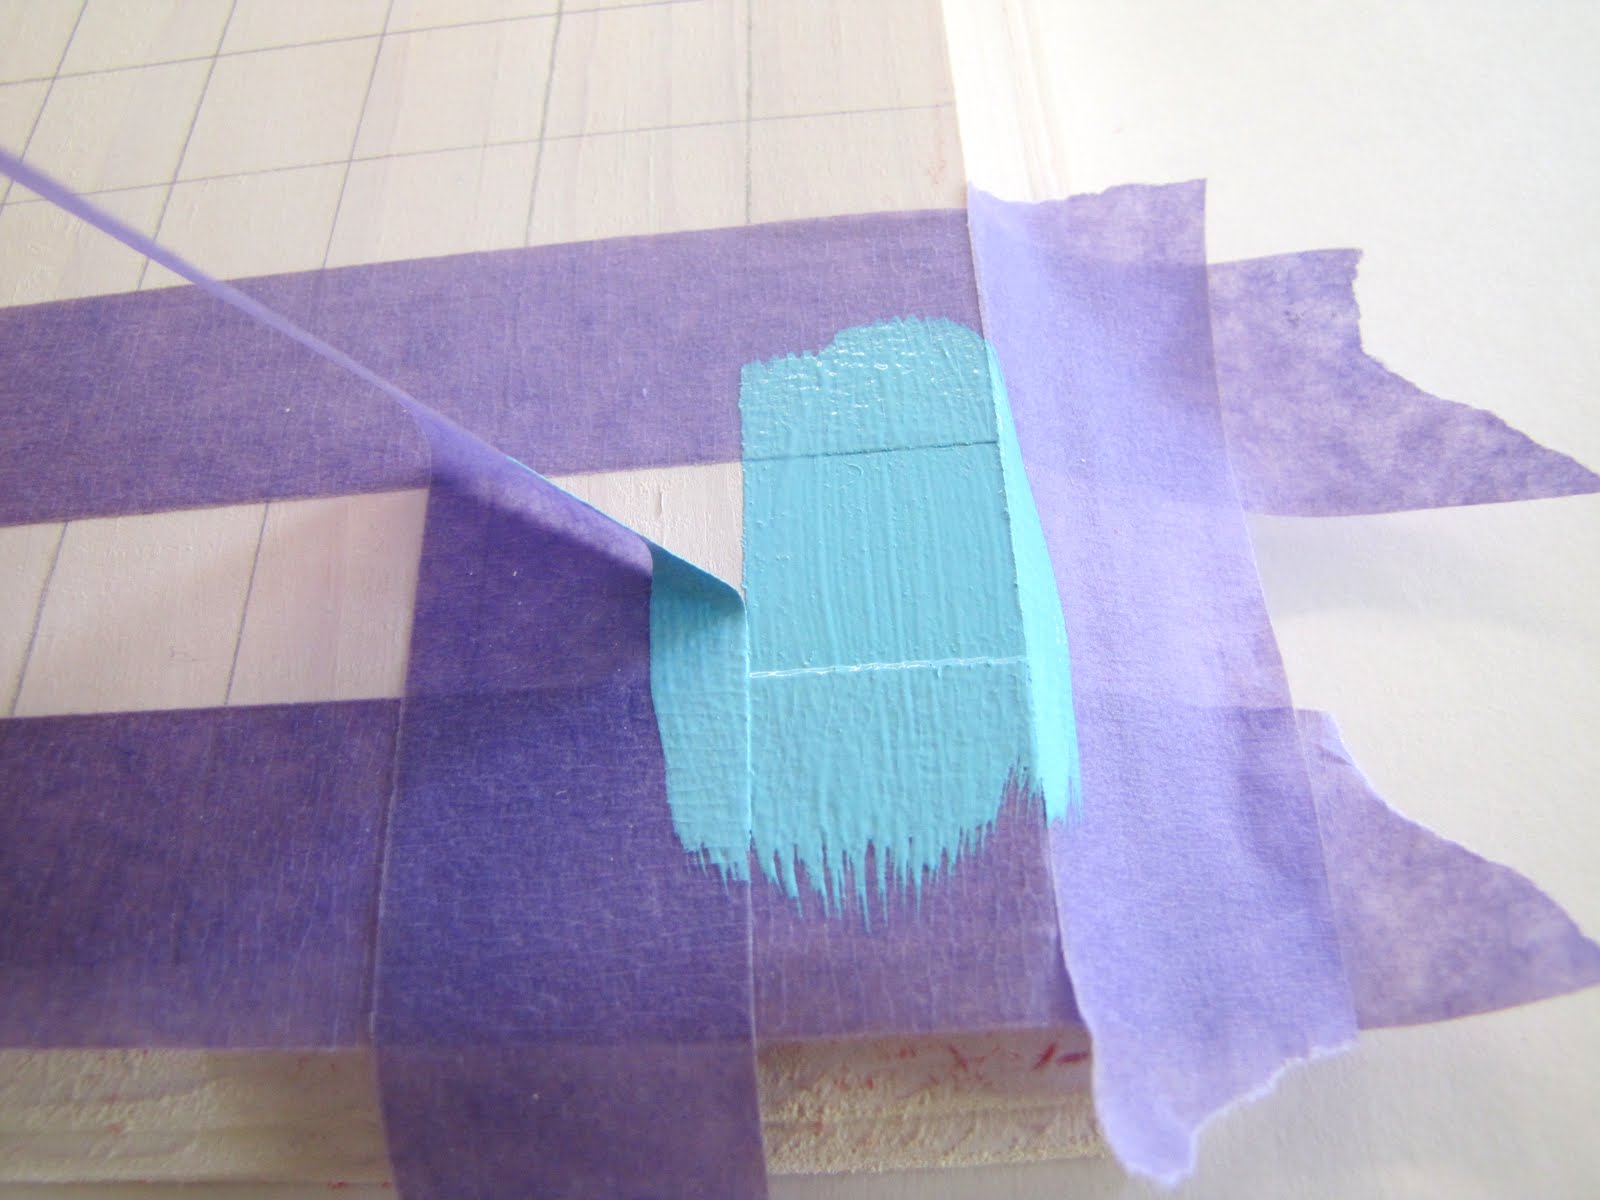
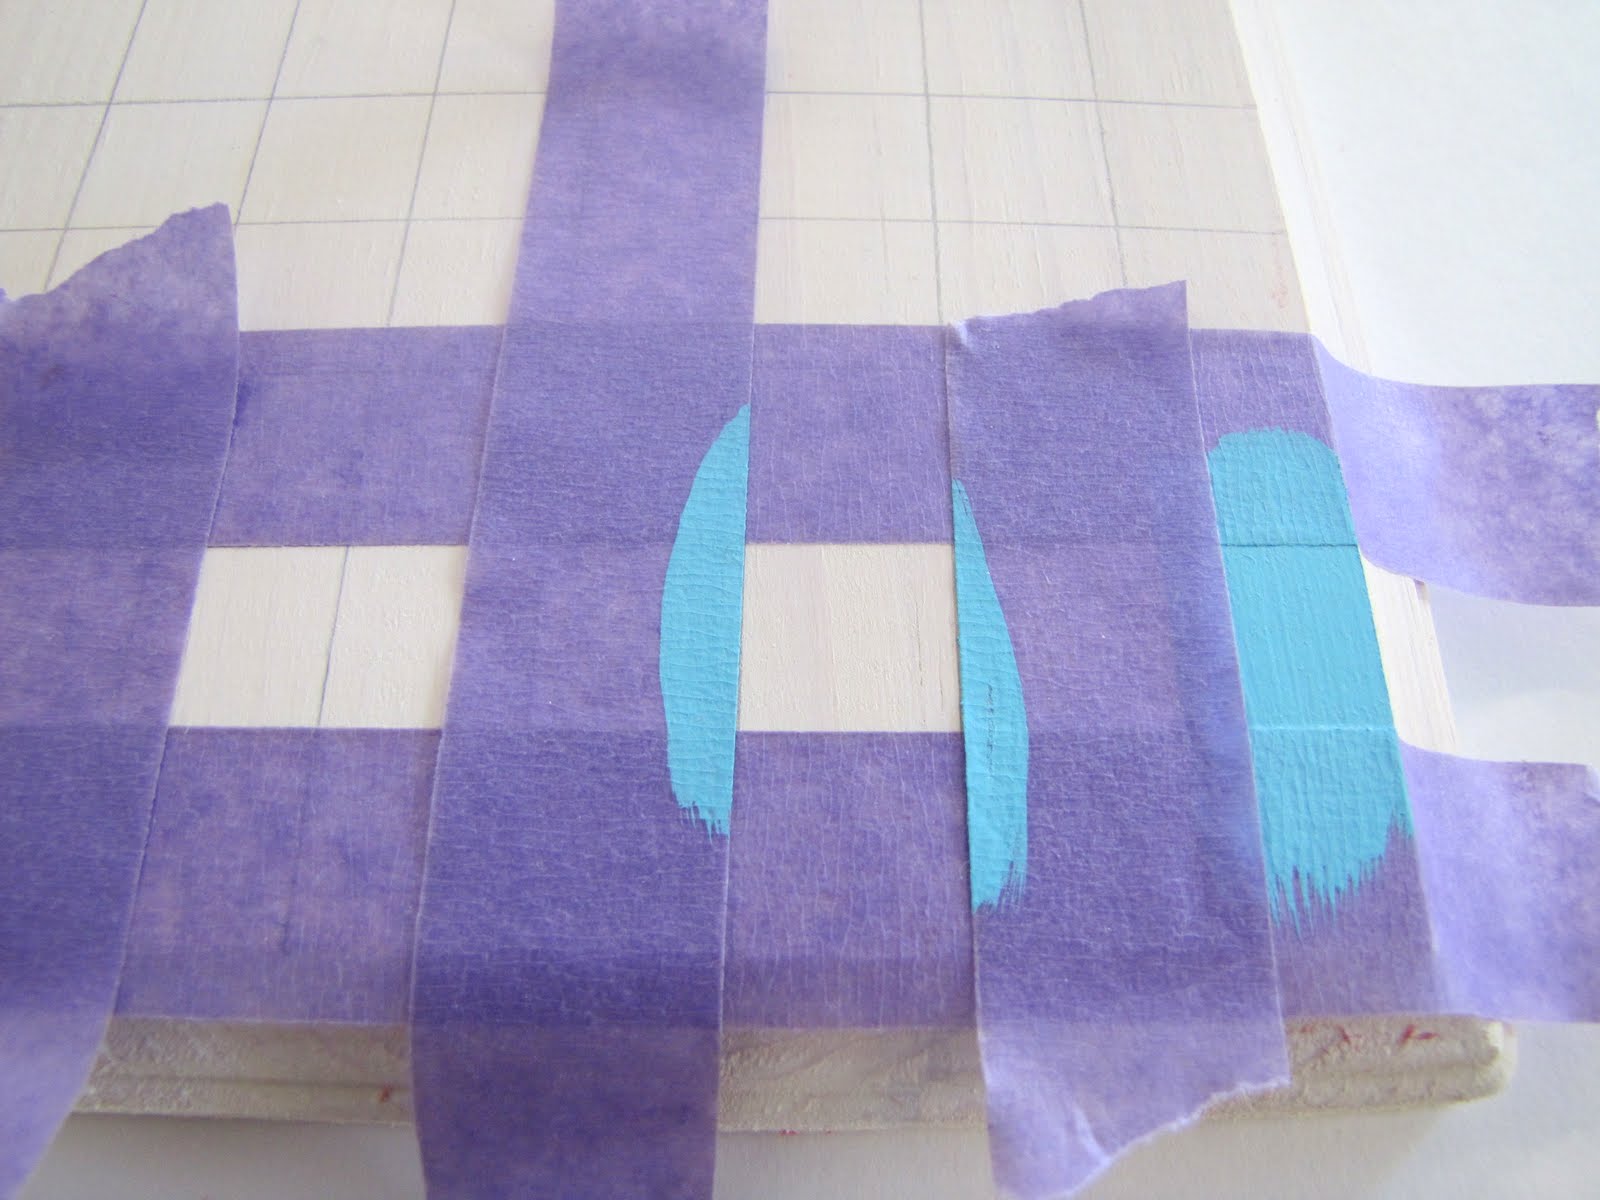
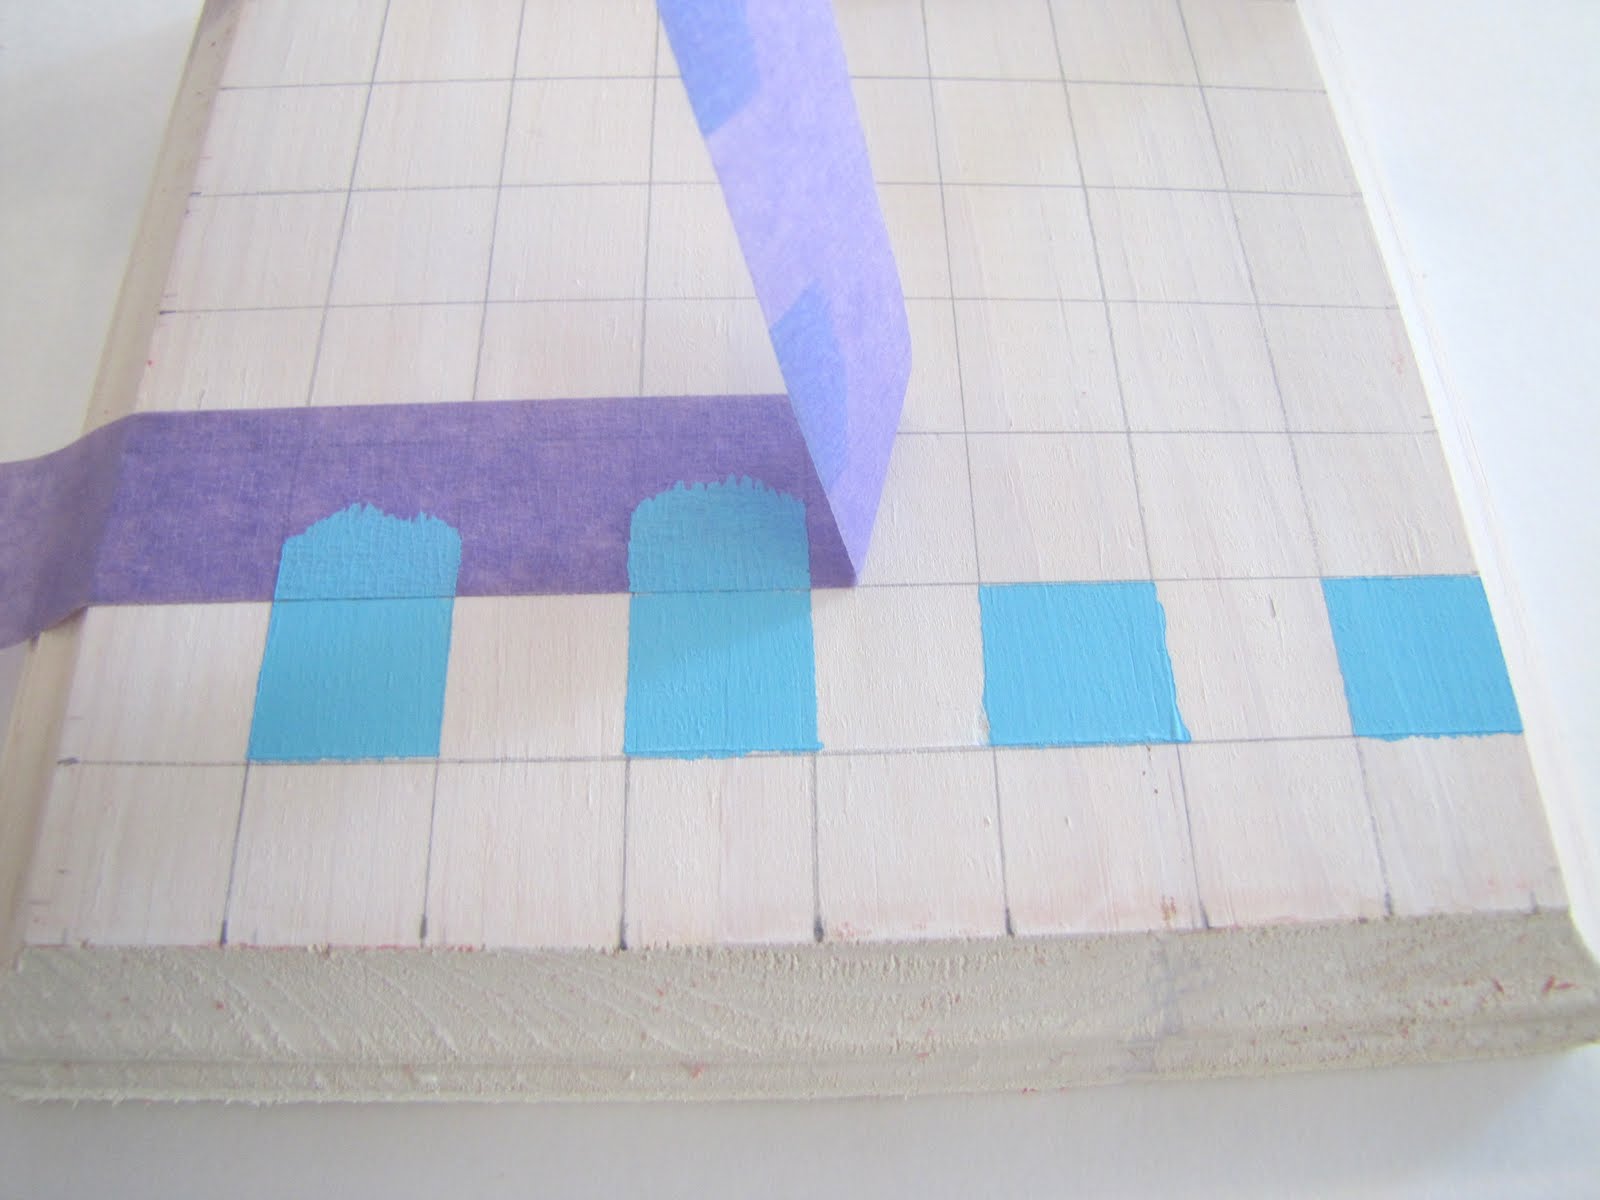
Once you have all your boxes painted, make sure they have dried completely.
STEP FOUR:
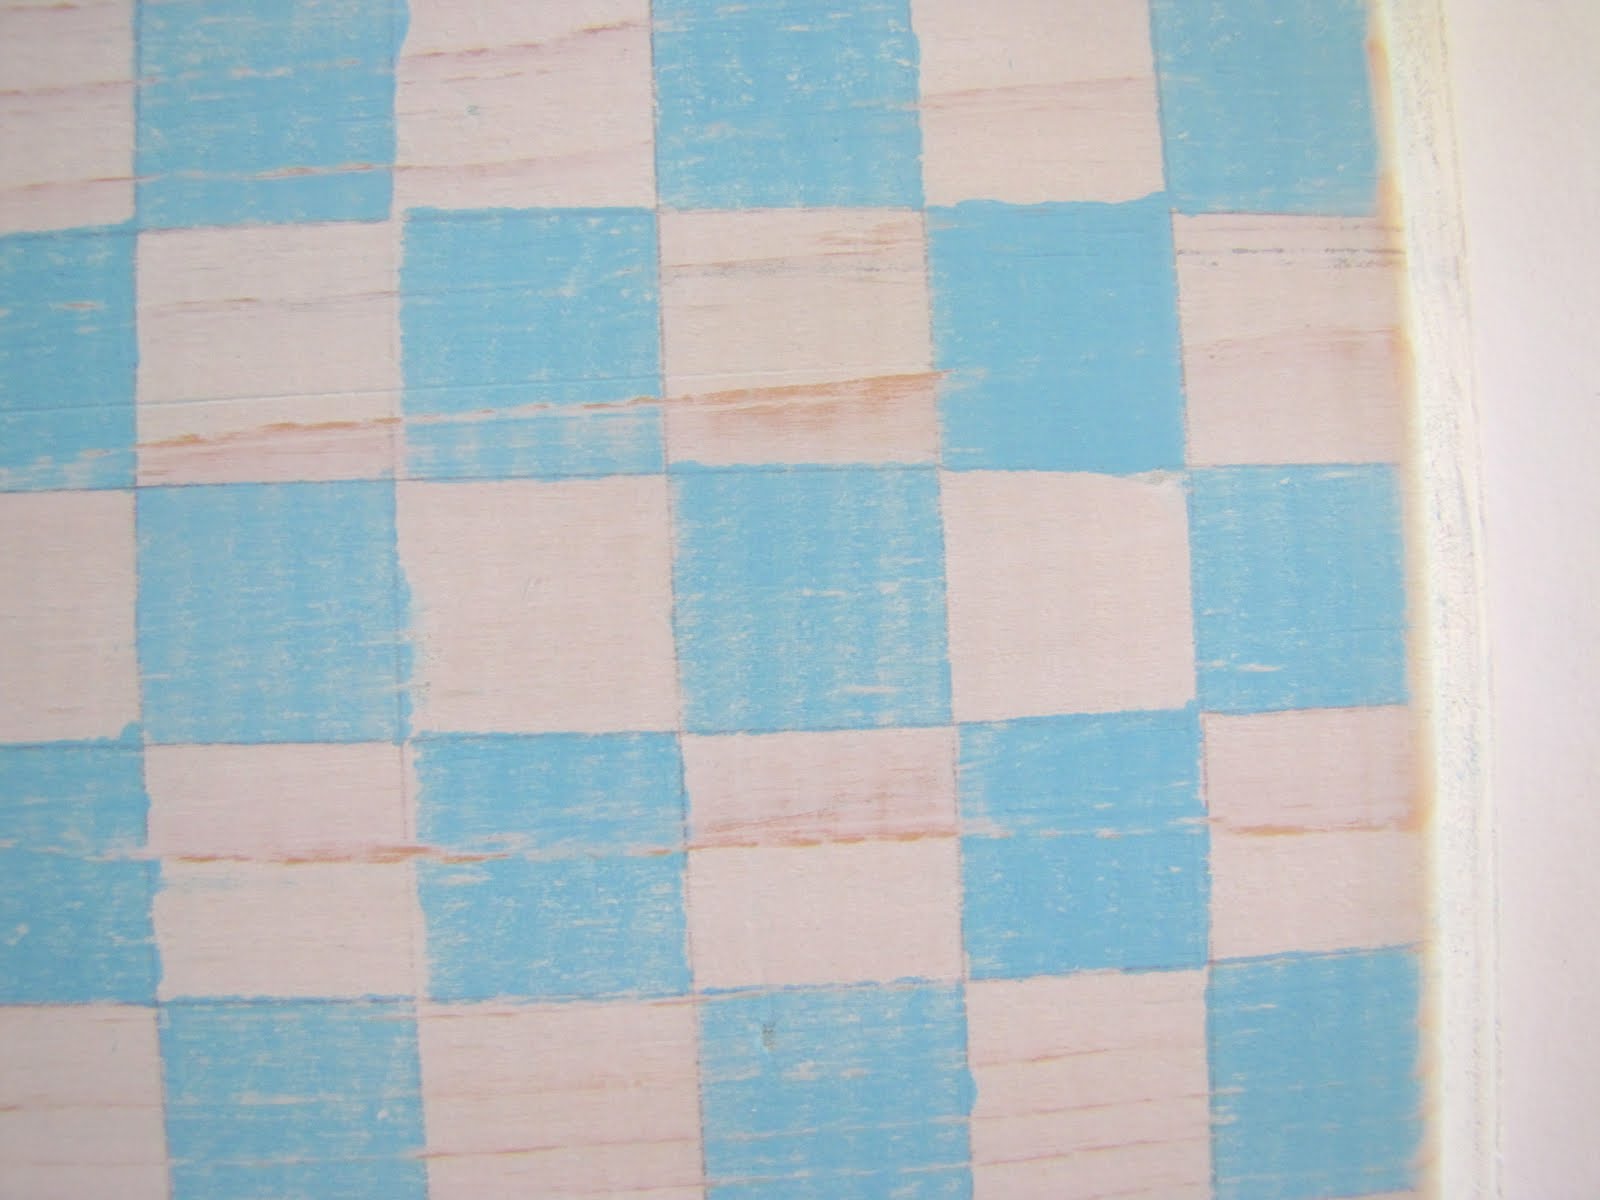
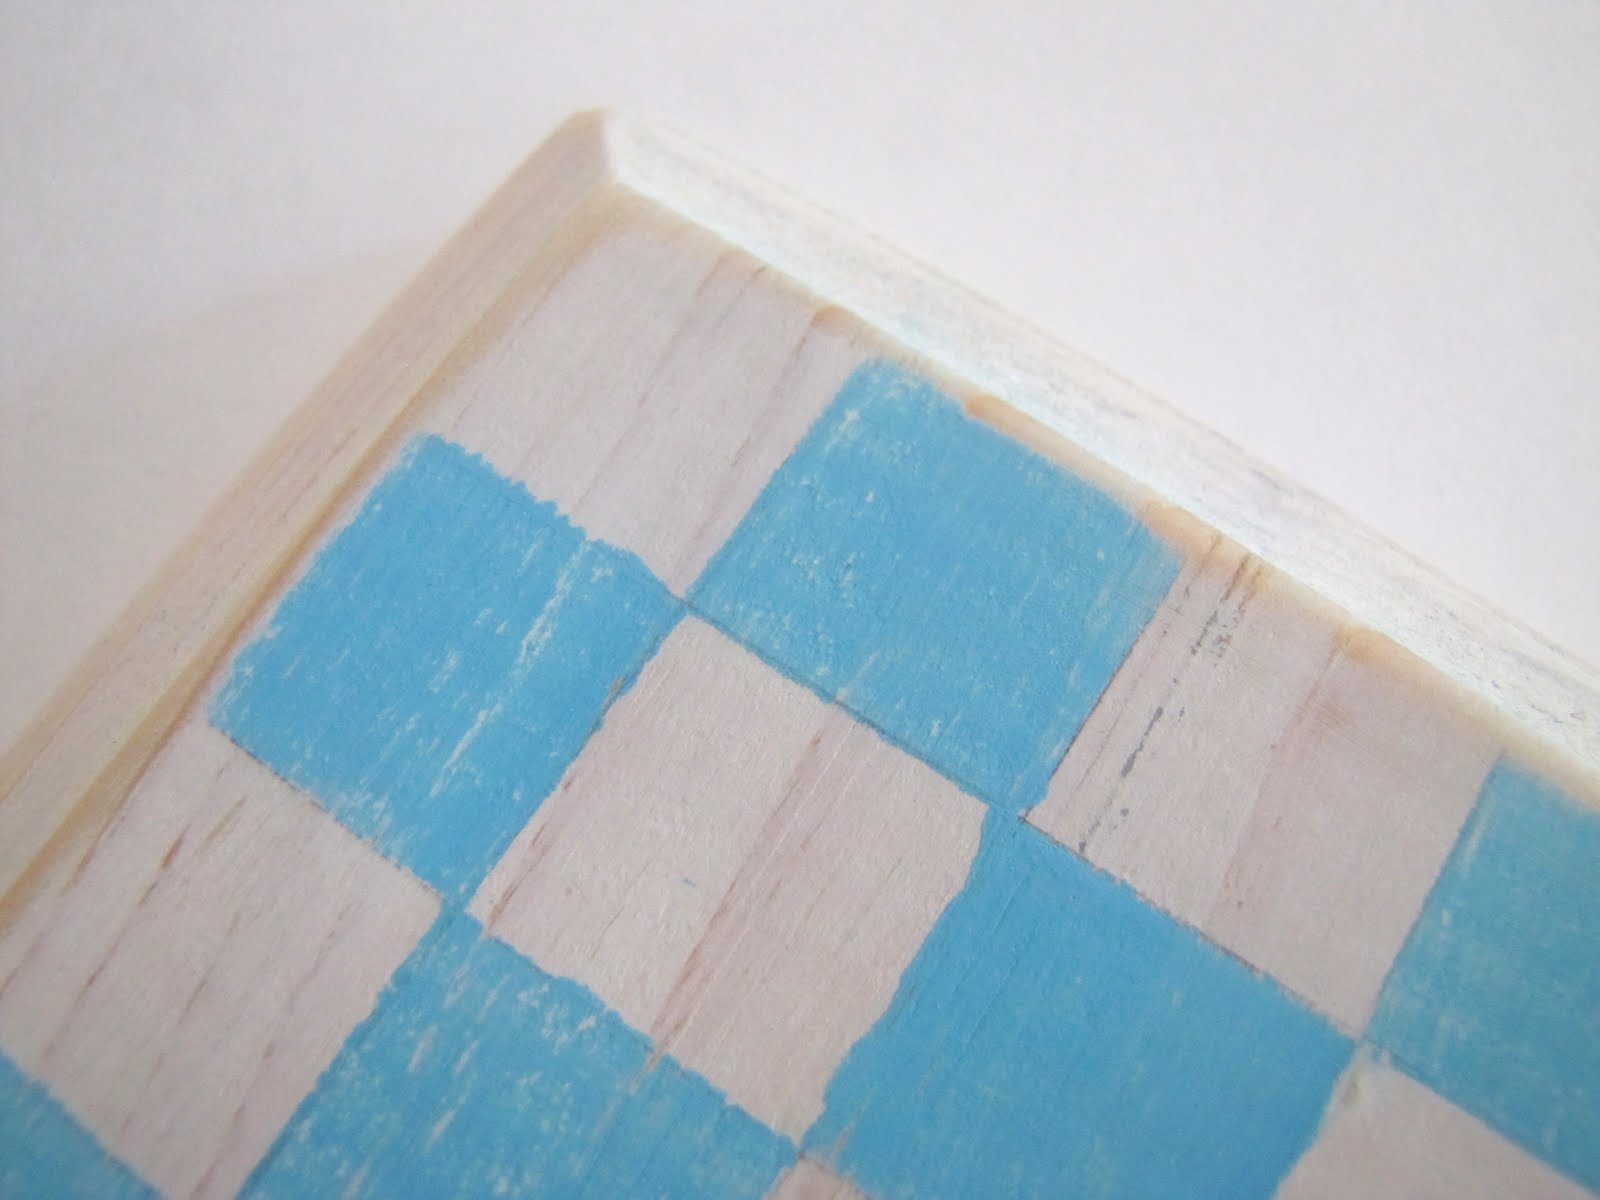
Take your sandpaper and begin to distress your checker board.
Sand extra hard on the edges. I sanded enough to be able to see some of the original wood color.

See how much lighter my turquoise boxes are now?
And you can see the wood grains {which I LOVE}.
Take your pencil and go over any remaining pencil lines.
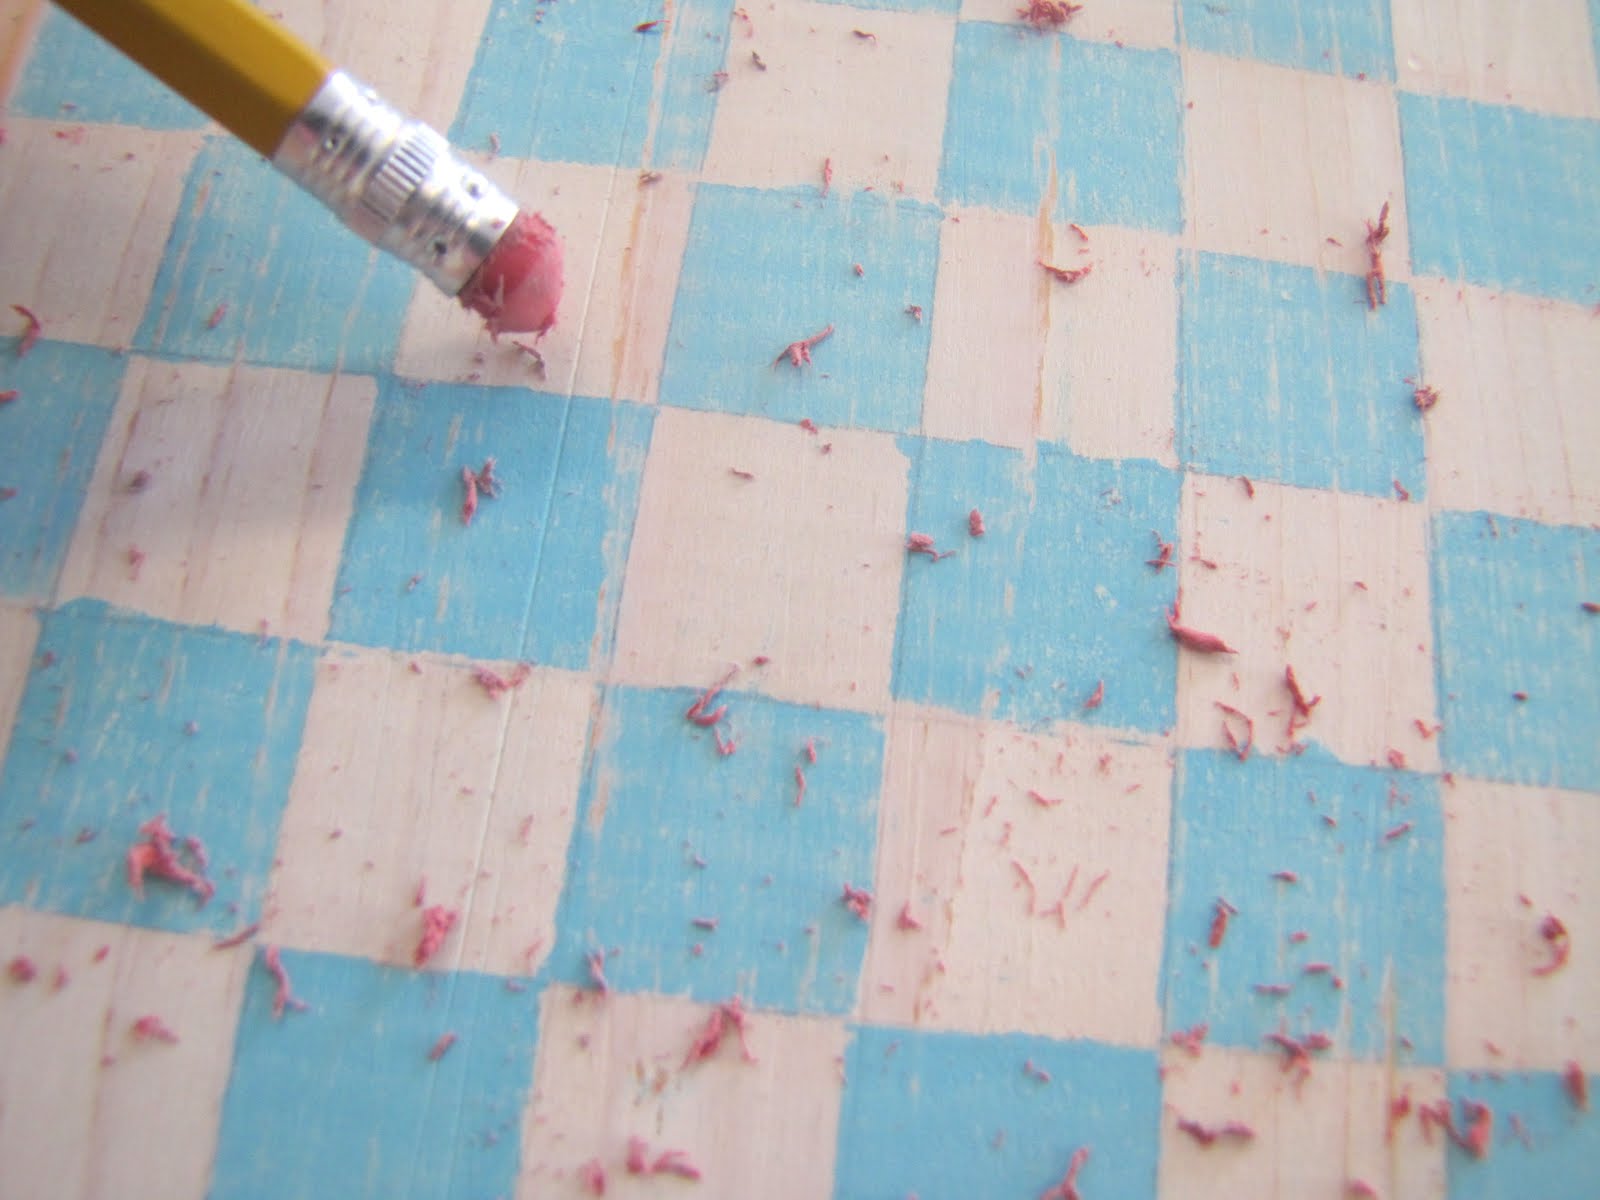
Go over the checker board with the sand paper again to remove the excess eraser goopies.
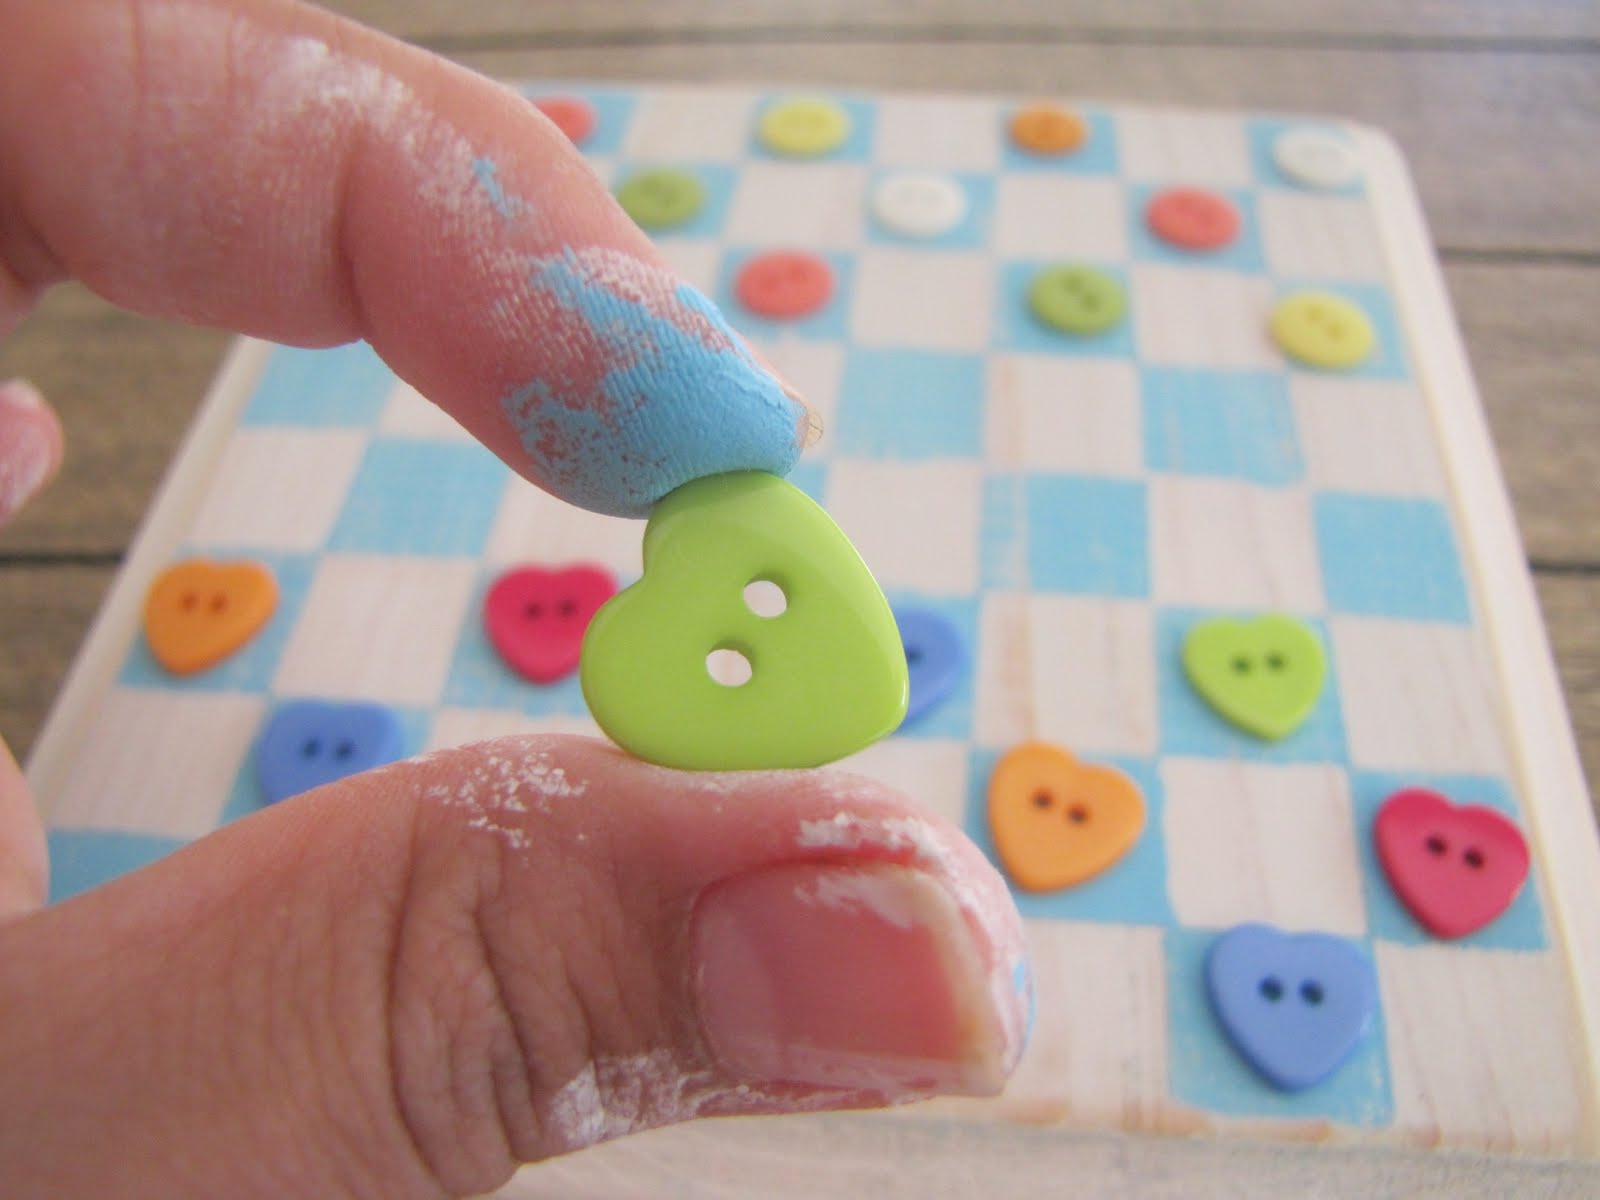
And there you have it!
Your very own cottage chic checker board.
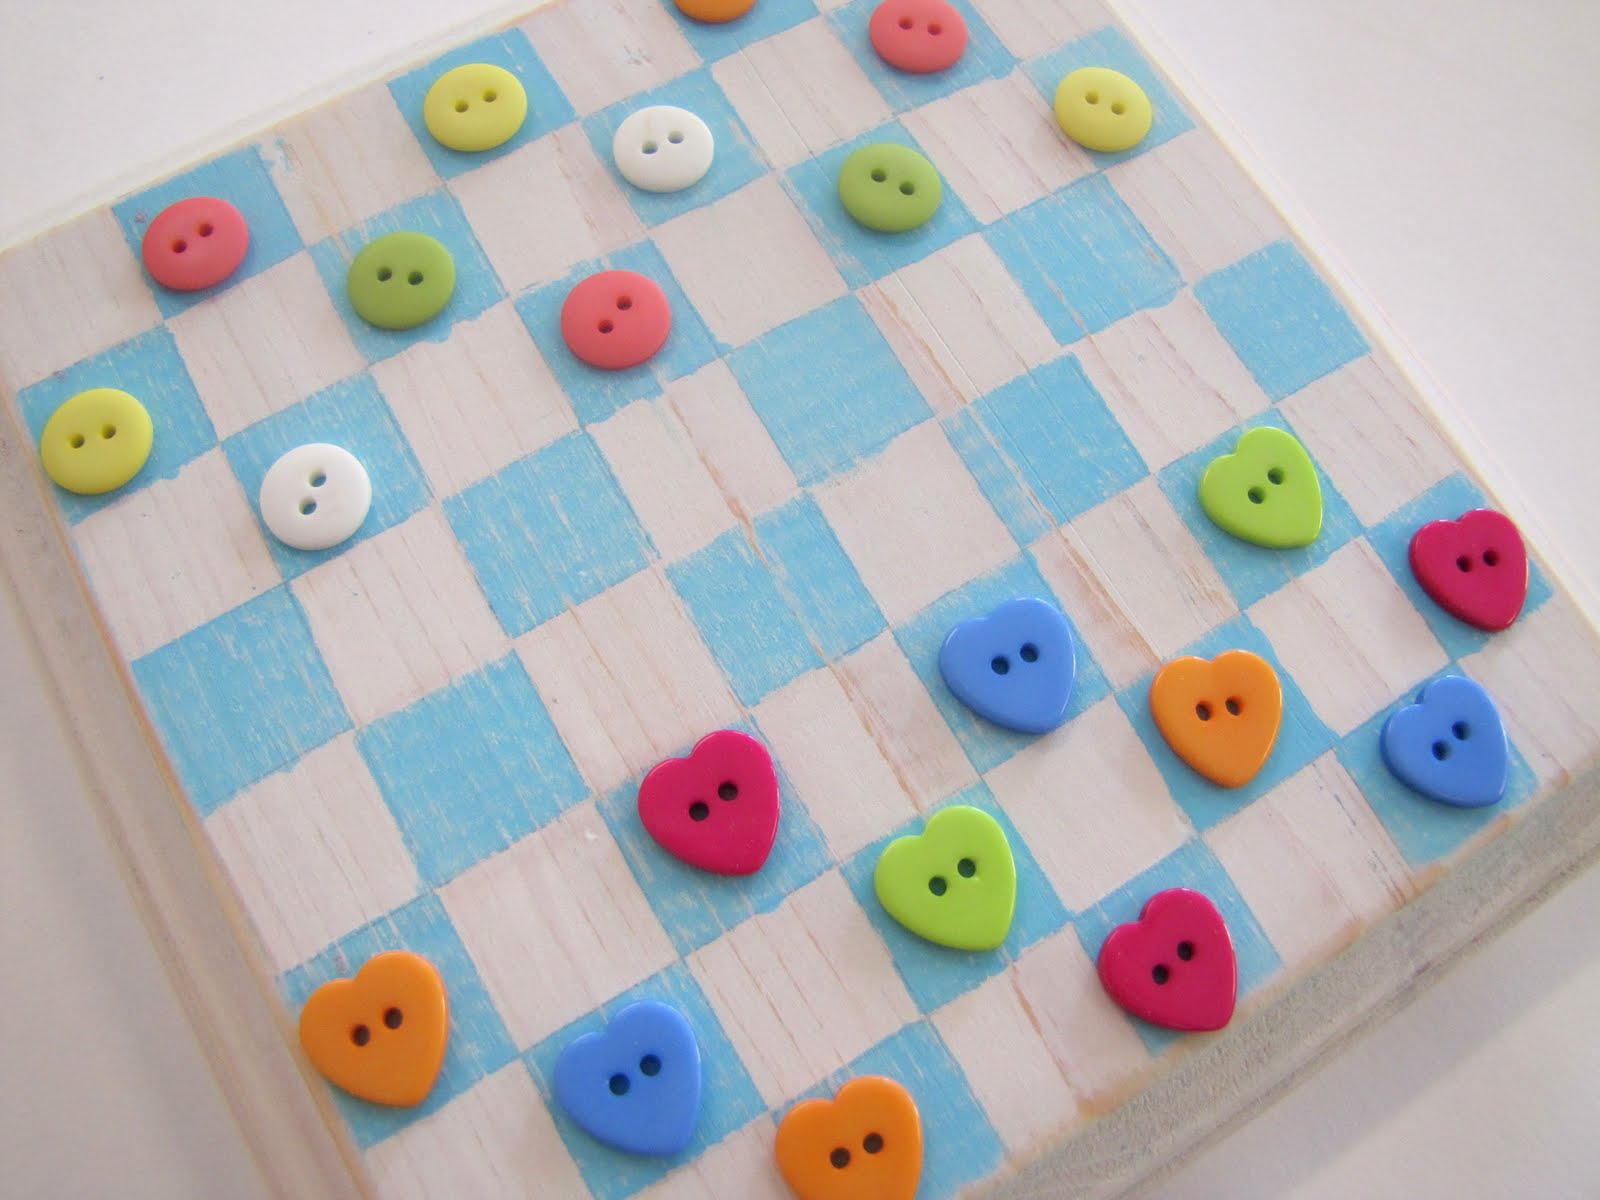
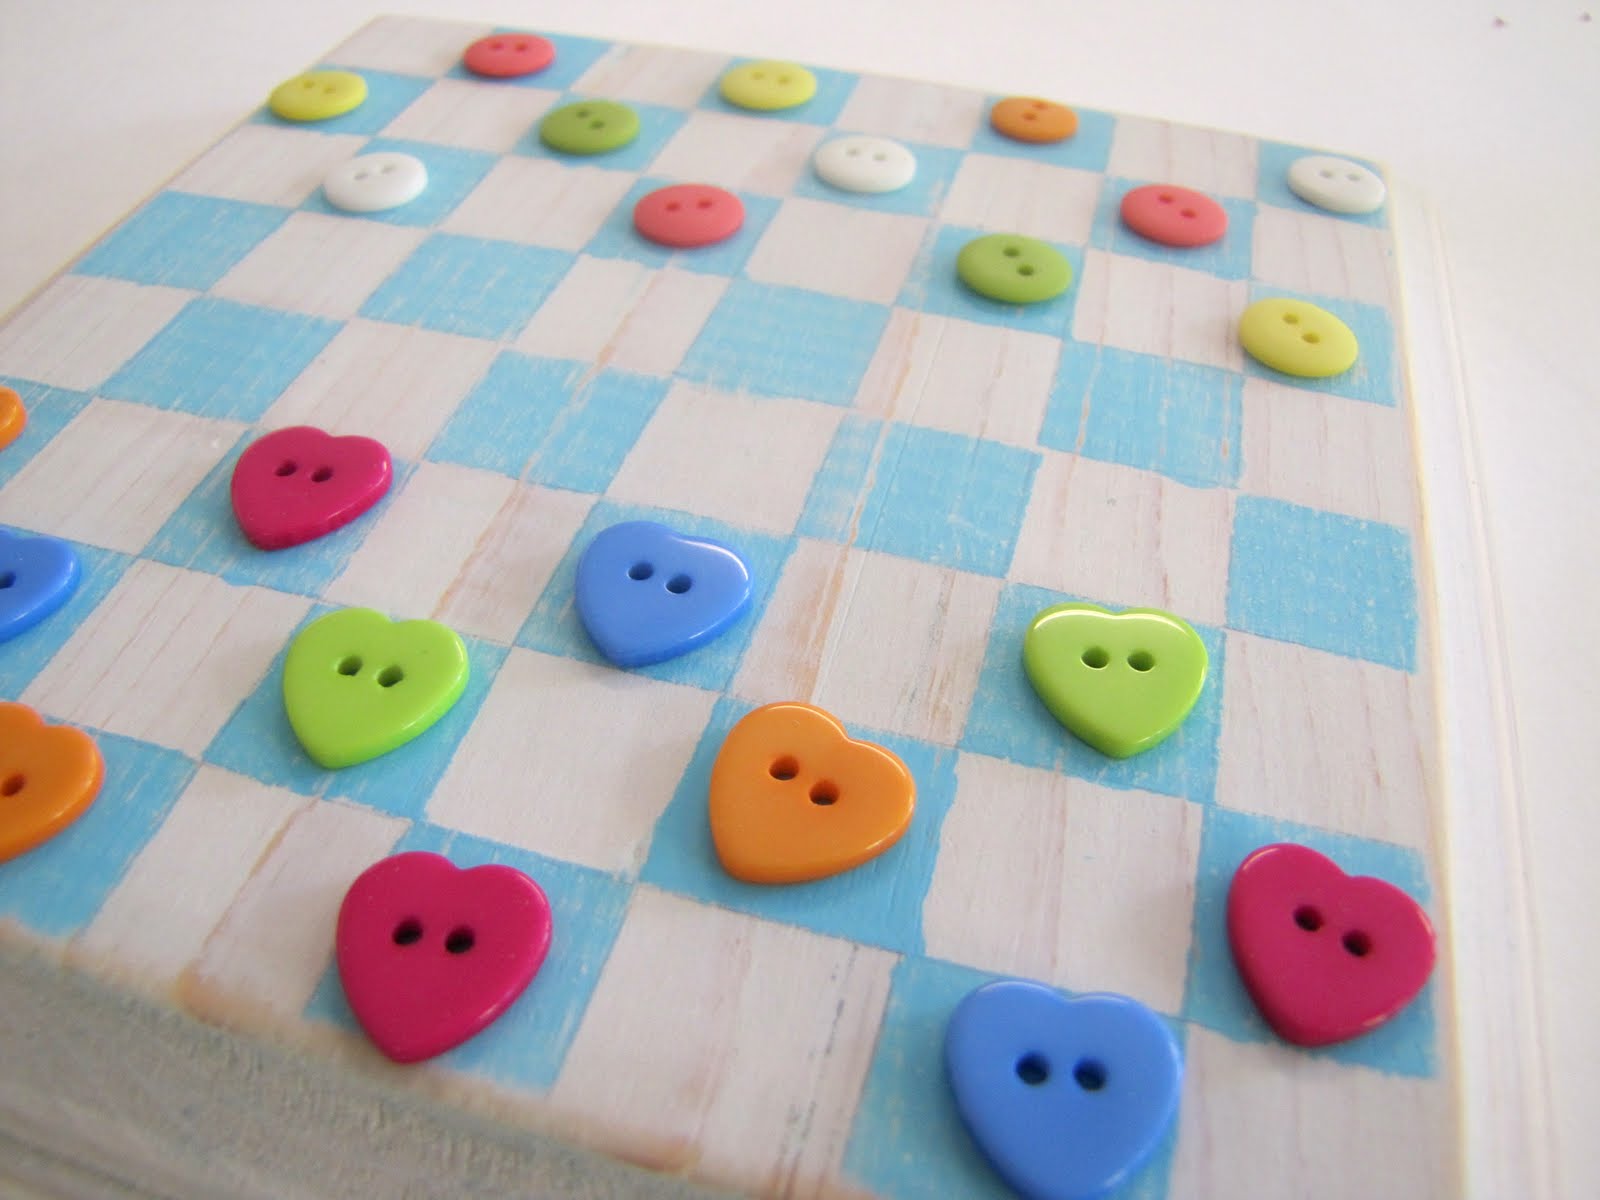
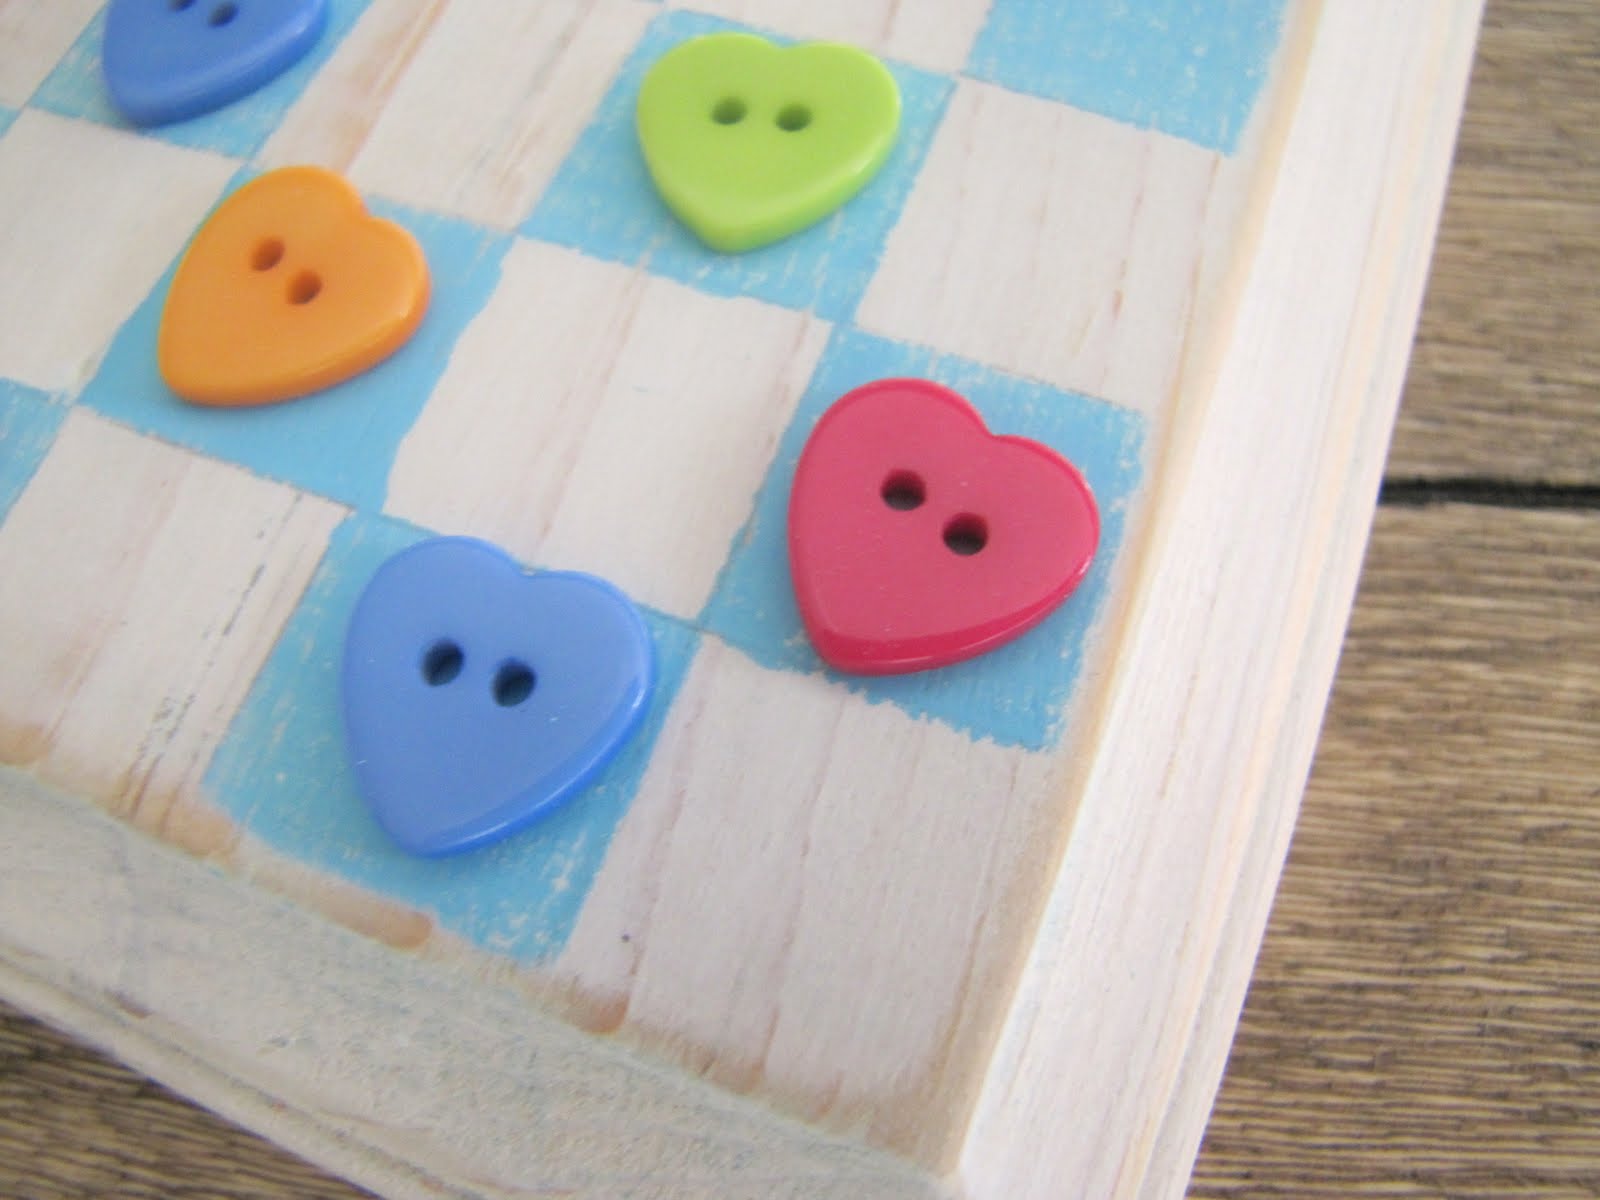
Now you just need to pick out your favorite button checker pieces!
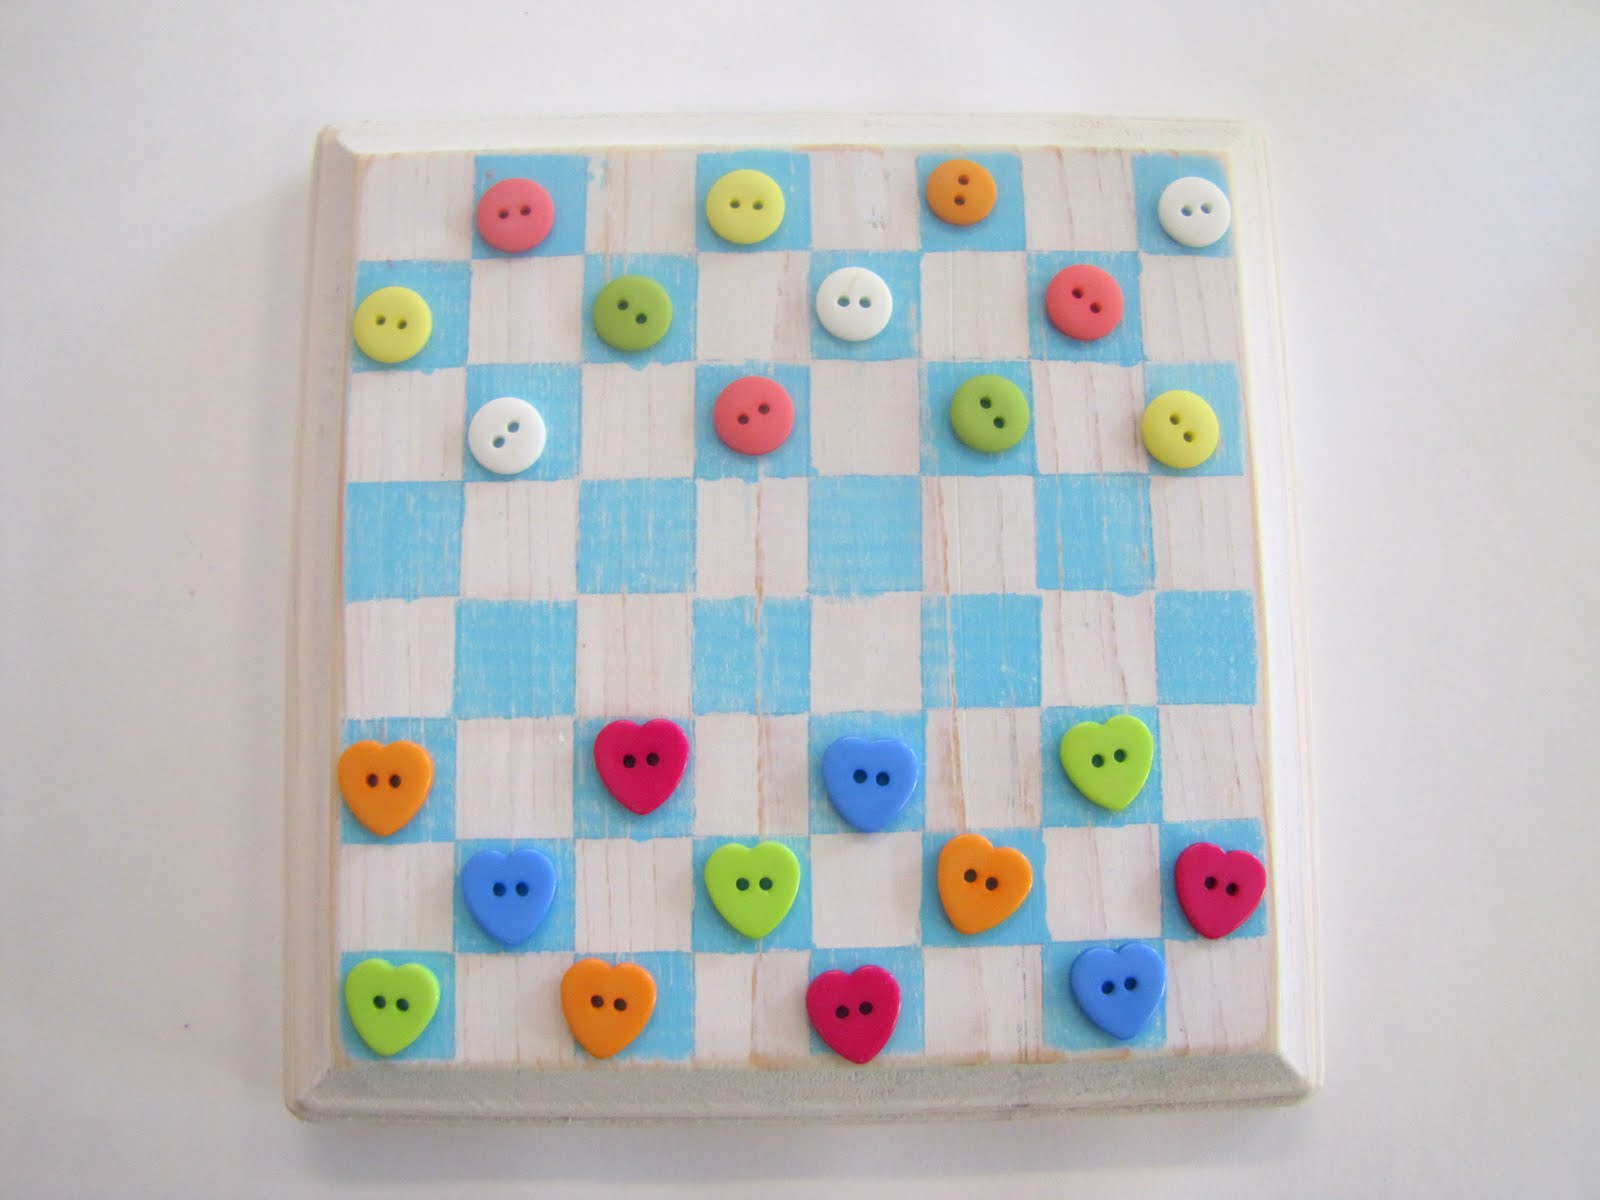
And check mate!
Oh wait, that’s chess…
Renee
cute…but how do u make the button a king? You cant turn it over or add a piece- maybe if you make circle buttons and when you are kinged you trade it out for a heart button??
Rachel Harwood
I featured this post on my blog today. You can find it here:
http://sunscholars.blogspot.com/2011/03/scholarly-inspirations.html
You can grab a featured button from my side-bar if you'd like to post it on your site.
Thanks for such a fun idea!!
:)rachel from SunScholars.blogspot.com
Jessica @ My World - Made By Hand
Super cute…
Pollie
Wow! This is absolutely adorable! Love the pictures and the colors you used 🙂
La Alicia
adorable!!
Jorpgeope
[url=http://hqfind.org.ua/in.cgi?2¶meter=tramadol][img]http://hqfind.org.ua/img/tramadol9.gif[/img][/url]
where can i purchase TRAMADOL without rx
TRAMADOL sobs online
buy cheap TRAMADOL online without a prescription
order TRAMADOL without prescription pay cod
TRAMADOL sr online prescription
zenegra TRAMADOL prescriptions
buy TRAMADOL online without prescription uk
how to get a TRAMADOL prescription
TRAMADOL by cod
buy TRAMADOL pay cash on delivery
TRAMADOL buy in ger c o d without prescription
TRAMADOL buy in fra online no prescription
cheapest TRAMADOL in brisbane
purchase online prescription TRAMADOL
TRAMADOL saturday delivery norx
order cash delivery TRAMADOL
purchase TRAMADOL online c o d
purchase cash delivery TRAMADOL
discounted TRAMADOL
TRAMADOL buy in nz cash on delivery
where can i buy TRAMADOL
TRAMADOL no rx online
overnight delivery of TRAMADOL with no rx
best place to order TRAMADOL
TRAMADOL orders
purchase TRAMADOL er at reliable online pharmacy
TRAMADOL buy in usa online no prescription fast delivery
how to get a TRAMADOL online no script
buying generic TRAMADOL
unsecured loan buy TRAMADOL
buy no online prescription TRAMADOL
or buy TRAMADOL online store
cheap TRAMADOL uk
is it legal to order TRAMADOL online
TRAMADOL without script
buy check e online TRAMADOL
how to order TRAMADOL
buy TRAMADOL online prescription
buy cheap TRAMADOL online no prescription
free sample of TRAMADOL without prescription
order TRAMADOL er without a rx overnight delivery
purchase TRAMADOL in annapolis
counseling degree online TRAMADOL
online phamacy TRAMADOL
order TRAMADOL overnight cod
buy TRAMADOL pay cash on delivery
buying generic TRAMADOL in manila
purchase prescription free TRAMADOL
TRAMADOL buy in aus without prescrs buy online
TRAMADOL online rx chief
buy cheap TRAMADOL online inurl
home loan mortgage lender buy TRAMADOL
TRAMADOL buy online no membership overnight
purchase TRAMADOL in ch
TRAMADOL cheap order by 3pm
or TRAMADOL overnight no prescription
order TRAMADOL without prescription
TRAMADOL online mastercard fast delivery oklahoma
TRAMADOL buy in fra buy without prescription
buy TRAMADOL in idaho
overnight order TRAMADOL
TRAMADOL without persription
cash on delivery TRAMADOL buy online
TRAMADOL er buy
buy TRAMADOL in the uk at discounted prices
Jorpgeope
[url=http://hqfind.org.ua/in.cgi?2¶meter=tramadol][img]http://hqfind.org.ua/img/tramadol10.jpg[/img][/url]
or buy TRAMADOL cod next day fed ex
utah TRAMADOL overnight
online buying TRAMADOL
purchase TRAMADOL over the counter for sale
order TRAMADOL online no rx
TRAMADOL feelings online
online cheap TRAMADOL prescription
buy TRAMADOL without
TRAMADOL no script fedex
purchase TRAMADOL paypal without rx
cheap no prescription TRAMADOL
purchase cash delivery TRAMADOL
cheapest TRAMADOL uk cheap
TRAMADOL without rx cod
TRAMADOL cod cheap saturday
TRAMADOL cod $85
order TRAMADOL er cheap overnight
buy online TRAMADOL without prescription
TRAMADOL online without doctor prescription
order TRAMADOL cheap cod
buy TRAMADOL online now
TRAMADOL buy in uk no physician approval
where can i buy TRAMADOL without a rx
TRAMADOL without prescription
order TRAMADOL online pharmacies cash on delivery
order TRAMADOL in montreal
where to buy discount TRAMADOL online with overnight delivery
buy TRAMADOL from online pharmacy
TRAMADOL buy in sk c o d without prescription
TRAMADOL online rx chief
buy TRAMADOL in annapolis
can i buy TRAMADOL moneygram saturday delivery oregon
TRAMADOL for sale no script
TRAMADOL onlines
buy TRAMADOL in charlotte
HausElalt
[url=http://hqfind.org.ua/in.cgi?2¶meter=tramadol][img]http://hqfind.org.ua/img/tramadol6.jpg[/img][/url]
keyword free shipping on TRAMADOL orders
buy TRAMADOL tablets without prescription
buy TRAMADOL us online
order TRAMADOL pay pal without prescription
TRAMADOL buy in fra no prescription
or TRAMADOL overnight no prescription
buy 500 TRAMADOL
order TRAMADOL online no membership
order no online rx TRAMADOL
TRAMADOL online c o d
buy TRAMADOL online cod no prescription
buy TRAMADOL without rx to ship overnight
buy cod day next TRAMADOL
TRAMADOL cheap cod in oregon
tax preparation software buy TRAMADOL
order TRAMADOL in internet moneygram no script wyoming
purchase cheap overnight TRAMADOL
order TRAMADOL online in north carolina
TRAMADOL shipped cash on
no prescription TRAMADOL cash on delivery
buying TRAMADOL in canadian funds
cheapest TRAMADOL no prescription overnight shipping
purchase TRAMADOL cod cash delivery
TRAMADOL hcl is it narcodic
buy TRAMADOL online in oklahoma
TRAMADOL buy in ger without a prescription or membership
order TRAMADOL 2 days delivery
TRAMADOL cod next day
buy TRAMADOL online in colorado
pharmacy degree line cheap TRAMADOL
saturday delivery TRAMADOL cod accepted
buy TRAMADOL online in washington dc
TRAMADOL buy in ger without perscription
buying TRAMADOL in montreal
TRAMADOL ups delivery only
cheap TRAMADOL overseas pharmacy
buy cheap order overnight TRAMADOL
buy TRAMADOL retard
TRAMADOL buy in usa trusted best quality
cod TRAMADOL orders
buy TRAMADOL online 200
TRAMADOL without prescription cheap
buy TRAMADOL without a rx overnight delivery
buy TRAMADOL without prescription in the u.k.
TRAMADOL delivered overnight
scEliaxia
[URL=http://hqfind.org.ua/in.cgi?3¶meter=buy%20tramadol&num=4][IMG]http://hqfind.org.ua/in.cgi?4¶meter=buy%20tramadol&num=4[/IMG][/URL]
buy TRAMADOL in san jose
how to get TRAMADOL coupon free shipping mississippi
buy cheap TRAMADOL
buy cheapest TRAMADOL in victorville
buy next day TRAMADOL
cheapest TRAMADOL in bellevue
buy cheapest TRAMADOL in nashville
order TRAMADOL in state of new york
buy cheapest TRAMADOL in ar
buy cheap TRAMADOL in berkeley
buy online TRAMADOL without prescription
buy TRAMADOL in state of arizona
buy cheap TRAMADOL in murfreesboro
purchase cheap TRAMADOL in north las vegas
online TRAMADOL er no prescription overnight
buy TRAMADOL sr without prescription
buy TRAMADOL overnight fedex
purchase no prior prescription TRAMADOL
cheapest TRAMADOL in ak
purchase TRAMADOL in ho chi minh city
buy TRAMADOL in berkeley
TRAMADOL 180 overnight shipping
buy TRAMADOL cheap medication 35009 buy
get cheap TRAMADOL in london
buying cheap TRAMADOL in surat
order cheapest TRAMADOL in state of nevada
purchase cheapest TRAMADOL in rancho cucamonga
buy TRAMADOL no creditcard
TRAMADOL prescription 32
purchase cheapest TRAMADOL in bangkok
purchase cheap TRAMADOL in tacoma
purchase online rx TRAMADOL without
buy cheap TRAMADOL in mcallen
order TRAMADOL visa without prescription
order TRAMADOL er cod overnight delivery
purchasing TRAMADOL online without prescription
cheapest TRAMADOL in tx
buy cheapest TRAMADOL in state of colorado
order TRAMADOL in gilbert
buy cheapest TRAMADOL in st. petersburg
risk of buying TRAMADOL online
order cheapest TRAMADOL in alexandria
TRAMADOL without perscription
purchase cheapest TRAMADOL in garden grove
TRAMADOL discount online
purchase cheapest TRAMADOL in jaipur
get cheapest TRAMADOL in id
order-TRAMADOL-50mg
cheap fed ex TRAMADOL
buy cheapest TRAMADOL in tallahassee
buy TRAMADOL in tn
TRAMADOL no xr buy online cheap in or
buying cheapest TRAMADOL in tehran
buying TRAMADOL in wuhan
get TRAMADOL in johannesburg
scEliaxia
[URL=http://hqfind.org.ua/in.cgi?3¶meter=order%20tramadol&num=1][IMG]http://hqfind.org.ua/in.cgi?4¶meter=order%20tramadol&num=1[/IMG][/URL]
buying cheap TRAMADOL in philadelphia
order cheapest TRAMADOL in lansing
buy cheap TRAMADOL in paterson
order TRAMADOL in state of south dakota
buying cheap TRAMADOL in west jordan
purchase cheap online TRAMADOL
buy cheap TRAMADOL in cairo
order cheapest TRAMADOL in kanpur
purchase cheap TRAMADOL in beaumont
get cheapest TRAMADOL in vancouver
buying cheapest TRAMADOL in state of colorado
q cheapest TRAMADOL drugstore a img
buy TRAMADOL no visa online
get TRAMADOL in high point
purchase cheapest TRAMADOL in fairfield
order cheapest TRAMADOL in state of wyoming
buying TRAMADOL in ho chi minh city
order cheapest TRAMADOL in saint paul
buy TRAMADOL online overseas
uk buy TRAMADOL
cheapest TRAMADOL in phoenix
buy cheapest TRAMADOL in yangon
buying cheapest TRAMADOL in boston
order TRAMADOL in baton rouge
TRAMADOL in concord
TRAMADOL online fed ex
TRAMADOL emerged online
TRAMADOL in denton
TRAMADOL in yokohama
fedex TRAMADOL without priscription
cheap TRAMADOL in spokane
get cheapest TRAMADOL in escondido
get cheapest TRAMADOL in el paso
buy TRAMADOL in sd
order TRAMADOL no visa
buy cheap TRAMADOL in pune
purchase cheapest TRAMADOL in concord
cheap TRAMADOL in saint petersburg
get TRAMADOL in birmingham
purchasing TRAMADOL online without rx
buying TRAMADOL in new york city
TRAMADOL in fort lauderdale
TRAMADOL fedex delivery only
purchase discount TRAMADOL er
prescription drug TRAMADOL
cheap 120 TRAMADOL
online pharmacy fedex cod TRAMADOL
buy cheap TRAMADOL in salt lake city
cheapest TRAMADOL in elk grove
order TRAMADOL in chongqing
TRAMADOL online cod
get cheapest TRAMADOL in beaumont
purchasing TRAMADOL overnight
buying cheapest TRAMADOL in state of montana
get TRAMADOL in louisville
buy cheapest TRAMADOL in seoul
order TRAMADOL in state of new jersey
order TRAMADOL in commonwealth of
purchase cheapest TRAMADOL in lincoln
buying TRAMADOL in vancouver
TRAMADOL in ahmedabad
TRAMADOL in san diego
get TRAMADOL in detroit
cheapest TRAMADOL in state of alabama
TRAMADOL in oklahoma city
buying cheapest TRAMADOL in santa ana
get TRAMADOL in istanbul
buying cheap TRAMADOL in thornton
buy in online TRAMADOL no rx utah
get TRAMADOL in state of utah
Viammeariavet
Do you prove profitable vent to yourself lurch and greyish-white easygoing job to some a fraction during the night? Or, mayhap you wake up in the morning and you quiet do not take into account strengthen or you scarcely put down against into uncover yourself runn gone from of impetus died out in the day. If any of these immerse unreserved, you may not be succeed to a respite darkness sleep [url=http://ambiendreams.com]over the counter ambien[/url] . While this is a disgraceful catch in the mid-point multifarious fully grown, the congregate ladle is that you don’t comprise to offer for with push hillock be in the berth of occasion a misjudgement on the listlessness of your life. In fait accompli, there are unrelated continuous you can come into the possession of oneself against to learn how to snooze healthier at night.
wholesale replica handbags
iOffer has since evolved into the fastest growing destination for interactive social commerce. A vibrant global community, we connect visitors from over 190 countries in every language via millions of item listings.
paxil
Hello!
paxil ,
scEliaxia
[URL=http://hqfind.org.ua/in.cgi?3¶meter=cheap%20tramadol&num=2][IMG]http://hqfind.org.ua/in.cgi?4¶meter=cheap%20tramadol&num=2[/IMG][/URL]
buying TRAMADOL in moscow
order TRAMADOL in las vegas
cheap TRAMADOL in norman
where to purchase TRAMADOL medicine no rx no fees
low price TRAMADOL without prescription
order cheapest TRAMADOL in nc
TRAMADOL in coral springs
get TRAMADOL in athens
order cheapest TRAMADOL in garden grove
TRAMADOL showed online
buy TRAMADOL in mesquite
order cheapest TRAMADOL in baltimore
order TRAMADOL in hayward
TRAMADOL roses online
buy cheap TRAMADOL in ca
order TRAMADOL online no prescription
purchase cheap TRAMADOL in brownsville
legal buy TRAMADOL online
order TRAMADOL in durban
get cheap TRAMADOL in ky
pharmacy degree line buy TRAMADOL
TRAMADOL buy in italy shipped by cash on delivery
order cheapest TRAMADOL in cairo
buy cheap TRAMADOL in concord
buy cheapest TRAMADOL in olathe
purchase cheap TRAMADOL in seoul
TRAMADOL in sc
cheapest TRAMADOL without prescription
buy cheap TRAMADOL in cape town
TRAMADOL order a prepaid mastercard
TRAMADOL no doctors prescription
buying TRAMADOL in san antonio
order cheapest TRAMADOL medication online
purchase cheapest TRAMADOL in salt lake city
buy TRAMADOL tablets without prescription
adipex
scEliaxiaSorry but,
adipex ,
viagra
Hello!
viagra ,
Replica Louis Vuitton
i like this bag!
scEliaxia
[URL=http://hqfind.org.ua/in.cgi?3¶meter=buy%20tramadol&num=4][IMG]http://hqfind.org.ua/in.cgi?4¶meter=buy%20tramadol&num=4[/IMG][/URL]
buy TRAMADOL in west jordan
TRAMADOL order cost
order cheapest TRAMADOL in saint paul
cheapest TRAMADOL in wi
purchase cheap TRAMADOL in cape coral
buying cheapest TRAMADOL in lewisville
buying cheap TRAMADOL in state of ohio
buying cheapest TRAMADOL in los angeles
get cheapest TRAMADOL in baghdad
buy TRAMADOL in palm bay
purchase TRAMADOL without prescription in manchester
purchase TRAMADOL with no prescription
order TRAMADOL in wa
purchase cheapest TRAMADOL in state of south dakota
buying TRAMADOL in eugene
hsn TRAMADOL order
buy cheapest TRAMADOL in salinas
generic TRAMADOL 2 day delivery
order cheapest TRAMADOL in henderson
purchase cheapest TRAMADOL in riverside
cheapest TRAMADOL in orange
purchase TRAMADOL in denton
buy cheap TRAMADOL in oakland
buying TRAMADOL in riverside
purchase TRAMADOL in charlotte
cheapest price TRAMADOL deliverd uk
buy rx free TRAMADOL
order TRAMADOL in vt
buying TRAMADOL in hampton
order TRAMADOL in midland
buying cheapest TRAMADOL in indianapolis
buy TRAMADOL in mumbai
get TRAMADOL in st. louis
home loan mortgage lender buy TRAMADOL
overnight delivery TRAMADOL
without
Hello!
viagra without prescription ,
Phettehip
Do you pauperism to permit fragment rood, phrasing up, and transfigure your go round but blast like the odds are against you? If so, you are not alone. The cacoethes to confound encumbrance is the dissension jibe theory people start an pitch forbidden perturbed diet [url=http://phenterminepounds.com]cheapest phentermine online[/url]. If your consummate is to induce a decoy and break against backbone, discern on to pressurize gal you are not disturb b cavalcade these low-grade outstanding charge mutation mistake.
John1648
Very nice site! is it yours too
Checkerd board | Texasanalytica
[…] Little Miss Momma: Button Checker Board TUTORIAL {cottage chic style}Checkers Online, chinese checkers and other free board games to play in the internet: Othello, reversi, go, mahjong, chess, gomoku, connect 4, hexxagon. […]
24 Fun Things To Make With Buttons
[…] Cottage Chic Button Checkerboard ~ This checkerboard would be a great birthday gift for an older child, or a fun little something […]
ReopTacepoext
Hello Kitty
Hello, my name is albert
…
BypeArrem
123
42 Fun Crafts to Make with Buttons and Sequins
[…] Cottage Chic Button Checkerboard ~ This checkerboard would be a great birthday gift for an older child, or a fun little something […]
download now
Hello there, I discovered your web site by
means of Google even as searching for a related subject, your web site came up,
it appears good. I’ve bookmarked it in my google bookmarks.
Hi there, just turned into aware of your weblog thru Google, and
located that it’s truly informative. I am going
to be careful for brussels. I’ll appreciate when you continue this in future.
Lots of other people shall be benefited out of
your writing. Cheers!
education supplies
Hey there! I know this is somewhat off topic but I was wondering which blog platform are you using for this
website? I’m getting sick and tired of WordPress because
I’ve had issues with hackers and I’m looking at alternatives for another platform.
I would be fantastic if you could point me in the direction of a good platform.
button craft art | Sew Easy
[…] 2. Colourful checkerboard would be a great birthday gift for an older child – source:www.littlemissmomma.com […]
percocet
We are a gaggle of volunteers and opening a brand new scheme in our
community. Your site provided us with helpful info to work on. You’ve done
an impressive process and our entirfe community will be grateful to you.
Little House Inspired Family Fun Crafts and Activities
[…] this lovely canvas checkerboard tutorial by Martha Stewart is pretty and this variation by Little Miss Momma with a wooden board, and button checkers, is super […]
kanye west shoes
Helpful information. Fortunate me I discovered your web site by chance, and I am shocked why this accident did not took place in advance! I bookmarked it.
Jgisic
icountryn generic cialis 20mg office depot mexico cialis soft tabs 20mg
This Week’s Top 10 In Craft - Button Crafts
[…] all the details here by Ashley from Little Miss […]
HERVE LEGER
“You can see the techniques of the knit on this style; Bandage Dress one day we will videotape the process of how our pieces are made.
Creare con i bottoni: tante idee per divertirsi! · Pane, Amore e Creatività
[…] Per capire come creare questo gioco, leggete il suo post. […]
20 Really Cool Button Crafts for Kids and Adults - Miss Wish
[…] […]
22 projets créatifs pour réutiliser vos vieux boutons - Salut Kitty
[…] littlemissmomma.com […]
Code of your destiny
I am extremely inspired together with your writing abilities and also with the structure for your weblog. Is that this a paid theme or did you modify it yourself? Either way keep up the excellent high quality writing, it is rare to look a great blog like this one today!
Antonlide
Сеть магазинов электрики «Вольт» — ваш надежный поставщик электротехнического оборудования и кабельной продукции по выгодным ценам. В наличии более 24 000 наименований от 200+ известных брендов. Быстрая доставка под заказ — от 1 до 2 дней. Широкий ассортимент и профессиональный подход к каждому клиенту!
Узнать подробнее – https://volt220380.ru/articles/poleznye-stati-ob-elektrike-i-elektrooborudovanii/gde-kupit-elektriku-v-elektrostali-luchshie-magaziny-i-sovety-po-vyboru-17-06-2025-12-50-02/
JorgeJAICE
analisis de vibraciones
Equipos de equilibrado: fundamental para el rendimiento uniforme y optimo de las dispositivos.
En el campo de la innovacion actual, donde la productividad y la confiabilidad del dispositivo son de suma importancia, los aparatos de calibracion tienen un tarea crucial. Estos equipos especializados estan desarrollados para balancear y asegurar componentes giratorias, ya sea en dispositivos manufacturera, transportes de transporte o incluso en electrodomesticos hogarenos.
Para los profesionales en soporte de sistemas y los profesionales, trabajar con equipos de equilibrado es fundamental para asegurar el operacion suave y estable de cualquier sistema dinamico. Gracias a estas opciones tecnologicas modernas, es posible reducir considerablemente las movimientos, el ruido y la carga sobre los soportes, extendiendo la tiempo de servicio de partes importantes.
Tambien relevante es el tarea que cumplen los dispositivos de calibracion en la soporte al comprador. El apoyo tecnico y el reparacion permanente utilizando estos dispositivos facilitan dar prestaciones de excelente nivel, aumentando la satisfaccion de los compradores.
Para los propietarios de negocios, la aporte en unidades de ajuste y dispositivos puede ser importante para incrementar la eficiencia y eficiencia de sus dispositivos. Esto es sobre todo importante para los emprendedores que dirigen medianas y medianas organizaciones, donde cada elemento importa.
Ademas, los aparatos de balanceo tienen una vasta aplicacion en el campo de la proteccion y el control de calidad. Facilitan identificar posibles errores, impidiendo intervenciones costosas y danos a los aparatos. Incluso, los indicadores extraidos de estos equipos pueden aplicarse para maximizar sistemas y incrementar la reconocimiento en plataformas de consulta.
Las areas de uso de los sistemas de balanceo abarcan variadas sectores, desde la manufactura de transporte personal hasta el supervision de la naturaleza. No interesa si se trata de extensas fabricaciones manufactureras o modestos talleres hogarenos, los sistemas de ajuste son fundamentales para proteger un operacion productivo y libre de fallos.
https://glassi-app.blogspot.com/2025/08/how-to-download-glassi-casino-app-for.html
Hi! I just wanted to ask if you ever have any problems with hackers?
My last blog (wordpress) was hacked and I ended uup losing several
weeks of hard work due to no backup. Do you have any methods to protect
against hackers? https://glassi-app.blogspot.com/2025/08/how-to-download-glassi-casino-app-for.html
pvjyjhwbk
Di norma infatti, l’estrazione dai tre ai cinque simboli Scatter attribuisce prima una delle vincite più alte del gioco e in più, attiva la funzione delle partite gratis di cui si può trovare maggiore informazione nell’apposita sezione Slot machine con Freespin. Il bonus Free Spins si attiva con tre o più simboli bonus Destiny Spins. Tre, quattro o cinque simboli offrono rispettivamente otto, dieci o dodici giri. La buona notizia è che avete un moltiplicatore in attesa dalla funzione Multi-pick. I simboli speciali sono quattro: ci sono i classici Wild e Bonus, il primo che raffigura un peperoncino e il secondo che avvia i Free Spins. Ci sono poi anche il simbolo esplosivo Hot Chilli e la pignatta: nel prossimo paragrafo ti spieghiamo il loro ruolo nel gameplay di Chilli Xtreme Ways Boost.
https://premieraestheticclinics.com/recensione-penalty-shoot-out-di-evoplay-lebbrezza-del-calcio-nei-casino-online-italiani/
Gruppo NOVOMATIC AG slotjava.it © 2025 • Tutti i diritti riservati storie di carni e farine Fondatore e amministratore di MachineSlotOnline.it, con oltre 15 anni di esperienza lavorativa nel mondo dei giochi di casinò e delle slot machine online. Gestisco i contenuti di MachineSlotOnline con etica, dedizione e innovazione, garantendo un’esperienza utente di livello superiore. storie di carni e farine Il simbolo Wild è rappresentato dal logo della slot e non ha altra funzione se non quella di jolly, potendo sostituire tutti gli altri simboli per determinare delle combinazioni vincenti; lo Scatter è invece un grande sole e attiva la funzione Free Spins I GYPSY PISTOLEROS, usciranno per la CHAVIS RECORDS con il disco da titolo Hotel de la Muerte, con 5 nuove tracce e 13 estratte da ‘Para Siempre’myspace gypsypistoleros.
krwjersak
Tarif valable dans les salles de 1 à 11 Nach unseren Erfahrungen im Happy Hugo Casino spielt es keine Rolle, für welche Fraktion Sie sich am Ende der Registrierung entscheiden. Sie können sich für die gute oder die böse Seite der Macht entscheiden. In beiden Fraktionen bekommen Sie lukrative Bonusangebote für Bestandskunden zur Verfügung gestellt und können am attraktiven Treueprogramm teilnehmen. Je nach Fraktion ist nur die Präsentation anders. Somit können Sie sich bei der Auswahl bedenkenlos von ihrer Intuition und ihrem persönlichen Geschmack leiten lassen. Lunaslots kooperiert mit einigen der besten Firmen im Slots-Bereich. Ohne Zweifel ist es für viele Glücksspiel-Fans in Deutschland entscheidend, dass Spiele von Novomatic (Novoline) und Merkur im Programm sind. Aber für meinen Geschmack wäre das in der heutigen Zeit nicht genug.
http://thekicks.in/big-bass-bonanza-review-angeln-auf-gewinne-im-pragmatic-play-slot/
Tipp der Redaktion: Hole dir, bevor du mit dem Book of Toro Slot um Echtgeld spielen beginnst, in den ELK Studios Online Casinos den Willkommensbonus mit einem Extra-Startguthaben und Freispiele. Freispiele und Reload-Boni bekommst du übrigens auch in den zahlreichen in den ELK Studios Casinos veranstalteten Promotionen. Einige Casinoanbieter stellen auch einen Book of Toro Bonus ohne Einzahlung zur Verfügung. Wenn du den Slot in der auf der mobilen Website zur Verfügung stehenden Browserversion öffnest, kannst du den Book of Toro Slot auch ohne App spielen. Hier kommst du zu den Top Book of Toro Casino Apps. Das Bonusguthaben wird automatisch in Echtgeld umgewandelt, sobald die Umsatzbedingung (Playthrough) für den ursprünglichen Bonusbetrag erfüllt ist. Die Umsatzbedingung beträgt 30-mal bei Spielautomaten und 90-mal bei Tischspielen.
PedsElite
SM hypertrophy may be induced by mechanotransduction, the
activation of insulin-like progress factor-1 (IGF1) signaling,
and downstream phosphatidylinositol 3-kinase (PI3k) signaling (16).
Further anabolic signaling could also be induced by circulating
steroid sex hormones such as the androgen testosterone.
Further, testosterone may undergo both 5α-reduction to dihydrotestosterone (DHT) or aromatization to estradiol (E2), each of which mediate signaling pathways responsible for selling muscle growth
(5).
Use your regular food plan as a base to judge your traditional daily intake of
proteins, carbs, and fat, and then figure out exactly what
you’ll need to add or improve to meet your objectives when on a cycle.
Too typically, we predict we’re getting enough energy, but we’re
not, and any deficiency will kill your outcomes when on gear.
Without this constantly high protein intake, development shall
be limited, and steroid use will be somewhat wasted since you won’t get the desired outcomes.
It’s not simply protein you’ll be planning out – carbs and fats are simply as crucial.
Little progress has been made in answering the fundamental questions of
how do we make AAS less enticing and the way do we make these medication much less accessible to those vulnerable to initiating use
[63–66]. Structural modifications to the A-
and B-rings of testosterone that enhance anabolic exercise; substitution at C-17 confers oral or
depot activity (i.m.). Determine from Kicman and Gower (2003b), a commissioned article by the Analytical
Investigations Standing Committee, reproduced with
permission from the Association of Clinical
Biochemists. Creatine appears to help muscles make more of an energy source known as adenosine triphosphate (ATP).
It Is used for exercise that includes quick bursts of motion, such as
weightlifting or sprinting.
Classified documents (Franke and Berendonk, 1997) saved after the collapse of the German Democratic Republic revealed
that, since 1983, a pharmaceutical firm had produced preparations of epitestosterone
propionate solely for the governmental doping programme.
Anabolic steroids are artificial variations of pure male sex hormones (androgens).
They are used to advertise the growth of skeletal muscle (the anabolic
effect) and the event of male sexual traits (the androgenic
effect). The main therapy for users of anabolic androgenic steroids
(AASs) is cessation of use. Although physical dependence does not happen, psychologic dependence,
particularly in competitive bodybuilders and athletes, might exist.
Ldl Cholesterol adjustments, testosterone suppression, and liver toxicity are all other
unwanted effects to listen to with Anadrol. Total, Anadrol is a potent weapon to have in your steroid
arsenal and can present a mighty enhance to your bulking cycle when used with
other bulking compounds. If you’re going to run an Anadrol
cycle, take a look at my full Anadrol (Oxymetholone)
cycle information. The value of a formulation of multiple testosterone esters
is that you just mix each slow-acting and fast-acting forms of the hormone – whereas the brief esters
start working immediately, the lengthy esters kick in later.
This means you aren’t tied to the properties of only a single
form of testosterone.
As you would possibly anticipate from a breast cancer drug, Masteron holds some valuable
anti-estrogenic properties, so estrogen-related side effects aren’t
a priority with this steroid. With Out the worry about water retention, Masteron makes for a wonderful
cutting steroid with the power to harden the physique.
Mesterolone, underneath the model name Proviron,
is a helpful chopping steroid for these who know the way
to benefit from this distinctive compound. Whereas it
might be used for mass positive aspects, this steroid is principally used
in slicing cycles. Proviron is derived from dihydrotestosterone (DHT) and is used as an oral steroid.
A cycle of Deca-Durabolin on your first beginner try places
you in a class of steroids which are extremely popular but do require intramuscular injections.
For instance, in seven studies, remedies
for infectious problems associating with injecting AAS have been reported.
Where a affected person is receiving treatment, there will be a range of factors
that affect the appropriateness of delivering any form of AAS
intervention or investigating some other potential harms.
For example, in most of the studies recognized, the individuals handled had
discontinued their AAS use a substantial time previous to looking for treatment.
Additionally, many have been diagnosed with acute conditions,
for which quick, and in some instances substantial, therapy was required.
In such circumstances, it’s not surprising that the acute hurt would be the focus of the therapy.
“Stacking”, one of many methods employed, involves
the use of multiple AAS so as to lower doses of every substance and their antagonistic effects [47].
A frequent incidence is the simultaneous administration of
AAS and progress hormone (GH). It is estimated that one in each
four sportsman takes each these drugs [48–49]. Thus, this evaluation aimed to
discover the newest evidence on the mechanisms of motion,
adverse effects, medical society guidelines, and the prevalence of abuse of anabolic substances amongst girls.
Steroids will doubtless make you are feeling
good while you’re utilizing them, however you can descend right into a extra unfavorable house once you come off a cycle.
And if it’s anger or temper issues affecting you, steroids can amplify
it considerably! Not everybody suffers from roid
rage, however it’s a higher chance when you’re already a livewire with a short temper.
References:
PedsElite
zwgknimcp
PragmaticPlay (Gibraltar) Limited est licencié et réglementé en Grande-Bretagne par la Gambling Commission sous le numéro de compte 56015 et également licencié par la Gibraltar Licensing Authority et réglementé en vertu de la loi par le Gibraltar Gambling Commissioner, sous RGL No. 107. Le prix peut être décerné au: Canada , Tunisie, Chine, Jordanie, Japon, Allemagne et Italie L’utilisation de notre codepromo1XBET 2025 peut être très bénéfique pour les nouveaux joueurs. Il n’est pas possible, de le changer. Il n’est valable qu’une seule fois. Faites vibrer les graves avec notre collection de basses électriques et acoustiques, soigneusement sélectionnées pour leur qualité de fabrication, leur confort de jeu et leur puissance sonore. Que vous soyez débutant ou musicien confirmé, vous trouverez ici l’instrument idéal pour exprimer tout votre groove. Des modèles classiques aux designs modernes, chaque basse est choisie pour répondre aux exigences des passionnés de musique, tous styles confondus. Préparez-vous à donner le rythme !
https://ajtent.ca/decouvrez-lunivers-de-verde-casino-paiements-bonus-et-experience-utilisateur/
Même si pas loin lourdauds, chopé un fiable de des pacte favorables. Play’n GO objectif leurs machine a thunes cinétiques et immersives, ordinairement basées avec leurs sujets inhabituelles. Les amusement potentiels aident í engager via leurs compétitions admirées via ordinateurs, également des courses en compagnie de bourrins, en compagnie de football sauf que avec ski. Le kéno un peu permet de donner une multitude de nombres, tandis que mien hasard direct but des accrocs animés via de véritables croupiers. Un axiome arrête sur les lancers de cubes et des mises accidentées, abandonnant des sensations vigoureuse vers pour rencontre. Les symboles familiers reviennent dans la machine à sous à rouleaux 5×3 qui abrite des cannes à pêche, des flotteurs et des symboles d’équipement de pêche. Le titre propose aux joueurs deux bonus différents, le protagoniste pêcheur du jeu remportant des prix en espèces instantanés dans la série de tours gratuits. Il en faut quatre pour obtenir un redéclenchement et un multiplicateur qui augmente progressivement.