


Mod Podge Magnet Tutorial
The pictures didn’t turn out as well as I had hoped, but I can promise you these magnets are cute as pie in person–and they only take 5 minutes and a few bucks to make.

Here’s what you’ll need:

Supplies:
glass beads {flower section at Michael’s}
your favorite scrapbook paper
magnet strips
Mod Podge
scissors
First…
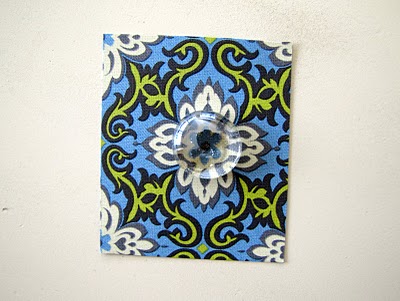
Decide where you want to place your magnet on the scrapbook paper.

Apply the Mod Podge to the backside of a glass bead.

Place on the paper.
Don’t worry that you can see the white Mod Podge–it will dry clear.

See, in just a few short minutes it has dried clear.

Glue on the remaining beads and let dry.

Now cut away the beads from the paper.


Now take your magnet strip and cut down to fit on the back of your beads.


Remove the white adhesive paper and stick to the back of the magnets.

Then put them on your favorite magnetic surface {or package them up as a fun little gift}.


Happy Crafting!
I will be linking this project to these link parties!
Book Page Magnets | {paisley boulevard}
[…] saw this super easy and way cute little craft over at Little Miss Momma (for real, is there anything not adorable over there?!) and I thought I’d try it. I needed […]
DIY Flip Flop Glass Magnets | The Fashionista's Guide to Saving
[…] stumbled upon this tutorial by one of my favorite bloggers, Littlemissmomma.com, and had to try it at once. What I like best about these adorable DIY magnets is once you have […]
Tracey @ My-CreativiT
Hello Ashley, I wanted to let you know this was the inspiration for one of my crafty gifts this year and I have provided a link to your project in my recent tutorial. Thank you for the inspiration – Tracey from My-CreativiT
http://my-creativit.blogspot.com/2013/02/monogram-magnets.html
microsoft windows 10 help support
Great creativity! I love this blog page and your Idea.Am here to inform everyone about this useful Online institute through which you are able to know about how to work windows 10 Desktop.Thank you guys.
Chanchal ji
Such a amazing work dear really very awesome creativity http://robloxrobuxtix.com Thanks for sharing this .
HERVE LEGER
Herve Leger, Oktoberfest outfit people tend to wear our collections together, as one piece. But I like them as separates; it’s almost cooler,” she says. “I would put this jacket with a pair of jeans or a work skirt. And of course it all but if you’re in L.A.
26q60
can you buy generic clomid online buying cheap clomid tablets where can i buy clomiphene without prescription where to get clomid tablets clomid medication effects can i purchase cheap clomiphene pills can i purchase generic clomid without insurance