


Blogging Tips:
How to Add Pages to your Blog
A few months ago Blogger added this awesome new feature that allows us bloggers to easily add pages to our blogs–hooray!
Page tabs allow your readers to quickly find the information they are looking for on your blog. For example, my page titled “Tutorials” takes readers directly to my complete list {and links} of tutorials–rather than making my readers search through my archives.
Here are some page ideas:
About Me
Contact
Best Of
Favorite Posts
Advertising
Blogs I Love
Link Parties
My Etsy Shop
My Buttons
Etc…
Here’s how you create your own pages:
1. Log in and go to your blogger dashboard. Select the blog you want to add pages to. Now, click on the tab titled “Posting” {it’s the first tab}. Next, click on the “Edit Pages” tab {see red circle below}.

2. Click on the blue “new page” button.
Just like you were creating a new post, create a title for this page and insert the content you want to be included. Then click the “Publish Page” button at the bottom of the page. This is the next screen that will appear.

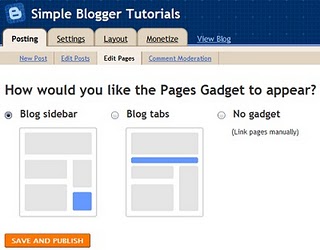
Decide if you want your page tabs be in a row across the top of your blog or on your sidebar, and then check that circle. Then click the orange “Save and Publish” button.
Continue these same steps for any additional pages you would like to add. Blogger allows up to 10 pages.
For additional {and more complex} information on how to add links to your page tabs click HERE.
Hope this helps a bit!
This TIP brought to you by a sweaty baby on his way home from the Pumpkin Patch:
