DIY Painted Mason Jar Vases

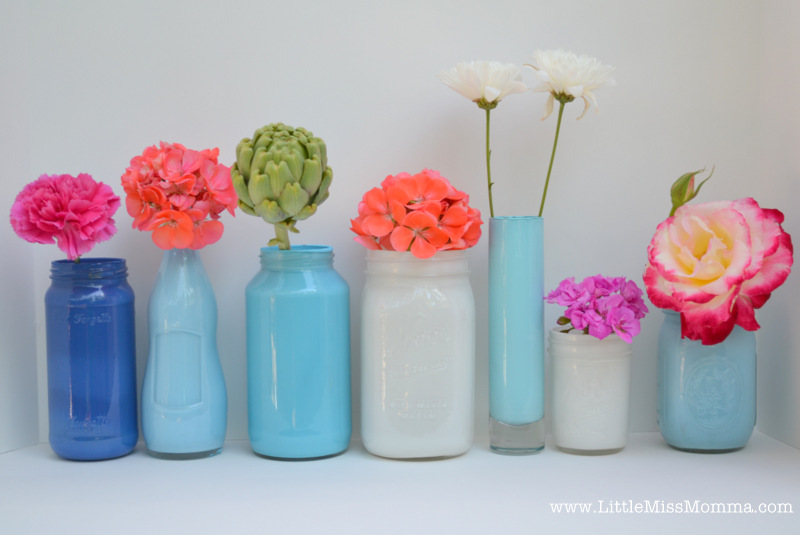
These pretties have been on my to-do list for months now. With the outdoor dinner party I’m throwing this week, I knew now would be the perfect time to give painted jars a try for the tablescape center pieces.  After seeing these jars on Pinterest, I knew I liked the jars in different shades of the same color–I decided to go with blues.

My saved up jars with the labels removed.

Shades of blue acrylic craft paint, and white so that I could dilute any of the colors to a lighter shade.

First I squirted a generous amount of paint directly into the bottom of the jar (approximately 1/2 an inch). Then I turned the jar mostly upside down and twirled it slowly until the paint covered the entire inside of the jar.  Why paint the inside of the jar, rather than the outside, you ask?  Well, I learned my lesson with my mason jar Give Thanks tutorial. I painted the outside of these jars and then learned just how easily the paint scratched off when touched or bumped–this won’t happen if you paint the inside.  Acrylic paint is water based, so if you paint the inside of your jars you won’t be able to fill them with water without the paint washing away.  So this site  suggests putting a paper cup in the bottom first if you want to use the jars as a vase.

Once the entire inside is covered in paint, turn the jars upside down on thick cardboard so all the excess paint can run out–there will be quite a bit.  You will want to move your jars every 10-15 minutes so that the excess paint can escape.

Once you feel that a majority of the excess paint is gone, turn the jars upright and continue to let them dry for a few hours.
Again, because we’re using acrylic paint, if you accidentally get any smudges on the outside of the jars you can simply scratch it off with your fingernail. Next I cut some fresh flowers from my patio and stylized the jars. Later this week, I’m going to use the jars down the center of the table for my dinner party (remember that gourmet club I’m in here).

 Happy Crafting!

Ashley Stock
I'm Ashley. Sometimes I craft, occasionally I cook, everyday I write, and I'm always Momma. This is my blog. I keep it real while still seeing the rainbows and butterflies in all of life's lessons.
Ashley Stock
Ashley Stock
Ashley Stock

Latest posts by Ashley Stock (see all)

Ashley Stock

Comments

  1. Oh wow! You did a wonderful job!! They look fabulous!

  2. I love it! Is that an artichoke in one of the vases? So creative!

  3. As always I love it!! Can’t wait to see the dinner party! Those are always some of my favorite posts!!

  4. love the artichoke. Love it.

  5. They look beautiful! Love it!

  6. Those all came from your garden?! Love it, they look absolutely gorgeous! Perfect with the blues. :)

  7. Beautiful! I did the same thing with some old vases I had. I love the blues!!

  8. Love how they turned out and I love the colors you picked for them! You can even do different colors like pink for girls birthday parties or light blue for baby shower. That’s too cute!

  9. SO, SO, SO CUTE. I HAVE WANTED TO DO THIS FOR YEARS BUT DIDN’T KNOW HOW BUT NOW I DO !!!
    I was at a party this weekend and the hostess was talking about vases for her daughter’s graduation party and I told her I had seen vases like this that were so cute but had no idea how to make them. I have sent her your link so she can make these for her party. Love you sweetie, Auntie Debbie

  10. oh my goodness. i L O V E this!!! i have all the materials needed, too. (that’s the best part!) THANK YOU for sharing this fun, classy, inexpensive DIY! xoxo

  11. ah, these are amazing! must try now…

  12. fantastic tutorial! the blue shades you chose/created are lovely together! and the flowers too…i need to get some more floral up in my home :) and i have plenty of vases to work with…i kind of have an addiction with collecting them any time I go thrifting. :)

    xo
    haley

  13. Thanks for the great directions for this adorable craft. Love the different shapes of jars and glasses! Renee

  14. The blues you chose are super together! Great tutorial, very simple—thank you! The paper cup at the bottom to hold fresh flowers is fab idea.

  15. that looks SO great!! I’m going to have to give this a go over the weekend!!

  16. Ooh the different shades of blue are going to look great together on your table! :) And all the different flowers you’ve cut are so bright and pretty!

  17. some blogs are hard to let it be without staying awhile and your blog is one of it. i can’t wait to come read more. thanks for sharing your love story on Casey’s blog.

  18. Love the blues and the flowers with them! So cute and way easier than I thought..thank you!

  19. Love this! Will share this post with our readers!

  20. I love those!!! So simple, and so pretty, I can’t wait to try it!!

  21. I never thought to put the paint on the inside. Awesome idea!

  22. Eva Scott says:

    Really pretty. Those flowers really make the colors pop too.

  23. I love these painted jars! Such a great and inexpensive way to add color and change decor. I have a friend who has a blog associated with KC Mag (and Kansas City based magazine)and she did something very similar using enamel paint that is made for glass and dishwasher safe. Since the enamel paint is water-safe, you can fill the jars with water if you’d like! Here is the link to her blog:

    http://ohsolovelyblog.blogspot.com/2012/05/entertaining-made-lovely-diy-glass_01.html

  24. I love these. I have painted the out side of jars before and they do get scratched up easy. So this is much better. And I like the colors better on the inside. They seem softer. I tried this just yesterday, but I didn’t add enough paint the first time )-; so I had to go back and add more. I am going to use mine to store some paint brushes (trying to get my craft room organized). Thank you for sharing your tutorial, now I know to add a lot more paint the first time (-;

  25. Question: How do you water your flowers? Is the paint acryllpaint waterproof?

  26. I really like this. Thanks for the excellent tutorial.

  27. These are so cute! I’m featuring them tomorrow on my [so cheap, so easy] series. I’ll link back to your original tutorial. Thanks for sharing!

  28. Hi, I love this tutorial and I’m trying it right know!

Trackbacks

  1. [...] photos of painted mason jars. I found a few images on pinterest that eventually brought me to “Little Miss Momma”—a DIY blog with some fantastic projects.  Check out this post for a [...]

  2. [...] paper, card stock, and bits of fabric). Toss wildflowers like daisies, thistle, and clovers into a mason jar as a whimsical [...]

  3. [...] Remember the Gourmet Dinner Club I told you about? 12 girls, partnered up with a pal, to create and serve a delicious, gourmet meal for the group. It was our turn a few weeks ago. And here are the photos from the evening. Recipes to come. We held the dinner on my Mom’s back patio which overlooks the lake by our house. The jar centerpieces are from this DIY project. [...]

  4. [...] adore all kinds of painted mason jars. They are an easy craft. A simple way to add color and style to your holiday table and home [...]

  5. [...] Via: littlemissmomma.com [...]

  6. [...] Via: littlemissmomma.com [...]

Leave a Comment

*