• Home
  • About
  • SHOP
    • Oils
    • Amazon
    • Free People
    • Rugs USA
  • Recipes


        • Recipe

        • Appetizers
        • Main Dish
        • Salads
        • Sides
        • Desserts
        • Drinks + Smoothies
        • Recent Posts

          • Best Books to Read (Depending on Your Mood) Pt. 2

            Best Books to Read (Depending on Your Mood) Pt. 2

            October 29, 2024
        • Recent Posts

          • Grandma’s Authentic Tomatillo Salsa Recipe

            Grandma’s Authentic Tomatillo Salsa Recipe

  • Wellness


        • Wellness

        • beauty
        • self care
        • kiddos
        • essential oils
          • DIY Aromatherapy Bath Salts

            DIY Aromatherapy Bath Salts

          • Bloomer Crew Dinner Party

            Bloomer Crew Dinner Party

  • Life


        • Life

        • love
        • grow
        • learn
        • live
        • lake arrowhead
        • Favorites

          • The Weekly Report: Volume 1

            The Weekly Report: Volume 1


          • Our Love Story: Part 13

            Our Love Story: Part 13

  • Make


        • Make

        • celebrate
        • craft
        • nest
        • style
          • Jack-O’-Lantern Stuffed Peppers

            Jack-O’-Lantern Stuffed Peppers

          • Foraging Fresh Flowers + Greens

            Foraging Fresh Flowers + Greens

  • Contact

Little Miss Momma

craft

Doily Banner TUTORIAL

July 26, 2010
Paper Doily Banner TUTORIAL
So I have seen a few of these doily banners out there in the blogoshere and the world of Etsy–and I knew I had to try one out for myself.
And, I also think my button obsession is expanding into the doily arena–which means you can expect a few more doily tutorials out of me in the future.
Now honestly, this is perhaps the easiest craft project you’ll ever embark on–not to mention, its perfect for party decor {baby shower, bridal shower, luncheon, Easter, etc.}. 
You can even spray paint your doilies any color you want.  Last Halloween I made one of these banners and spray painted all the doily’s black–very Gothic chic, lol!  
Or you can add cut-out letters to your doilies to spell out something like “Happy Birthday”.  The possibilities are endless!
Shall we get started?
Here’s what you’ll need.
Supplies:
Paper doilies {from the Dollar Tree}
Ribbon in the color of your choice {at least 3/4 inch wide}
Glue gun and hot glue
STEP ONE:
Determine how long you want your banner to be and select how many doilies you want to use.  I used six–I wanted to use 7, but my ribbon was too short.  I suggest using an odd number of doilies. Now fold all your doilies in half.
STEP TWO:
You will glue down your first doily about 18 inches in from the end of the ribbon {leave at least 18 inches on both ends for hanging your banner}.  Lay your ribbon flat and apply a row of hot glue to the bottom half of the ribbon in the length of your first doily.  Now set your doily on top of the hot glue and press firmly in place.   
**Important**: When you set your doily on the glue, be sure that you set it down exactly halfway through the ribbon {see picture below}.   
Now follow the same steps with the remaining doilies.  For this banner, I placed my doilies about 5 inches apart.  Next time I want to try to place them touching each other {I think that will look cuter}. 
STEP THREE:
Once you have glued down the first side of all your doilies, you are ready to move on.  Lay your banner flat on your work space.  Start with the first doily again, but this time apply hot glue to the top half of the ribbon. 

And then fold the top half of the ribbon over the doily and press firmly into place.
Continue this step until the ribbon is glued down along the length of the banner.
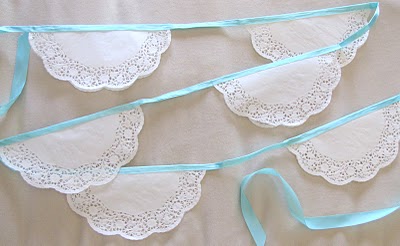
I left the end ribbon pieces unglued so that they would be cuter and easy to tie when hanging {see picture below}.
And in just 15 short minutes, you have your very own paper doily banner to hang for your next party or holiday!
I will be linking this doily banner to
 these super rad  link parties!
Happy Crafting!
35 Comments
Share
Ashley Stock

I'm Ashley. Sometimes I craft, occasionally I cook, everyday I write, and I'm always Momma. This is my blog. I keep it real while still seeing the rainbows and butterflies in all of life's lessons.

You May Also Like

11 Tutorials I Love, and you will too

May 9, 2010

Quick and Easy Painted Mason Jar Vases

June 10, 2013

Fun Gift Wrapping Ideas and Inspiration

December 21, 2020

Leave a Comment

You must be logged in to post a comment.

Previous Post
Party Box Birthday Party {off the hook}
Next Post
Barn Owl Primitives GIVEAWAY {with a bonus twist}
About Me

About Me

I'm Ashley. Sometimes blogger. Everyday oiler. Cozy homemaker. Milestones. Meltdowns. Life lessons of a momma-in-training.

Join the mailing list

Be the first to know about new posts + all the best deals!


Thank you for subscribing!


Wellness

Life

Make

Lake Arrowhead

Recent Posts

  • Best Books to Read (Depending on Your Mood) Pt. 2

    October 29, 2024
  • I almost cancelled this photoshoot…

    October 13, 2024
  • Favorite Fall Recipes

    October 7, 2024

Shop My Favorites

Follow Along With Me

  • Home
  • Wellness
  • Life
  • Make
  • About
  • Contact
  • Amazon
  • SHOP

Copyright 2020 Little Miss Momma Site Powered by Pix & Hue.