


How about this Mother’s Day you switch things up from the “traditional” bouquet of flowers to this:
Paper Flower Arrangement Tutorial
This project is so quick and easy, even the craft-challenged can do this one. Shall we get started…

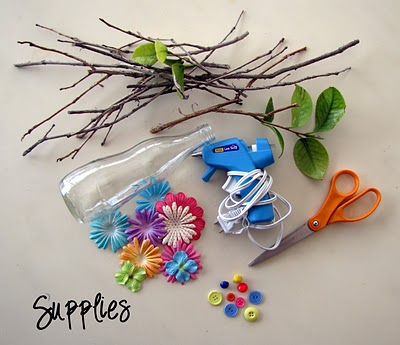
Here’s what you need:
One jar or vase {with a narrow neck if possible}
Small branches from your yard
Paper scrap booking flowers {available at Michael’s on scrapbook isle}
Glue gun and glue
Buttons in fun colors to coordinate with your flowers
Scissors
STEP ONE:
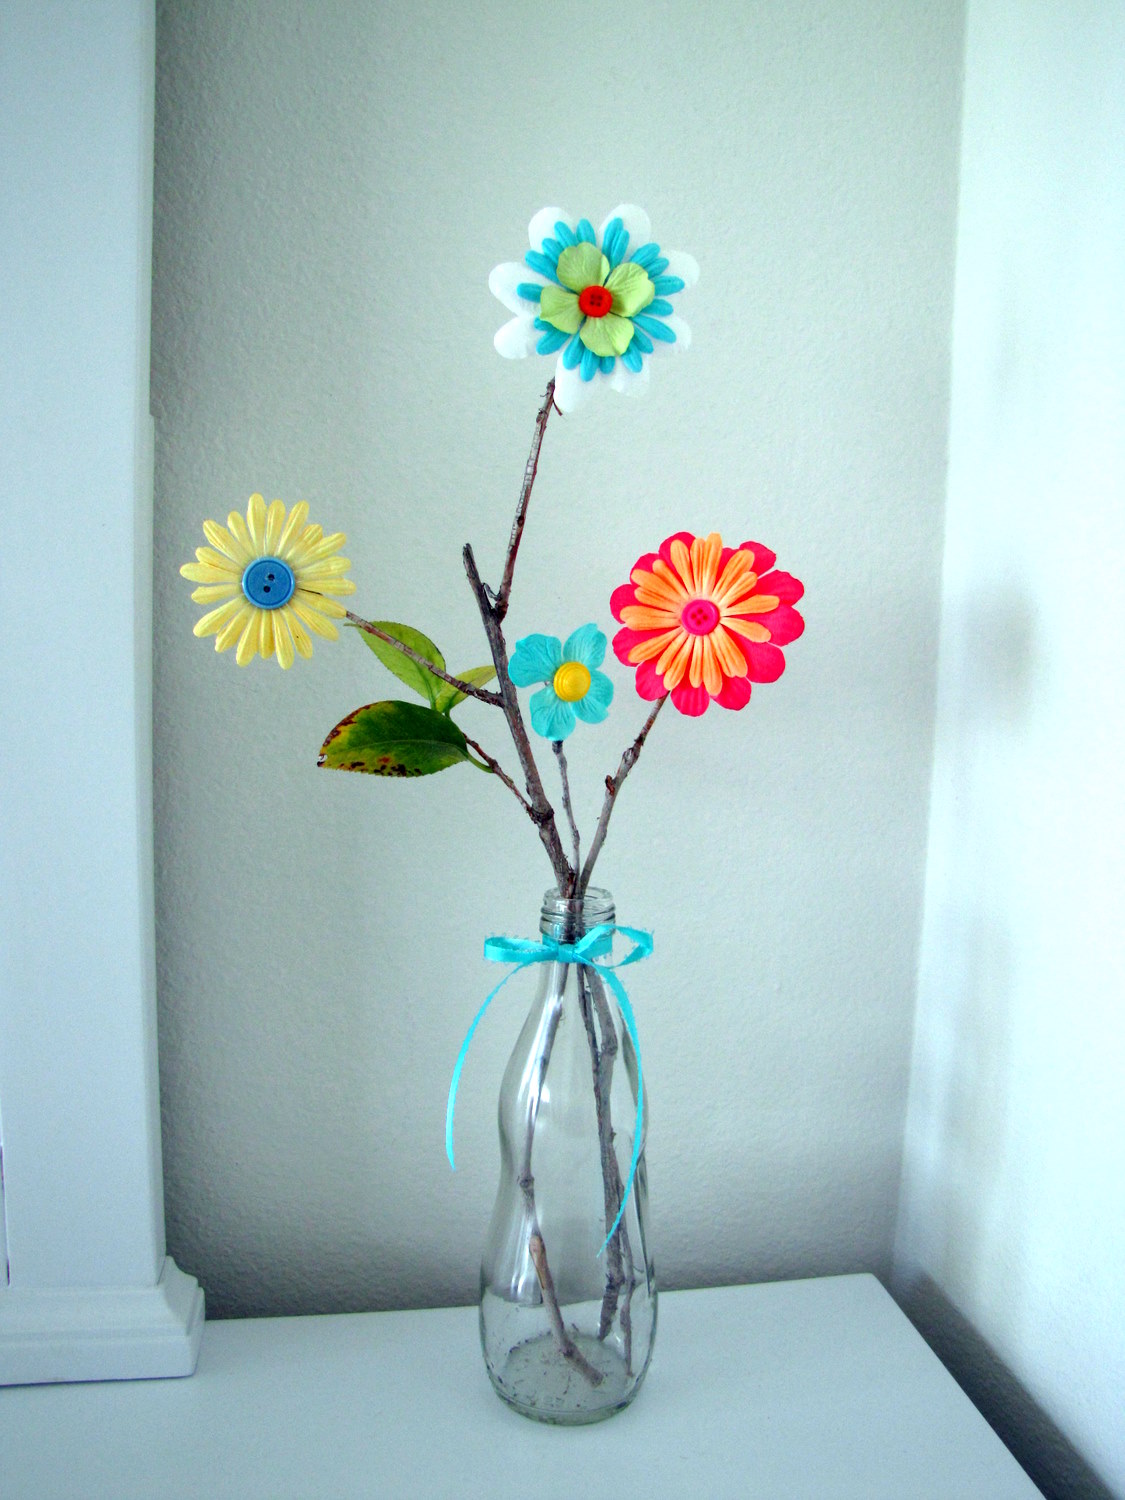
Trim the stems to your liking. I find that the fewer the branches the better the finished product looks. Notice that I left a few leaves on the branches for a natural look.

STEP TWO:
Put together a few sets of your favorite flower combinations with a coordinating button for the middle. Here is one of mine:

Now glue the layers of flowers on top of each other.


Then glue the button down in the center.

STEP THREE:
Glue the paper flowers to the ends of your stems.

Now, make some more flowers and glue them to the ends of the other stems.

Last, arrange your flowers like so:

You can even add a simple ribbon/bow to your vase for a little extra somethin–somethin:
Then present your lucky Momma with your adorable and immortal creation!
Happy Crafting!
I will be linking this project up to these super duper cool link parties.
_____________________________________________________
Want to win something cool?! uh, yes you do! Check out our current giveaway for a complete Blog Makeover from the talented and professional designer, Dumplin Design Studios. Click HERE.
Jessica @ Barefoot by the Sea
Super cute, thanks for sharing!!!
Casey
Wow this is so beautiful! Can't wait to try it out =D
rebecca
This is so darling as is your blog!I'd like to personally invite you to submit some projects to be featured on BCD! I've turned blue Cricket into a feature blog and want to feature the best designers out there! Check out how to submit by clicking my "Be Featured" button just under my header to find out how to submit! I hope to see some of your amazing stuff soon!
Becca
hushmama
very cute project!
Anonymous
Love flowers, this is so cute!
alabaster cow
hi from the mbc! i love the look of your blog and i definitely need help in the craft department. following now. 🙂
Carolyn @ My Backyard Eden
Very sweet. I love the button centers!
Thanks for sharing at My Backyard Eden!
Shel at Dreamy Nest
Too cute! One day – when I get time – I'm going to try this.
April
I am going to try this soon! one for me, and one for my mom and another for my MIL! this is such a neat idea!
Natalie Catherine
i am sooo happy i came across your blog! following you now.. i'm gonna bookmark your blog so i can post about it coming up soon!! you are too cute.
Artificial Wedding Flowers Melbourne
It is great to read some of the information and feedback, here. I hope to read more ideas in the future!!!
Artificial Wedding Flowers Melbourne
It is great to read some of the information and feedback, here. I hope to read more ideas in the future!!!
Artificial Wedding Flowers Melbourne
It is great to read some of the information and feedback, here. I hope to read more ideas in the future!!!
Wedding Flowers
Nice one.. Looking forward for more information.
Tricia
So pretty! Great idea and it looks so easy!
Bea@ artificial silk flowers
Wow, How cool that is… I love how you made the flowers with the button in it. The artificial flowers look really gorgeous, I'm loving it. Thanks for the tutorials.
Cheap Mulberry Handbags
All our Mulberry handbags are shipped to you directly.
timberland boots
Thank you, I have received this item,
Timberland Work Boots On Sale
love the bag… great seller
Lily
This is a great tutorial. I didn’t actually make a flower arrangement (which I plan to do soon) but I used this idea to make a card for a friend. It was quick and it turned out great
Thanks for sharing!
Lily
oh by the way….FYI
The link ….”I will be linking this project up to “these” super duper cool link parties. ”
is not working….thought you might like to know =)
Manualidades: Flores de Papel | La Cajita Azul
[…] http://www.littlemissmomma.com […]
40 Mothers Day Crafts - Formula Mom | Texas Blogger
[…] Paper Flower Arrangement by Little Miss Momma […]
artificial flower stems
Marvelous, what a websxite it is! Thhis weblog provides valuable information to us, keep
it up.
the best car wax and polish
Now you noticed that the chain has stretched so far that you
can’t adjust the chain slack anymore. Either wax the car yourself afterwards or have it done professionally,
and it will look nearly as good as it did when it came off tthe showroom floor.
Make sure to brush out the air vents aas these attract
dust like a magnet.
Jason
Much obliged such a great amount for sharing this marvelous data! I am anticipating see more postsby you! Sinus Infection
nina
like i was saying i love to this type of garden because i was searching about castor oil and then i find it a article about it by the way such a beautiful garden.
nina
like i was saying i love to this type of garden because i was searching about castor oil and then i find it a article about it by the way such a beautiful garden.
HERVE LEGER
As a signature French fashion brand, Black Bandage Dress has proven its worth in the fashion industry for catering nothing but high quality line of bandage dress.
CosmeticEra
I am a Beauty Blogger I loves to Read and writes about Beauty and haircare products.for more beauty products please go Through.Kinky Curly Hair